Running procedures
1. Prepare cathode buffer
Dilute the cathode buffer included in the DALT Buffer Kit to working strength by adding both bottles of 10× cathode buffer (total volume 250 ml) to 2.25 l distilled or deionized water.
2. Prepare anode buffer
Ensuring that the valve on the separation unit is set to “circulate”, fill the tank to the 7.5 l fill line with distilled or deionized water. Add the entire contents (75 ml) of the 100× anode buffer included in the DALT Buffer Kit into the tank.
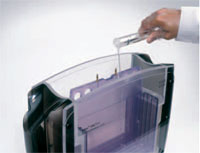
Note: Avoid pouring the 100× anode buffer on the tubing by spreading the tubing slightly with one hand while pouring the solution with the other (Fig 1).
Fig 1. Spreading the tubing elements apart with one hand while pouring the solution with the other (to avoid pouring the 100× anode buffer onto the tubing).
3. Switch on the separation unit
4. On the DALTtwelve control unit set the pump to "on" to mix the buffers and set the separation unit to the desired temperature.
Note: A temperature of 25 °C is recommended for electrophoresis.
When the electrophoresis buffer has reached the desired temperature, insert the loaded gel cassettes with the Immobiline DryStrip gels in place.
Gel Cassettes and Blank Cassette Inserts must be wet to slide into the unit. Distilled or deionized water from a plant sprayer can be used to wet the cassettes and Blank Cassette Inserts as they are being loaded into the unit.
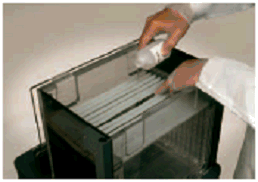
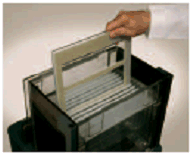
1.Load the unit from back to front (Fig 8).
Fig 8. Loading the gel cassettes into Ettan DALTtwelve electrophoresis unit.
2. Fit Blank Cassette Inserts into any unoccupied slots.
3. When all 12 slots are occupied, the lower buffer level should be slightly below the level of the gaskets. Pour the diluted (1×) cathode buffer into the upper portion of the tank to the fill line (some of this buffer may drip through the gasket and mix with the anode buffer during the run, but this will not affect performance or results).
4. Close the lid.
1. Open the gel package
Cut around the package on two sides at approximately 1 cm from the edge to avoid cutting the gel or the support film. Remove the gel from the package. The gel is cast onto a plastic support film and does not cover the film entirely. The gel is covered with a protective plastic sheet. Markings on the protective sheet indicate the orientation of the gel and the direction of electrophoresis. The bottom (+ or anodic) edge of the gel is flush with the edge of the support film. The support film protrudes approximately 15 mm beyond the top (- or cathodic) edge of the gel and approximately 5 mm at either side.
2. Open DALT Precast Gel Cassette
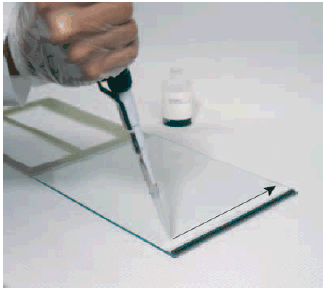
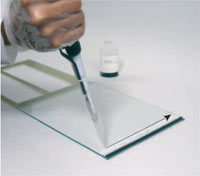
Place the gel cassette on the bench top with the hinge down. Apply 1 ml gel buffer onto the glass plate as a streak along the spacer on the right edge of the glass plate (Fig 2). Add an additional 2 ml of gel buffer to the center of the plate.
Fig 2. Pipetting a streak of gel buffer onto the glass plate. The arrow indicates the direction of motion in applying the streak.
3. Remove the protective plastic sheet from the gel
Handling the gel only by the side support film margins, hold it (gel-side down) over the glass plate. Ensure that it is oriented with the cathodic (-) edge of the gel toward the cathodic (-) edge of the cassette. Align the right edge of the gel with the right edge of the side spacer of the glass plate side, flex the gel downward slightly and lower it slowly toward the glass plate from right to left. Take care that the bottom (anodic) edge of the gel is flush (within 1 mm) of the bottom (anodic) edge of the glass plate. The protruding side support film margins (but not the gel) should rest on top of the side spacers.
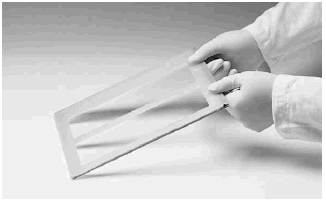
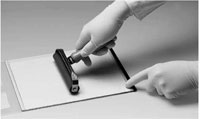
4. Remove bubbles and excess buffer
Use the roller (a separate accessory) to press out any bubbles or liquid from between the gel and the glass. Press firmly against the plastic support film with the roller and roll over the entire gel (Fig 3). After rolling, the gel should adhere firmly to the glass and resist further movement.
Fig 3. Pressing out air pockets between gel and glass plate.
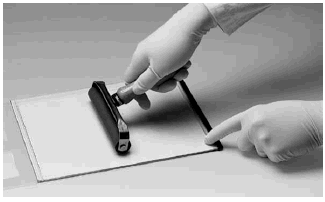
5. Close the cassette
Close the cassette, snap the plastic frame to the glass plate (Fig 4) and press the edges tightly together along the entire side of the cassette. Ensure that the cassette is closed completely; an incompletely closed cassette causes a strongly curved front.
Fig 4. Closing the DALT Precast Gel Cassette.
6. Repeat the procedure for each second-dimension gel to be run
The second-dimension vertical gel must be ready for use prior to Immobiline DryStrip gel equilibration.
Equilibration is carried out in a two-step process using tubes and volume of equilibration solution as specified in the table 1 below.
Preparatory steps
1. Place the IPG strips in individual tubes, with the support film toward the tube wall.
2. Prepare an appropriate volume of SDS equilibration buffer solution (see Table 2 below) then measure into two equal volumes. Add DTT to one portion (100 mg per 10 ml) and iodoacetamide to the other (250 mg per 10 ml).
Equilibration
1. Add the appropriate volume of SDS equilibration buffer (+ DTT) to each strip. Cap or seal the tubes with flexible paraffin film and place them on their sides on a rocker for the equilibration process. Equilibrate for 15 min.
2. Pour off buffer from above step and add the appropriate volume of SDS equilibration buffer (+iodoacetamide) to each strip. Again cap or seal the tubes with flexible paraffin film and place them on their sides on a rocker for the equilibration process. Equilibrate for an additional 15 min.
Note: Be consistent with the timing of the equilibration steps.
Note: The subsequent steps of gel assembly, preparation of electrophoresis unit, insertion of the gel into the precast gel cassette, and melting of the sealing solution can be performed as the Immobiline DryStrip gels are equilibrating, as long as the timeframes above are adhered to.
Table 1. Suggested containers and volumes of equilibration solution.
| Strip length (cm) | Container | Equilibration solution (ml) |
|---|---|---|
| 7 | Disposable, 15-ml conical tubes | 2.5 - 5 |
| 11 | 25 × 200 mm screw-cap culture tubes | 5 - 10 |
| 13 | 25 × 200 mm screw-cap culture tubes | 5 - 10 |
| 18 | 25 × 200 mm screw-cap culture tubes, Equilibration tubes or Petri dish | 10 - 15 |
| 24 | Equilibration tubes or Petri dish | 10 - 15 |
Table 2. SDS equilibration buffer solution.
(6 M urea, 75 mM Tris-HCl pH 8.8, 29.3% glycerol, 2% SDS, 0.002% bromophenol blue, 200 ml)*
| Final concentration | Amount | |
|---|---|---|
| Urea (FW 60.06) | 6 M | 72.1 g |
| Tris-HCl, pH 8.8** | 75 mM | 10.0 ml |
| Glycerol (87% w/w) | 29.3% (v/v) | 69 ml (84.2 g) |
| SDS (FW 288.38) | 2% (w/v) | 4.0 g |
| 1% Bromophenol blue stock solution | 0.002% (w/v) | 400 μl |
| Double-distilled water | - | to 200 ml |
* This is a stock solution. Just prior to use, add DTT or iodoacetamide (for first or second equilibration, respectively).
** For preparing the Tris-HCl, pH 8.8 solution see Table 3.
Store in 20- or 50-ml aliquots at -20 °C.
Table 3. 4× resolving gel buffer solution.
(1.5 M Tris base, pH 8.8, 1 l)
| Final concentration | Amount | |
|---|---|---|
| Tris base (FW 121.1) | 1.5 M | 181.7 g |
| Double-distilled water | - | 750 ml |
| HCI | - | adjust to pH 8.8 |
| Double-distilled water | - | to 1 l |
Filter solution through a 0.45-μm filter. Store at 4 °C.
Table 6 lists the recommended conditions for running DALT Gel 12.5 using Ettan DALTtwelve system. Electrophoresis is performed at constant power in two steps. Stop electrophoresis when the dye front is approximately 1 mm from the bottom of the gel. Temperature control improves gel-to-gel reproducibility, especially if the ambient temperature of the laboratory fluctuates significantly. For best results, gels should be run at 25 °C. After electrophoresis, remove gels from their gel cassettes in preparation for staining or blotting. Precast gels have a barcode, number, and gel percentage printed on them, which should be noted for orientation.
Table 6. Recommended electrophoresis conditions for second-dimension vertical gels.
| Step | Power (W/gel) | Approximate run duration (h:min) | |
|---|---|---|---|
| Ettan DALTtwelve (set temperature to 25 °C) | |||
| DALT Gel 12.5 (thickness 1 mm) | 1 | 2 | 0:45 |
| 2 | 17 (max 180) | 4:00 | |
| Overnight runs in Ettan DALTtwelve (set temperature to 30 °C and power supply for continuous run)* |
1 | 18:00 |
* For the best possible resolution, faster separation times should be used. Use the faster protocol instead. Change to day-run protocol when ever convenient.
Note: Place the unit close to a sink for easy rinsing and draining. Connect the tubing leading to and from the heat exchanger to a thermostatic temperature controller such as MultiTemp III. Do not connect the heat exchanger to a water tap or any other coolant supply that does not have pressure regulation. Position a suitable power supply (e.g. EPS 601) conveniently close to the electrophoresis unit.
1. Prepare anode and cathode buffers (stocks included in the DALT Buffer Kit)
Dilute half of the 100× anode (lower) buffer by adding 37.5 ml to 4.5 l of water.
Dilute one bottle of 10× cathode (upper) buffer to a final volume of 0.8 l with deionized water.
2. Prepare anode assembly
When preparing to run a gel in the Ettan DALTsix Electrophoresis Unit, insert the anode assembly in the tank and then fill the lower buffer chamber tank with 4.5 liters of 1x electrophoresis buffer (Fig 1.) Turn on the circulation pump by plug the leads attached to the DALTsix base unit. (Only perform this operation once the tank contains buffer.)
Fig 1. Filling the Ettan DALTsix electrophoresis unit with anode buffer.
3. Temperature control
Connect an external thermostatic circulator (e.g. MultiTemp™ III) and set the temperature to 25°C for a day run and to 30°C for an overnight run.
The DALT gel cassettes have a “longer” glass plate. The cassette should be laid on the bench with the longer glass plate down, and the protruding edge oriented toward the operator (Fig 5).
Fig 5. Positioning an equilibrated Immobiline DryStrip gel on the DALT Precast Gel Cassette.
1. Position the Immobiline DryStrip gel
Dip the equilibrated Immobiline DryStrip gel in the SDS electrophoresis buffer (Table 4) to lubricate it. If using the DALT Gel 12.5, the diluted cathode buffer can be used to lubricate the strip.
Table 4. 1× Laemmli SDS electrophoresis buffer
(25 mM Tris base, 192 mM glycine, 0.1% SDS, 10 l)*
| Final concentration | Amount | |
|---|---|---|
| Tris base (FW 121.1) | 25 mM | 30.3 g |
| Glycine (FW 75.07) | 192 mM | 144.0 g |
| SDS (FW 288.38) | 0.1% (w/v) | 10.0 g |
| Double-distilled water | - | to 10 l |
* The pH of this solution should not be adjusted.
This solution can be prepared by diluting one volume of 10× Laemmli SDS buffer (solution F) with nine volumes of double-distilled water. Store at room temperature.
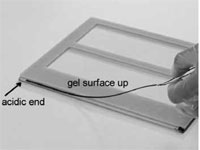
Place the strip with the acidic end to the left, gel surface up onto the protruding edge of the longer glass plate (Fig. 5)
2. Ensure Immobiline DryStrip gel has good contact
With a thin plastic ruler, gently push the Immobiline DryStrip gel down so that the entire lower edge of the Immobiline DryStrip gel is in contact with the top surface of the slab gel (Fig 6). Ensure that no air bubbles are trapped between the Immobiline DryStrip gel and the slab gel surface or between the gel backing and the glass plate.
Fig 6. Pushing the Immobiline DryStrip gel down to contact the gel slab.
3. Optional: Apply molecular weight marker proteins
Best results are obtained when the molecular weight marker protein solution is mixed with an equal volume of a hot 1% agarose solution prior to application to the IEF sample application piece. The resultant 0.5% agarose will gel and prevent the marker proteins from diffusing laterally prior to the application of electric current. Other alternatives are to apply the markers to a paper IEF sample application piece in a volume of 15–20 μl. For less volume, cut the sample application piece proportionally. Place the IEF application piece on a glass plate and pipette the marker solution onto it, then pick up the application piece with forceps and apply to the top surface of the gel next to one end of the Immobiline DryStrip gel. The markers should contain 200–1000 ng of each component for Coomassie staining and approximately 10–50 ng of each component for silver staining.
4. Seal the Immobiline DryStrip gel in place
The agarose sealing solution prevents the Immobiline DryStrip gel from moving or floating in the electrophoresis buffer. For precast DALT gels, the agarose blocks the narrow gap(s) between the gel edge(s) and the lateral spacer(s) to prevent leakage of the upper buffer. Prepare agarose sealing solution for DALT precast gels using the agarose sealing solution from the DALT Buffer Kit. If using the Laemmli buffer system, see Table 5. Melt each aliquot as needed in a 100 °C heat block (each gel will require 1–1.5 ml). It takes approximately 10 min to fully melt the agarose.
Table 5. Agarose sealing solution.
(25 mM Tris base, 192 mM glycine, 0.1% SDS, 0.5% agarose, 0.002% bromophenol blue, 100 ml)
| Final concentration | Amount | |
|---|---|---|
| Laemmli SDS electrophoresis buffer (see Table 1.) | 100 ml | |
| Agarose (NA or M) | 0.5% | 0.5 g |
| 1% Bromophenol blue stock solution | 0.002% (w/v) | 200 μl |
Add all ingredients into a 500-ml Erlenmeyer flask. Swirl to disperse. Heat in a microwave oven on low or on a heating stirrer until the agarose is completely dissolved. Do not allow the solution to boil over. Dispense 1.5-ml aliquots into screw-cap tubes. Store at room temperature.
Note: An ideal time to carry out this step is during Immobiline DryStrip gel equilibration.
Allow the agarose to cool until the tube can be held with your fingers (60 °C) and then slowly pipette the amount required to seal the Immobiline DryStrip gel in place (Fig 7). Pipette slowly to avoid introducing bubbles. Apply only the minimum quantity of agarose sealing solution required to cover the Immobiline DryStrip gel. Allow a minimum of 1 min for the agarose to cool and solidify.
Fig 7. Sealing the Immobiline DryStrip gel in place on a DALT precast gel using agarose sealing solution.
Table 6 lists the recommended conditions for running DALT Gel 12.5 using Ettan DALTsix system. Electrophoresis is performed at constant power in two steps. Stop electrophoresis when the dye front is approximately 1 mm from the bottom of the gel. Temperature control improves gel-to-gel reproducibility, especially if the ambient temperature of the laboratory fluctuates significantly. For best results, gels should be run at 25 °C. After electrophoresis, remove gels from their gel cassettes in preparation for staining or blotting. Precast gels have a barcode, number, and gel percentage printed on them, which should be noted for orientation.
Table 6. Recommended electrophoresis conditions for second-dimension vertical gels.
| Step | Current mA/gel | Voltage (V) | Power (W/gel) | Time (h:min) | |
|---|---|---|---|---|---|
| DALT Gel 12.5 (1 mm thick gel, set temperature to 25°C) |
1 2 |
10 40 |
80 500 |
1 13 |
1:00 4:30-6:00* |
| Overnight runs (1 mm thick gel, set temperature to 30°C)** |
1 2 |
10 12 |
80 150 |
1 2 |
1:00 15-17* |
* Continue the electrophoresis until the bromophenol blue reaches the end of the gel.
** For the best possible resolution, faster separation time should be used. Use the faster protocol instead. Change to the day-run protocol when ever convenient.
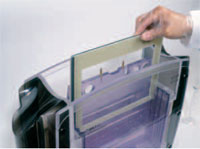
1. Carefully insert the electrophoresis gels (Fig 8) and fill any empty slots with DALT blank cassette inserts.
Fig 8. Inserting the cassettes into the cassette carrier.
2. Sealing and filling the Upper buffer chamber.
Wet the Upper buffer chamber (UBC) sealings with buffer solution or 0.1% SDS (immerse the sealings in solution or spray the sealings of the UBC using a plant sprayer) and carefully slide the UBC over the gel cassettes. Do not move the UBC repeatedly up and down as this will reduce the sealing effect. Fill the UBC with 1.2 liters of 2x buffer and use a funnel to adjust the buffer level in the lower buffer chamber to the same height as in the UBC, by adding 1x buffer.
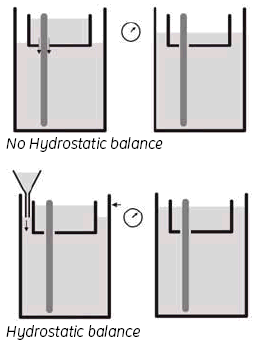
3. Hydrostatic balance.
By adjusting the buffer level in the Lower buffer chamber to be the same as the level in the UBC, you achieve a status called ‘hydrostatic balance’, where there will be no overall change in the levels of either buffer chamber during electrophoresis. This will also help to improve runs and minimize any possible ‘leakage’ from the UBC. See Fig 9.
Fig 9. Adjusting the buffer level.
The second-dimension vertical gel must be ready for use prior to Immobiline DryStrip gel equilibration.
Equilibration is carried out in a two-step process using tubes and volume of equilibration solution as specified in the table 1 below.
Preparatory steps
1. Place the IPG strips in individual tubes, with the support film toward the tube wall.
2. Prepare an appropriate volume of SDS equilibration buffer solution (see Table 2 below) then measure into two equal volumes. Add DTT to one portion (100 mg per 10 ml) and iodoacetamide to the other (250 mg per 10 ml).
Equilibration
1. Add the appropriate volume of SDS equilibration buffer (+ DTT) to each strip. Cap or seal the tubes with flexible paraffin film and place them on their sides on a rocker for the equilibration process. Equilibrate for 15 min.
2. Pour off buffer from above step and add the appropriate volume of SDS equilibration buffer (+iodoacetamide) to each strip. Again cap or seal the tubes with flexible paraffin film and place them on their sides on a rocker for the equilibration process. Equilibrate for an additional 15 min.
Note: Be consistent with the timing of the equilibration steps.
Note: The subsequent steps of gel assembly, preparation of electrophoresis unit, insertion of the gel into the precast gel cassette, and melting of the sealing solution can be performed as the Immobiline DryStrip gels are equilibrating, as long as the timeframes above are adhered to.
Table 1. Suggested containers and volumes of equilibration solution.
| Strip length (cm) | Container | Equilibration solution (ml) |
|---|---|---|
| 7 | Disposable, 15-ml conical tubes | 2.5 - 5 |
| 11 | 25 × 200 mm screw-cap culture tubes | 5 - 10 |
| 13 | 25 × 200 mm screw-cap culture tubes | 5 - 10 |
| 18 | 25 × 200 mm screw-cap culture tubes, Equilibration tubes or Petri dish | 10 - 15 |
| 24 | Equilibration tubes or Petri dish | 10 - 15 |
Table 2. SDS equilibration buffer solution.
(6 M urea, 75 mM Tris-HCl pH 8.8, 29.3% glycerol, 2% SDS, 0.002% bromophenol blue, 200 ml)*
| Final concentration | Amount | |
|---|---|---|
| Urea (FW 60.06) | 6 M | 72.1 g |
| Tris-HCl, pH 8.8** | 75 mM | 10.0 ml |
| Glycerol (87% w/w) | 29.3% (v/v) | 69 ml (84.2 g) |
| SDS (FW 288.38) | 2% (w/v) | 4.0 g |
| 1% Bromophenol blue stock solution | 0.002% (w/v) | 400 μl |
| Double-distilled water | - | to 200 ml |
* This is a stock solution. Just prior to use, add DTT or iodoacetamide (for first or second equilibration, respectively).
** For preparing the Tris-HCl, pH 8.8 solution see Table 3.
Store in 20- or 50-ml aliquots at -20 °C.
Table 3. 4× resolving gel buffer solution.
(1.5 M Tris base, pH 8.8, 1 l)
| Final concentration | Amount | |
|---|---|---|
| Tris base (FW 121.1) | 1.5 M | 181.7 g |
| Double-distilled water | - | 750 ml |
| HCI | - | adjust to pH 8.8 |
| Double-distilled water | - | to 1 l |
Filter solution through a 0.45-μm filter. Store at 4 °C.
The DALT gel cassettes have a “longer” glass plate. The cassette should be laid on the bench with the longer glass plate down, and the protruding edge oriented toward the operator (Fig 5).
Fig 5. Positioning an equilibrated Immobiline DryStrip gel on the DALT Precast Gel Cassette.
1. Position the Immobiline DryStrip gel
Dip the equilibrated Immobiline DryStrip gel in the SDS electrophoresis buffer (Table 4) to lubricate it. If using the DALT Gel 12.5, the diluted cathode buffer can be used to lubricate the strip.
Table 4. 1× Laemmli SDS electrophoresis buffer
(25 mM Tris base, 192 mM glycine, 0.1% SDS, 10 l)*
| Final concentration | Amount | |
|---|---|---|
| Tris base (FW 121.1) | 25 mM | 30.3 g |
| Glycine (FW 75.07) | 192 mM | 144.0 g |
| SDS (FW 288.38) | 0.1% (w/v) | 10.0 g |
| Double-distilled water | - | to 10 l |
* The pH of this solution should not be adjusted.
This solution can be prepared by diluting one volume of 10× Laemmli SDS buffer (solution F) with nine volumes of double-distilled water. Store at room temperature.
Place the strip with the acidic end to the left, gel surface up onto the protruding edge of the longer glass plate (Fig. 5)
2. Ensure Immobiline DryStrip gel has good contact
With a thin plastic ruler, gently push the Immobiline DryStrip gel down so that the entire lower edge of the Immobiline DryStrip gel is in contact with the top surface of the slab gel (Fig 6). Ensure that no air bubbles are trapped between the Immobiline DryStrip gel and the slab gel surface or between the gel backing and the glass plate.
Fig 6. Pushing the Immobiline DryStrip gel down to contact the gel slab.
3. Optional: Apply molecular weight marker proteins
Best results are obtained when the molecular weight marker protein solution is mixed with an equal volume of a hot 1% agarose solution prior to application to the IEF sample application piece. The resultant 0.5% agarose will gel and prevent the marker proteins from diffusing laterally prior to the application of electric current. Other alternatives are to apply the markers to a paper IEF sample application piece in a volume of 15–20 μl. For less volume, cut the sample application piece proportionally. Place the IEF application piece on a glass plate and pipette the marker solution onto it, then pick up the application piece with forceps and apply to the top surface of the gel next to one end of the Immobiline DryStrip gel. The markers should contain 200–1000 ng of each component for Coomassie staining and approximately 10–50 ng of each component for silver staining.
4. Seal the Immobiline DryStrip gel in place
The agarose sealing solution prevents the Immobiline DryStrip gel from moving or floating in the electrophoresis buffer. For precast DALT gels, the agarose blocks the narrow gap(s) between the gel edge(s) and the lateral spacer(s) to prevent leakage of the upper buffer. Prepare agarose sealing solution for DALT precast gels using the agarose sealing solution from the DALT Buffer Kit. If using the Laemmli buffer system, see Table 5. Melt each aliquot as needed in a 100 °C heat block (each gel will require 1–1.5 ml). It takes approximately 10 min to fully melt the agarose.
Table 5. Agarose sealing solution.
(25 mM Tris base, 192 mM glycine, 0.1% SDS, 0.5% agarose, 0.002% bromophenol blue, 100 ml)
| Final concentration | Amount | |
|---|---|---|
| Laemmli SDS electrophoresis buffer (see Table 1.) | 100 ml | |
| Agarose (NA or M) | 0.5% | 0.5 g |
| 1% Bromophenol blue stock solution | 0.002% (w/v) | 200 μl |
Add all ingredients into a 500-ml Erlenmeyer flask. Swirl to disperse. Heat in a microwave oven on low or on a heating stirrer until the agarose is completely dissolved. Do not allow the solution to boil over. Dispense 1.5-ml aliquots into screw-cap tubes. Store at room temperature.
Note: An ideal time to carry out this step is during Immobiline DryStrip gel equilibration.
Allow the agarose to cool until the tube can be held with your fingers (60 °C) and then slowly pipette the amount required to seal the Immobiline DryStrip gel in place (Fig 7). Pipette slowly to avoid introducing bubbles. Apply only the minimum quantity of agarose sealing solution required to cover the Immobiline DryStrip gel. Allow a minimum of 1 min for the agarose to cool and solidify.
Fig 7. Sealing the Immobiline DryStrip gel in place on a DALT precast gel using agarose sealing solution.
1. Open the gel package
Cut around the package on two sides at approximately 1 cm from the edge to avoid cutting the gel or the support film. Remove the gel from the package. The gel is cast onto a plastic support film and does not cover the film entirely. The gel is covered with a protective plastic sheet. Markings on the protective sheet indicate the orientation of the gel and the direction of electrophoresis. The bottom (+ or anodic) edge of the gel is flush with the edge of the support film. The support film protrudes approximately 15 mm beyond the top (- or cathodic) edge of the gel and approximately 5 mm at either side.
2. Open DALT Precast Gel Cassette
Place the gel cassette on the bench top with the hinge down. Apply 1 ml gel buffer onto the glass plate as a streak along the spacer on the right edge of the glass plate (Fig 2). Add an additional 2 ml of gel buffer to the center of the plate
Fig 2. Pipetting a streak of gel buffer onto the glass plate. The arrow indicates the direction of motion in applying the streak.
3. Remove the protective plastic sheet from the gel
Handling the gel only by the side support film margins, hold it (gel-side down) over the glass plate. Ensure that it is oriented with the cathodic (-) edge of the gel toward the cathodic (-) edge of the cassette. Align the right edge of the gel with the right edge of the side spacer of the glass plate side, flex the gel downward slightly and lower it slowly toward the glass plate from right to left. Take care that the bottom (anodic) edge of the gel is flush (within 1 mm) of the bottom (anodic) edge of the glass plate. The protruding side support film margins (but not the gel) should rest on top of the side spacers.
4. Remove bubbles and excess buffer
Use the roller (a separate accessory) to press out any bubbles or liquid from between the gel and the glass. Press firmly against the plastic support film with the roller and roll over the entire gel (Fig 3). After rolling, the gel should adhere firmly to the glass and resist further movement.
Fig 3. Pressing out air pockets between gel and glass plate.
5. Close the cassette
Close the cassette, snap the plastic frame to the glass plate (Fig 4) and press the edges tightly together along the entire side of the cassette. Ensure that the cassette is closed completely; an incompletely closed cassette causes a strongly curved front.
Fig 4. Closing the DALT Precast Gel Cassette.
6. Repeat the procedure for each second-dimension gel to be run