DIGE Buffer Kit
Specially designed two-buffer system for running up to twelve DIGE gels simultaneously
FAQ
When is depletion useful and what are the main applications?
High abundant protein depletion adds value to any analysis when a high resolution of the ingoing proteins is required, and when the aim is to analyze a number of proteins and no specific detection is available for the individual proteins. Examples of these types of analyses are 2-D electrophoresis/DIGE.
Running procedures
For convenient run times and minimal spot diffusion we recommend the following run conditions.
Table 4. Day Run — Temperature 22°C.
| Step | mA/gel | Voltage (V) | W/gel | Time (hours) |
|---|---|---|---|---|
| A | 10 | 80 | 1 | 1 |
| B | 50 | 500 | 171 | 4 - 5 |
1. Maximum electrical input for the electrophoresis unit is 600 V, 400 mA, and 100 W.
Table 5. Overnight Run — Temperature 15°C.
| Step | mA/gel | Voltage (V) | W/gel | Time (hours) |
|---|---|---|---|---|
| A | 12 | 150 | 1.5 | 15 - 17* |
* Change to day run protocol when ever convenient.
Stop run
Continue the electrophoresis until the bromophenol blue front reaches the end of the gel. The front can be run off the gel if desired.
Removing the gels
1. Remove the lid and carefully lift the UBC upwards making sure the cassettes remain in the anode assembly by applying downward pressure on them.
2. Lift the gel cassette holder upwards and remove the gels.
Care and Maintenance
1. On completion of the electrophoresis run, immediately remove the UBC from the Ettan DALTsix Electrophoresis Unit.
2. Wash the UBC in distilled water of room temperature to wash off the buffer solution. Rinse thoroughly and allow the UBC to dry at room temperature.
3. Do not leave the UBC in buffer solution when the unit is not in use. Store the UBC empty, not even on the cassette holder, since the sealings in the middle.
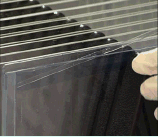
Take out the gels from the refrigerator and keep gels at room temperature. Open the gel package and remove the gel. The DIGE gels come in glass cassettes and are ready to be used. Allow the gels to reach room temperature before use.
Loading of focused Immobiline DryStrips
1. Place the gels in the Ettan DALT cassette rack.
2. Briefly rinse the Immobiline DryStrips by submerging them in a measuring cylinder containing SDS electrophoresis running buffer for Ettan DALT.
3. Holding one end of the Immobiline DryStrip with forceps, carefully place the Immobiline DryStrip in-between the two glass plates of the gel. Using a thin plastic spacer, push against the plastic backing of the Immobiline DryStrip (not the gel itself) and slide the strip between the two glass plates until it comes into contact with the surface of the gel.
Note: The strip should just rest on the surface of the gel. Avoid trapping air bubbles between strip and the gel and avoid piercing the second-dimension gel with the strip.
Note: The acidic end of the Immobiline DryStrip should be on the right side of the gel when the shorter of the two plates is facing the user.
Note: The gel face of the strip must not touch the opposite glass plate.
4. Melt an aliquot of agarose overlay solution in a heating block or boiling water bath for each Immobiline DryStrips. Allow the agarose to cool slightly and slowly pipette the molten agarose solution, along the upper surface of the gel, up to the top of the glass plate. Take care not to introduce bubbles. Do not allow the agarose to solidify.
5. Once the agarose solution has completely set the gel should be run in the second dimension as soon as practically possible.
1. In a separate container dilute the concentrated cathode buffer included in the DIGE Buffer Kit to working strength by adding four bottles of DIGE cathode buffer (total volume 500 ml) and fill up with distilled or deionized water to a total volume of 2.25 l.
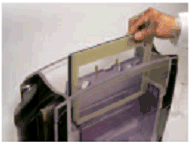
2. Ensure that the valve on the separation unit is set to “circulate”. Add the entire contents of two bottles of DIGE anode buffer stock solution included in the DIGE Buffer Kit into the tank (see Fig 1). Rinse the bottles with distilled or deionized water and pour it into the tank. Fill the tank to the 7.5 l with distilled or deionized water, in this way washing the DIGE anode buffer from the buffer seal.
Fig 1. Spreading the tubing elements apart with one hand while pouring the solution with the other (to avoid pouring the anode buffer onto the tubing).
3. Switch the separation unit on.
4. Turn the pump on to mix, set separation unit to desired temperature. A temperature of 22ºC is recommended for day runs, and 15ºC for overnight runs.
1. When preparing to run a gel in the DALTsix instrument, insert the anode assembly in the tank and then fill the lower buffer chamber tank. Add one bottle (125 ml) of DIGE Anode Buffer stock solution included in the DIGE Buffer Kit into the tank. Fill the electrophoresis unit to the 4.5 l fill line with distilled or deionized water, and turn the pump on.
Note: Use only one bottle of the DIGE Anode (lower) Buffer for each DALTsix run.
2. Turn on the circulation pump by plug the leads attached to DALTsix base unit. (Only perform this operation once the tank contains buffer.)
3. Connect an external thermostatic circulator (e.g. MultiTemp III) and set the temperature to 22ºC for a day run and to 15ºC for an overnight run. Equilibrate the buffer to 15ºC before starting an overnight run.
The equilibration step saturates the Immobiline™ DryStrip gel (IPG strip) with the SDS buffer system required for the second-dimension separation. To reduce vertical streaking in the second dimension it is necessary to apply two equilibration steps. The first step saturates the IPG strip with the SDS system and the second step blocks the protein thiol groups. The equilibration solution contains buffer, urea, glycerol, reductant, SDS and dye.
Prepare equilibration solution. Prepare SDS equilibration buffer (Table 1). This is a stock solution. Just prior to use, add 50 mg DTT per 10 ml SDS equilibration buffer (0.5% [w/v]).
Table 1. SDS equilibration buffer.
| Final concentration | Amount | |
|---|---|---|
| 1.5 M Tris-Cl, pH 8.8 | 50 mM | 6.7 ml |
| Urea (FW 60.06) | 6 M | 72.07 g |
| Glycerol (87% w/w) | 30% (v/v) | 69 ml |
| SDS (FW 288.38) | 2% (w/v) | 4.0 g |
| Bromophenol blue | 0.001% (w/v) | 2 mg |
| Distilled or deionized water | - | to 200 ml |
Store in 40 ml aliquots at –20ºC.
Equilibration.
Place the IPG strips in individual tubes with the support film toward the tube wall. Add 10 ml DTT-containing solution to each tube. Place the tubes on a rocker and equilibrate for 15 min.
Note: When using CyDye DIGE saturation dyes (Labeling Kit for scarce samples), repeat the first equilibration with DTT-containing SDS equilibration solution for another 15 min.
Second equilibration.
A second equilibration is performed with an iodoacetamide solution (instead of DTT). Prepare a solution of 450 mg iodoacetamide per 10 ml of SDS equilibration buffer (4.5% [w/v]). Decant the first equilibration solution and add the same volume of iodoacetamide containing equilibration solution to each tube. Place the tubes on a rocker and equilibrate for an additional 15 min.
Note: The subsequent steps of electrophoresis unit preparation, insertion of gels and melting of the Sealing Solution can be performed while the IPG strips are equilibrating
When the electrophoresis buffer has reached the desired temperature, insert the loaded gel cassettes with the Immobiline DryStrip gels in place.
Gel Cassettes and Blank Cassette Inserts must be wet to slide into the unit. Distilled or deionized water from a plant sprayer can be used to wet the cassettes and Blank Cassette Inserts as they are being loaded into the unit.
1.Load the unit from back to front (Fig 8).
Fig 8. Loading the gel cassettes into Ettan DALTtwelve electrophoresis unit.
2. Fit Blank Cassette Inserts into any unoccupied slots.
3. When all 12 slots are occupied, the lower buffer level should be slightly below the level of the gaskets. Pour the diluted (1×) cathode buffer into the upper portion of the tank to the fill line (some of this buffer may drip through the gasket and mix with the anode buffer during the run, but this will not affect performance or results).
4. Close the lid.
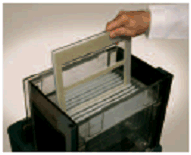
1. Carefully insert the electrophoresis gels (Fig 4) and fill any empty slots with DALT blank cassette inserts.
Fig 4. Inserting the cassettes into the cassette carrier.
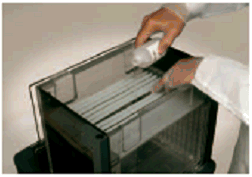
2. Sealing and filling the Upper buffer chamber.
Wet the Upper buffer chamber (UBC) sealings with buffer solution or 0.1% SDS (immerse the sealings in solution or spray the sealings of the UBC using a plant sprayer) and carefully slide the UBC over the gel cassettes. Do not move the UBC repeatedly up and down as this will reduce the sealing effect. Fill the UBC with 1.2 liters of 2x buffer and use a funnel to adjust the buffer level in the lower buffer chamber to the same height as in the UBC, by adding 1x buffer.
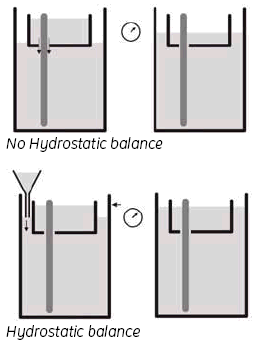
3. Hydrostatic balance.
By adjusting the buffer level in the Lower buffer chamber to be the same as the level in the UBC, you achieve a status called ‘hydrostatic balance’, where there will be no overall change in the levels of either buffer chamber during electrophoresis. This will also help to improve runs and minimize any possible ‘leakage’ from the UBC. See Fig 9.
Fig 9. Adjusting the buffer level.
Take out the gels from the refrigerator and keep gels at room temperature. Open the gel package and remove the gel. The DIGE gels come in glass cassettes and are ready to be used. Allow the gels to reach room temperature before use.
Loading of focused Immobiline DryStrips
1. Place the gels in the Ettan DALT cassette rack.
2. Briefly rinse the Immobiline DryStrips by submerging them in a measuring cylinder containing SDS electrophoresis running buffer for Ettan DALT.
3. Holding one end of the Immobiline DryStrip with forceps, carefully place the Immobiline DryStrip in-between the two glass plates of the gel. Using a thin plastic spacer, push against the plastic backing of the Immobiline DryStrip (not the gel itself) and slide the strip between the two glass plates until it comes into contact with the surface of the gel.
Note: The strip should just rest on the surface of the gel. Avoid trapping air bubbles between strip and the gel and avoid piercing the second-dimension gel with the strip.
Note: The acidic end of the Immobiline DryStrip should be on the right side of the gel when the shorter of the two plates is facing the user.
Note: The gel face of the strip must not touch the opposite glass plate.
4. Melt an aliquot of agarose overlay solution in a heating block or boiling water bath for each Immobiline DryStrips. Allow the agarose to cool slightly and slowly pipette the molten agarose solution, along the upper surface of the gel, up to the top of the glass plate. Take care not to introduce bubbles. Do not allow the agarose to solidify.
5. Once the agarose solution has completely set the gel should be run in the second dimension as soon as practically possible.

For convenient run times and minimal spot diffusion we recommend the following run conditions.
Table 4. Day Run — Temperature 22°C
| Step | W/gel | Time (hours) |
|---|---|---|
| A | 1 | 1 |
| B | 17 | 4 - 5 |
Table 5. Overnight Run — Temperature 15°C
| Step | W/gel | Time (hours) |
|---|---|---|
| A | 1 | 1 |
| B | 1.5 | 15 - 17* |
* Change to day-run protocol when ever convenient.
Stop run
Continue the electrophoresis until the bromophenol blue front reaches the end of the gel. The front can be run off the gel if desired.
Removing the gels
1. Remove the lid and carefully lift the UBC upwards making sure the cassettes remain in the anode assembly by applying downward pressure on them.
2. Lift the gel cassette holder upwards and remove the gels.
The equilibration step saturates the Immobiline™ DryStrip gel (IPG strip) with the SDS buffer system required for the second-dimension separation. To reduce vertical streaking in the second dimension it is necessary to apply two equilibration steps. The first step saturates the IPG strip with the SDS system and the second step blocks the protein thiol groups. The equilibration solution contains buffer, urea, glycerol, reductant, SDS and dye.
Prepare equilibration solution. Prepare SDS equilibration buffer (Table 1). This is a stock solution. Just prior to use, add 50 mg DTT per 10 ml SDS equilibration buffer (0.5% [w/v]).
Table 1. SDS equilibration buffer.
| Final concentration | Amount | |
|---|---|---|
| 1.5 M Tris-Cl pH 8.8 | 50 mM | 6.7 ml |
| Urea (FW 60.06) | 6 M | 72.07 g |
| Glycerol (87% v/v) | 30% (v/v) | 69 ml |
| SDS (FW 288.38) | 2% (w/v) | 4.0 g |
| Bromophenol blue | 0.001% (w/v) | 2 mg |
| Distilled or deionized water | - | to 200 ml |
Store in 40 ml aliquots at –20ºC.
Equilibration.
Place the IPG strips in individual tubes with the support film toward the tube wall. Add 10 ml DTT-containing solution to each tube. Place the tubes on a rocker and equilibrate for 15 min.
Note: When using CyDye DIGE saturation dyes (Labeling Kit for scarce samples), repeat the first equilibration with DTT-containing SDS equilibration solution for another 15 min.
Second equilibration.
A second equilibration is performed with an iodoacetamide solution (instead of DTT). Prepare a solution of 450 mg iodoacetamide per 10 ml of SDS equilibration buffer (4.5% [w/v]). Decant the first equilibration solution and add the same volume of iodoacetamide containing equilibration solution to each tube. Place the tubes on a rocker and equilibrate for an additional 15 min.
Note: The subsequent steps of electrophoresis unit preparation, insertion of gels and melting of the Sealing Solution can be performed while the IPG strips are equilibrating.
For day-to-day operation of the unit, the cleaning procedure outlined in unit operation—thoroughly rinsing the separation tank with distilled or deionized water—is sufficient. If desired, the internal components of the separation unit can be removed for a more thorough cleaning (see below).
The unit can also be periodically cleaned with a dilute solution of a mild detergent. Clean the gel casting cassettes and pre-cast gel cassettes with a dilute solution of a laboratory cleanser. Rinse the cassettes thoroughly with distilled or deionized water.
• DO NOT autoclave or heat any part above 50 ºC.
• DO NOT expose the unit or its parts to organic solvents, including >20% ethanol
• If using radioactive reagents, decontaminate the unit with a cleaning agent.