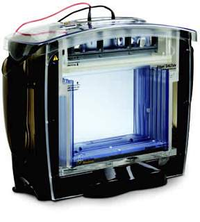
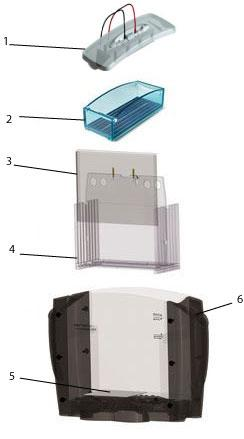
Ettan DALTsix Electrophoresis Unit, 115 VAC
FAQ
What internal standards can I use in 2-D electrophoresis?
Experienced researchers often find that the endogenous, well-characterized, abundant proteins in their samples serve as excellent internal standards as opposed to adding contaminating proteins to their 2-D samples. If molecular weight standards are desired, these can be run adjacent to the IPG strip on the 2-D gel.
Can I scan gels attached to glass plates?
If one is scanning gels attached to glass plates then low fluorescence glass plates must be used.
How is the Ettan DALTsix cleaned?
For day-to-day operation of the unit, the cleaning procedure outlined in unit operation--thoroughly rinsing the separation tank with distilled or deionized water--is sufficient. If desired, the internal components of the separation unit can be removed for a more thorough cleaning (see below). The unit can also be periodically cleaned with a dilute solution of a mild detergent.
Clean the gel casting cassettes and precast gel cassettes with a dilute solution of a laboratory cleanser. Rinse the cassettes thoroughly with distilled or deionized water.
DO NOT autoclave or heat any part above 50 °C.
DO NOT expose the unit or its parts to organic solvents, including dilute ethanol.
If using radioactive reagents, decontaminate the unit with a cleaning agent such as CONTRAD 70 or Decon 90.
What is the purpose of using Bind-Silane in 2-D electrophoresis?
Note: To ensure that glass plates are properly clean after spot picking (and before re-use for spot picking), soak the plates overnight in a solution of alkaline laboratory glassware cleaner.
1. Thoroughly wash the plate to be treated. Take care to remove any gel fragments attached to the plate from previous gels. The careful cleaning of the glass plates before casting is important, to ensure a uniform coating with the Bind-Silane.
2. Dry the plate using a lint-free tissue.
3. Prepare the bind-silane working solution: 8 ml ethanol, 200 µl glacial acetic acid, 10 µl bind silane, 1.8 ml distilled or de-ionized water.
4. Pipette 2-4 ml (depending on plate size) of the above solution onto the plate and wipe it over with a lint-free tissue. Cover the plate to prevent dust contamination and leave to air dry on the bench for 1.5 hours (minimum 1 hour).
Note: If the Bind-Silane is not left for at least 1 hour to dry before the glass plates are assembled for casting, the solution will evaporate off the treated plate and coat the facing glass surface. This will cause the gel to stick to both plates when it sets.
The gels will stay attached to the glass during electrophoresis, staining procedures, scanning and storage.
When casting gradient gels in a multiple gel caster, how can I prevent that no flat air bubbles will appear between the gel and the glass plate during polymerization?
When casting gradient gels it is important to use a displacement solution to prevent a vacuum at the bottom of the gels as the polymerization occurs. This allows for the change in volume as gels contract and expand during the polymerization process. Secondly, you should control the rate of polymerization. This can be accomplished by adding less catalyst to the higher percentage solution and more to the lower percentage. Ideally the low percentage solution should polymerize first. If the polymerization is too fast, the gels will generate a lot of heat (as polymerization is exothermic) causing the gel to expand. Once polymerization is complete, the gel contracts and I think that may be where you are getting air pulled into the plates. 22% gels are quite high and I have also found bubbles forming as the gels are stored due to the high percentage gel expanding with age. Best to run these soon after they are cast.
The precast gel is designed to fit between the spacers of the Precast Gel Cassette with a clearance gap of 1-2 mm at most. Care must be taken to ensure the gel is positioned completely between the spacers, with the GelBond margin of the precast gel lying over the spacers. A gel that is positioned incorrectly will be readily apparent -- it cannot be rolled flat. The bottom of the gel should be positioned flush with the bottom of the cassette, but 1-2 mm either way will not make a difference. Keep in mind that you want to avoid either creating a space where air bubbles can accumulate, or having the gel protrude out of the cassette.
On one side of my DALT Gel the dye front has a pronounced downward curving. Why?
There is an unfilled gap between the gel and one of the spacers. When sealing the IPG strip into place, ensure that some of the agarose sealing solution flows down any gap that may exist between the gel and the spacer. Make sure that the snap-side is closed smartly and not just gently pressed closed.
How can I avoid diffuse or broad protein spots?
1.Use only the highest-quality reagents.
2.Make sure that polymerization is complete.
3.Check equilibration time of IPG strips. Too long can lead to diffusion, and too short can lead to incomplete equilibration.
4.Make sure the IPG strip rests on the slab gel surface without damaging.
Are there staining trays to accommodate Ettan DALT gel (26 x 20 cm)?
Yes, you can order the Stainless Steel Staining Tray Set. This is an accessory part for the Ettan DALT System. The Stainless Steel Staining Tray can accommodate the 26 x 20 cm slab gel.
Why do I have vertical gap in the 2-D pattern?
Bubble between IPG strip and top surface of second dimension gel. Ensure that no bubbles are trapped between the IPG strip and the top surface of the second-dimension gel.
Can the DALTtwelve gradient maker be used with the DALTsix gel caster?
It is possible but it is not recommended.
The DALTtwelve caster casts 14 gels and requires about 950 ml of acrylamide solution. The DALTsix caster casts 6 gels and requires about 425 - 550 ml of acrylamide solution.
The DALTtwelve gradient maker delivers up to a 2 liter gradient. Small amounts like 500 ml are possible, but are more difficult to set up.
Can I make my own cassettes with any spacer material instead of using the Ettan DALT Gel Casting Cassettes?
No, if another spacer material is used, you will probably see excessive current leakage out the sides of the cassettes. This will result in distortions of the electrophoresis spot pattern.
Why is the electrophoresis run on the vertical gel unit running unusually slow or fast?
There are several possible causes for an unusually slow or fast run on a vertical electrophoresis unit:
1. Current leakage around gel. Check for leaks, all plates and spacers must be aligned and free of grease and cracks. If using SE600, make sure that buffer dam is used and assembled properly.
2. Sample or reagent preparation.
a. Check recipes, gel concentrations, and buffer dilution. (For instances, do not use Tris-HCl instead of Tris for Laemmli tank buffer.)
b. If proteins move too fast, dilute the buffer so that less current will be carried.
c. If proteins move too slowly, increase the buffer concentration so that more current will be carried.
d. If the required pH of a solution is overshot, do not back-titrate. Discard and prepare fresh buffer.
e. Dispose of older acrylamide solutions and use only stock of the highest quality.
f. Only use fresh deionized urea.
g. Decrease the salt concentration of samples.
3. Voltage or current settings. To increase or decrease the migration rate, adjust the voltage or current by 25 - 50%.
What to expect from the typical dye front pattern on the DALT precast gels?
The dye front will be sharper than the typical Laemmli system dye front, but it may undulate more. Major undulations (more than 1 cm) indicate problems with the gel or the set-up. Minor undulations generally don't indicate pattern distortion.
The protein front will actually be 1-2 cm behind the dye front at the end of the run, so the gels can be run a few minutes after the dye has left the gel if a bit more separation distance is desired without loss of spots.
Casting procedures
Quick guide for finding information on gel casting for DALTsix and DALTtwelve systems
To find gel-casting information quickly, refer to Table 2 for gel volumes required, Table 3 for single percentage gel recipes, and Table 4 for gradient gel recipes.
Warning: Some of the chemicals used in the procedures that follow—acrylamide, N,N’-methylenebisacrylamide, ammonium persulfate, TEMED, thiourea, DTT, and iodoacetamide—are very hazardous. Acrylamide monomer, for example, is a neurotoxin and suspected carcinogen. Read the manufacturer’s safety data sheet (MSDS) detailing the properties and precautions for all chemicals in your laboratory. These safety data sheets should be reviewed prior to starting the procedures described in this handbook. General handling procedures for hazardous chemicals include using double latex gloves for all protocols. Hazardous materials should be weighed in a fume hood while wearing a disposable dust mask. Follow all local safety rules and regulations, including for disposal.
Table 2. Volumes required per cast (Ettan DALT systems).
| Casting System | Volume (ml) |
|---|---|
| Ettan DALTsix | |
| 6 gels x 1-mm thick spacers | 450 |
| 6 gels x 1.5-mm thick spacers | 600 |
| Ettan DALTtwelve | |
| 14 gels x 1-mm thick spacers | 90 |
| 13 gels x 1.5-mm thick spacers | 1200 |
Table 3a. Single-percentage gel recipes for Ettan DALT systems.*
| Final gel concentration | 10% | 12.5% | 15% |
|---|---|---|---|
| Monomer solution | 300 ml | 375 ml | 450 ml |
| 4x resolving gel buffer | 225 ml | 225 ml | 225 ml |
| 10% SDS | 9 ml | 9 ml | 9 ml |
| Double-distilled water | 360.7 ml | 285.7 ml | 210.8 ml |
| 10% ammonium persulfate † | 5 ml | 5 ml | 5 ml |
| TEMED † | 0.30 ml | 0.25 ml | 0.20 ml |
| Total volume | 900 ml | 900 ml | 900 ml |
* Preparation of stock solutions is described in the end of this chapter. Adjust as necessary for the thickness of the gels and the number of gels cast.
† Add after (optional) deaeration.
Table 3b. Single-percentage gel recipes for Ettan DALT systems using premade solution of acrylamide and bisacrylamide.*
| Final gel concentration | 10% | 12.5% | 15% |
|---|---|---|---|
| PlusOne ReadySol IEF 40%T, 3%C | 225 ml | 281.25 ml | 337.5 ml |
| 4x resolving gel buffer | 225 ml | 225 ml | 225 ml |
| 10% SDS | 9 ml | 9 ml | 9 ml |
| Double-distilled water | 436.2 ml | 380 ml | 323.8 ml |
| 10% ammonium persulfate † | 4.5 ml | 4.5 ml | 4.5 ml |
| TEMED † | 0.30 ml | 0.25 ml | 0.20 ml |
| Total volume | 900 ml | 900 ml | 900 ml |
* Preparation of stock solutions is described in the end of this chapter. Adjust as necessary for the thickness of the gels and the number of gels cast.
Table 4a. Recipes for gradient gels for Ettan DALT systems.*
| Light solution - Final concentration | 8% | 10% | 12% | 14% | 16% |
|---|---|---|---|---|---|
| Monomer solution | 120 ml | 150 ml | 180 ml | 210 ml | 240 ml |
| 4x resolving gel buffer | 113 ml | 113 ml | 113 ml | 113 ml | 113 ml |
| 10% SDS | 4.5 ml | 4.5 ml | 4.5 ml | 4.5 ml | 4.5 ml |
| Double-distilled water | 210.5 ml | 180.5 ml | 150.5 ml | 120.5 ml | 90.5 ml |
| 10% ammonium persulfate † | 1.8 ml | 1.8 ml | 1.8 ml | 1.8 ml | 1.8 ml |
| TEMED † | 0.225 ml | 0.225 ml | 0.225 ml | 0.225 ml | 0.225 ml |
| Total volume | 450 ml | 450 ml | 450 ml | 450 ml | 450 ml |
| Heavy solution - Final concentration | 12% | 14% | 16% | 18% | 20% |
|---|---|---|---|---|---|
| Monomer solution | 180 ml | 210 ml | 240 ml | 270 ml | 300 ml |
| 4x resolving gel buffer | 113 ml | 113 ml | 113 ml | 113 ml | 113 ml |
| Glycerol (87% [w/w]) | 31 ml | 31 ml | 31 ml | 31 ml | 31 ml |
| 10% SDS | 4.5 ml | 4.5 ml | 4.5 ml | 4.5 ml | 4.5 ml |
| Double-distilled water | 119.9 ml | 89.9 ml | 59.9 ml | 29.9 ml | 0 ml |
| 10% ammonium persulfate † | 1.4 ml | 1.4 ml | 1.4 ml | 1.4 ml | 1.4 ml |
| TEMED † | 0.225 ml | 0.225 ml | 0.225 ml | 0.225 ml | 0.225 ml |
| Total volume | 450 ml | 450 ml | 450 ml | 450 ml | 450 ml |
* Preparation of stock solutions is described in the end of this chapter. Adjust as necessary for the thickness of the gels and the number of gels cast.
† Add after (optional) deaeration.
Table 4b. Recipes for gradient gels for Ettan DALT systems using premade solution of acrylamide and bisacrylamide.*
| Light solution - Final concentration | 8% | 10% | 12% | 14% | 16% |
|---|---|---|---|---|---|
| PlusOne ReadySol IEF 40%T, 3%C | 90 ml | 112.5 ml | 135 ml | 157.5 ml | 180 ml |
| 4x resolving gel buffer | 113 ml | 113 ml | 113 ml | 113 ml | 113 ml |
| 10% SDS | 4.5 ml | 4.5 ml | 4.5 ml | 4.5 ml | 4.5 ml |
| Double-distilled water | 240.5 ml | 218 ml | 195.5 ml | 173 ml | 150.5 ml |
| 10% ammonium persulfate † | 1.8 ml | 1.8 ml | 1.8 ml | 1.8 ml | 1.8 ml |
| TEMED † | 0.225 ml | 0.225 ml | 0.225 ml | 0.225 ml | 0.225 ml |
| Total volume | 450 ml | 450 ml | 450 ml | 450 ml | 450 ml |
| Heavy solution - Final concentration | 12% | 14% | 16% | 18% | 20% |
|---|---|---|---|---|---|
| PlusOne ReadySol IEF 40%T, 3%C | 135 ml | 157.5 ml | 180 ml | 202.5 ml | 225 ml |
| 4x resolving gel buffer | 113 ml | 113 ml | 113 ml | 113 ml | 113 ml |
| Glycerol (87% [w/w]) | 31 ml | 31 ml | 31 ml | 31 ml | 31 ml |
| 10% SDS | 4.5 ml | 4.5 ml | 4.5 ml | 4.5 ml | 4.5 ml |
| Double-distilled water | 164.9 ml | 142.4 ml | 119.9 ml | 97.4 ml | 74.9 ml |
| 10% ammonium persulfate † | 1.4 ml | 1.4 ml | 1.4 ml | 1.4 ml | 1.4 ml |
| TEMED † | 0.225 ml | 0.225 ml | 0.225 ml | 0.225 ml | 0.225 ml |
| Total volume | 450 ml | 450 ml | 450 ml | 450 ml | 450 ml |
* Preparation of stock solutions is described in the end of this chapter. Adjust as necessary for the thickness of the gels and the number of gels cast.
30 % T, 2.6 % C monomer stock solution
(30% acrylamide, 0.8% N,N’-methylenebisacrylamide, 1 l)
| Final concentration | Amount | |
|---|---|---|
| Acrylamide (PF 71.08) | 30% | 300 g |
| N,N'-methylenebisacrylamide (FW 154.17) | 0.8% | 8 g |
| Double-distilled water | - | to 1 l |
Filter solution through a 0.45-μm filter. Store at 4 °C in the dark.
4× resolving gel buffer solution
(1.5 M Tris base, pH 8.8, 1 l)
| Final concentration | Amount | |
|---|---|---|
| Tris base (FW 121.1) | 1.5 M | 181.7 g |
| Double-distilled water | - | 750 ml |
| HClaq | - | adjust to pH 8.8 |
| Double-distilled water | - | to 1 l |
Filter solution through a 0.45-μm filter. Store at 4 °C.
SDS equilibration buffer solution
(6 M urea, 75 mM Tris-HCl pH 8.8, 29.3% glycerol, 2% SDS, 0.002% bromophenol blue, 200 ml)*
| Final concentration | Amount | |
|---|---|---|
| Urea (FW 60.06) | 6 M | 72.1 g |
| Tris-HCI, pH 8.8** | 75 mM | 10.0 ml |
| Glycerol (87% w/w) | 29.3% (v/v) | 69 ml (84.2 g) |
| SDS (FW 288.38) | 2% (w/v) | 4.0 g |
| 1% Bromophenol blue stock solution | 0.002% (w/v) | 400 µ |
| Double-distilled water | - | to 200 ml |
* This is a stock solution. Just prior to use, add DTT or iodoacetamide (for first or second equilibration, respectively)
** For preparing the Tris-HCl, pH 8.8 solution see Table 3.
Store in 20- or 50-ml aliquots at -20 °C.
10% ammonium persulfate solution
(10% ammonium persulfate, 10 ml and 1 ml)
| Final concentration | Amount for 10ml | Amount for 1 ml | |
|---|---|---|---|
| Ammonium persulfate (FW 228.20) | 10% (w/v) | 1.0 g | 0.1 g |
| Double-distilled water | - | to 1 l | to 1 ml |
Fresh ammonium persulfate “crackles” when water is added. If it does not, replace it with fresh stock. Prepare just prior to use.
|
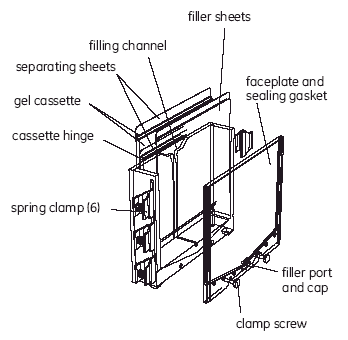
Preparing the gel caster for Ettan DALTsix system |
Gel casting for DALTsix and DALTtwelve systems
The instructions provided below for the preparation of vertical SDS-polyacrylamide gels employ the Tris-glycine system of Laemmli. Vertical second-dimension gels are most conveniently cast several at a time, in a multiple gel caster.
Warning: Some of the chemicals used in the procedures that follow—acrylamide, N,N’-methylenebisacrylamide, ammonium persulfate, TEMED, thiourea, DTT, and iodoacetamide—are very hazardous. Acrylamide monomer, for example, is a neurotoxin and suspected carcinogen. Read the manufacturer’s safety data sheet (MSDS) detailing the properties and precautions for all chemicals in your laboratory. These safety data sheets should be reviewed prior to starting the procedures described in this handbook. General handling procedures for hazardous chemicals include using double latex gloves for all protocols. Hazardous materials should be weighed in a fume hood while wearing a disposable dust mask. Follow all local safety rules and regulations, including for disposal.
1. Select the gel percentage
a. Single percentage gel versus gradient gel. When a gradient gel is used, the overall separation interval is wider and the linear separation interval is larger. In addition, sharper bands result because the decreasing pore size functions to minimize diffusion. However, a gradient gel requires more skill to cast. For detailed instructions on gradient preparation, see the user manual for the relevant electrophoresis unit and multiple gel caster.
Single percentage gels offer better resolution for a particular Mr window. A commonly used second-dimension gel for 2-D electrophoresis is a homogeneous gel containing 12.5% total acrylamide.
Note: Stacking gels are not necessary for vertical 2-D gels.
b. Whether single percentage or gradient, the appropriate percentage gel is selected according to the range of separation desired (Table 1).
Table 1. Recommended acrylamide concentrations for protein separation.
| Acrylamide percentage in resolving gel | Separation size range (Mr x 10-3) | |
|---|---|---|
| Single percentage | 5 | 36 - 200 |
| 7.5 | 24 - 200 | |
| 10 | 14 - 200 | |
| 12.5 | 14 - 100* | |
| 15 | 14 - 60* | |
| Gradient | 5 - 15 | 14 - 200 |
| 5 - 20 | 10 - 200 | |
| 10 - 20 | 10 - 150 |
* Larger proteins fail to move significantly into the gel.
2. Select gel thickness and calculate casting solution volume
DALT gel casting cassettes with either 1.0- or 1.5-mm-thick spacers can be used. Thinner gels stain and destain more quickly and generally give less background staining. Thicker gels have a higher protein capacity. Thicker gels are also less fragile and easier to handle.
Table 2 gives the volumes required for Ettan DALT systems.
Table 2. Volumes required per cast (Ettan DALT systems).
| Casting System | Volume (ml) |
|---|---|
| Ettan DALTsix | |
| 6 gels x 1-mm thick spacers | 450 |
| 6 gels x 1.5-mm thick spacers | 600 |
| Ettan DALTtwelve | |
| 14 gels x 1-mm thick spacers | 900 |
| 13 gels x 1.5-mm thick spacers | 1200 |
3. Calculate the formulation of the gel solution
The recipes given in Table 3a and 3b (premade solution of acrylamide and bisacrylamide) produce 900 ml of solution for a single percentage gel. The recipes in Table 4a and 4b (premade solution of acrylamide and bisacrylamide) produce 450 ml each of light and heavy solution for a gradient gel. These recipes can be scaled up or down, depending on the volume required.
Table 3a. Single-percentage gel recipes for Ettan DALT systems.*
| Final gel concentration | 10% | 12.5% | 15% |
|---|---|---|---|
| Monomer solution | 300 ml | 375 ml | 450 ml |
| 4x resolving gel buffer | 225 ml | 225 ml | 225 ml |
| 10% SDS | 9 ml | 9 ml | 9 ml |
| Double-distilled water | 360.7 ml | 285.7 ml | 210.8 ml |
| 10% ammonium persulfate † | 5 ml | 5 ml | 5 ml |
| TEMED † | 0.30 ml | 0.25 ml | 0.20 ml |
| Total volume | 900 ml | 900 ml | 900 ml |
* Preparation of stock solutions is described in the end of this chapter. Adjust as necessary for the thickness of the gels and the number of gels cast.
† Add after (optional) deaeration.
Table 3b. Single-percentage gel recipes for Ettan DALT systems using premade solution of acrylamide and bisacrylamide.*
| Final gel concentration | 10% | 12.5% | 15% |
|---|---|---|---|
| PlusOne ReadySol IEF 40%T, 3%C | 225 ml | 281.25 ml | 337.5 ml |
| 4x resolving gel buffer | 225 ml | 225 ml | 225 ml |
| 10% SDS | 9 ml | 9 ml | 9 ml |
| Double-distilled water | 436.2 ml | 380 ml | 323.8 ml |
| 10% ammonium persulfate † | 4.5 ml | 4.5 ml | 4.5 ml |
| TEMED † | 0.30 ml | 0.25 ml | 0.20 ml |
| Total volume | 900 ml | 900 ml | 900 ml |
* Preparation of stock solutions is described in the end of this chapter. Adjust as necessary for the thickness of the gels and the number of gels cast.
† Add after (optional) deaeration.
Table 4a. Recipes for gradient gels for Ettan DALT systems.*
| Light solution - Final concentration | 8% | 10% | 12% | 14% | 16% |
|---|---|---|---|---|---|
| Monomer solution | 120 ml | 150 ml | 180 ml | 210 ml | 240 ml |
| 4x resolving gel buffer | 113 ml | 113 ml | 113 ml | 113 ml | 113 ml |
| 10% SDS | 4.5 ml | 4.5 ml | 4.5 ml | 4.5 ml | 4.5 ml |
| Double-distilled water | 210.5 ml | 180.5 ml | 150.5 ml | 120.5 ml | 90.5 ml |
| 10% ammonium persulfate † | 1.8 ml | 1.8 ml | 1.8 ml | 1.8 ml | 1.8 ml |
| TEMED † | 0.225 ml | 0.225 ml | 0.225 ml | 0.225 ml | 0.225 ml |
| Total volume | 450 ml | 450 ml | 450 ml | 450 ml | 450 ml |
| Heavy solution - Final concentration | 12% | 14% | 16% | 18% | 20% |
|---|---|---|---|---|---|
| Monomer solution | 180 ml | 210 ml | 240 ml | 270 ml | 300 ml |
| 4x resolving gel buffer | 113 ml | 113 ml | 113 ml | 113 ml | 113 ml |
| Glycerol (87% [w/w]) | 31 ml | 31 ml | 31 ml | 31 ml | 31 ml |
| 10% SDS | 4.5 ml | 4.5 ml | 4.5 ml | 4.5 ml | 4.5 ml |
| Double-distilled water | 119.9 ml | 89.9 ml | 59.9 ml | 29.9 ml | 0 ml |
| 10% ammonium persulfate † | 1.4 ml | 1.4 ml | 1.4 ml | 1.4 ml | 1.4 ml |
| TEMED † | 0.225 ml | 0.225 ml | 0.225 ml | 0.225 ml | 0.225 ml |
| Total volume | 450 ml | 450 ml | 450 ml | 450 ml | 450 ml |
* Preparation of stock solutions is described in the end of this chapter. Adjust as necessary for the thickness of the gels and the number of gels cast.
† Add after (optional) deaeration.
Table 4b. Recipes for gradient gels for Ettan DALT systems using premade solution of acrylamide and bisacrylamide.*
| Light solution - Final concentration | 8% | 10% | 12% | 14% | 16% |
|---|---|---|---|---|---|
| PlusOne ReadySol IEF 40%T, 3%C | 90 ml | 112.5 ml | 135 ml | 157.5 ml | 180 ml |
| 4x resolving gel buffer | 113 ml | 113 ml | 113 ml | 113 ml | 113 ml |
| 10% SDS | 4.5 ml | 4.5 ml | 4.5 ml | 4.5 ml | 4.5 ml |
| Double-distilled water | 240.5 ml | 218 ml | 195.5 ml | 173 ml | 150.5 ml |
| 10% ammonium persulfate † | 1.8 ml | 1.8 ml | 1.8 ml | 1.8 ml | 1.8 ml |
| TEMED † | 0.225 ml | 0.225 ml | 0.225 ml | 0.225 ml | 0.225 ml |
| Total volume | 450 ml | 450 ml | 450 ml | 450 ml | 450 ml |
| Heavy solution - Final concentration | 12% | 14% | 16% | 18% | 20% |
|---|---|---|---|---|---|
| PlusOne ReadySol IEF 40%T, 3%C | 135 ml | 157.5 ml | 180 ml | 202.5 ml | 225 ml |
| 4x resolving gel buffer | 113 ml | 113 ml | 113 ml | 113 ml | 113 ml |
| Glycerol (87% [w/w]) | 31 ml | 31 ml | 31 ml | 31 ml | 31 ml |
| 10% SDS | 4.5 ml | 4.5 ml | 4.5 ml | 4.5 ml | 4.5 ml |
| Double-distilled water | 164.9 ml | 142.4 ml | 119.9 ml | 97.4 ml | 74.9 ml |
| 10% ammonium persulfate † | 1.4 ml | 1.4 ml | 1.4 ml | 1.4 ml | 1.4 ml |
| TEMED † | 0.225 ml | 0.225 ml | 0.225 ml | 0.225 ml | 0.225 ml |
| Total volume | 450 ml | 450 ml | 450 ml | 450 ml | 450 ml |
4. Prepare the gel solution
Make up the gel solution without TEMED or ammonium persulfate.
Note: An optional deaeration step may be performed at this point. To do so, make up the solution in a vacuum flask. Add a small magnetic stirring bar. Stopper the flask and apply a vacuum for several minutes while stirring on a magnetic stirrer.
Just before casting the gel, add TEMED and 10% ammonium persulfate. Gently swirl the flask to mix, being careful not to generate bubbles. Immediately pour the gel.
5. Pour and prepare the gel
Fill the gel cassette to 5–10 mm below the top (no stacking gel layer is required).
Overlay each gel with a layer of water-saturated 1-butanol (1.0 ml) immediately after pouring to minimize gel exposure to oxygen and to create a flat gel surface.
After allowing a minimum of 2 h for polymerization, remove the overlay and rinse the gel surface with gel storage solution (Table 5).
Table 5. Gel storage solution.
(375 mM Tris-HCl, 0.1% SDS, 1 l)
| Final concentration | Amount | |
|---|---|---|
| 4x resolving gel buffer | 1× | 250 ml |
| 10% SDS | 0.1% | 10 ml |
| Double-distilled water | - | to 1 l |
Store at 4 °C.
Note: An alternative to using water-saturated 1-butanol to overlay the gels after casting is to spray the edges of the cassettes using a 0.1% (w/v) SDS/water solution (using a plant sprayer) such that the edges are covered by just a few millimeters. This technique helps to avoid curved edges on the gels.
6. Storage of unused gels
Gels not used immediately can be stored for future use at 4 °C for up to two weeks. Gel storage solution (see Table 5) is pipetted over the top gel surface and the gel cassette is sealed with flexible paraffin film.
Alternatively, the gel cassettes can be stored fully immersed in gel storage solution.
For further information on the preparation of second-dimension vertical SDS slab gels, refer to the user manuals for the respective vertical gel unit and multiple gel caster.
30 % T, 2.6 % C monomer stock solution
(30% acrylamide, 0.8% N,N’-methylenebisacrylamide, 1 l)
| Final concentration | Amount | |
|---|---|---|
| Acrylamide (PF 71.08) | 30% | 300 g |
| N,N'-methylenebisacrylamide (FW 154.17) | 0.8% | 8 g |
| Double-distilled water | - | to 1 l |
Filter solution through a 0.45-μm filter. Store at 4 °C in the dark.
4× resolving gel buffer solution
(1.5 M Tris base, pH 8.8, 1 l)
| Final concentration | Amount | |
|---|---|---|
| Tris base (FW 121.1) | 1.5 M | 181.7 g |
| Double-distilled water | - | 750 ml |
| HClaq | - | adjust to pH 8.8 |
| Double-distilled water | - | to 1 l |
Filter solution through a 0.45-μm filter. Store at 4 °C.
SDS equilibration buffer solution
(6 M urea, 75 mM Tris-HCl pH 8.8, 29.3% glycerol, 2% SDS, 0.002% bromophenol blue, 200 ml)*
| Final concentration | Amount | |
|---|---|---|
| Urea (FW 60.06) | 6 M | 72.1 g |
| Tris-HCI, pH 8.8** | 75 mM | 10.0 ml |
| Glycerol (87% w/w) | 29.3% (v/v) | 69 ml (84.2 g) |
| SDS (FW 288.38) | 2% (w/v) | 4.0 g |
| 1% Bromophenol blue stock solution | 0.002% (w/v) | 400 µ |
| Double-distilled water | - | to 200 ml |
* This is a stock solution. Just prior to use, add DTT or iodoacetamide (for first or second equilibration, respectively)
** For preparing the Tris-HCl, pH 8.8 solution see Table 3.
Store in 20- or 50-ml aliquots at -20 °C.
10% ammonium persulfate solution
(10% ammonium persulfate, 10 ml and 1 ml)
| Final concentration | Amount for 10ml | Amount for 1 ml | |
|---|---|---|---|
| Ammonium persulfate (FW 228.20) | 10% (w/v) | 1.0 g | 0.1 g |
| Double-distilled water | - | to 1 l | to 1 ml |
Fresh ammonium persulfate “crackles” when water is added. If it does not, replace it with fresh stock. Prepare just prior to use.
Running procedures
For convenient run times and minimal spot diffusion we recommend the following run conditions.
Table 4. Day Run — Temperature 22°C.
| Step | mA/gel | Voltage (V) | W/gel | Time (hours) |
|---|---|---|---|---|
| A | 10 | 80 | 1 | 1 |
| B | 50 | 500 | 171 | 4 - 5 |
1. Maximum electrical input for the electrophoresis unit is 600 V, 400 mA, and 100 W.
Table 5. Overnight Run — Temperature 15°C.
| Step | mA/gel | Voltage (V) | W/gel | Time (hours) |
|---|---|---|---|---|
| A | 12 | 150 | 1.5 | 15 - 17* |
* Change to day run protocol when ever convenient.
Stop run
Continue the electrophoresis until the bromophenol blue front reaches the end of the gel. The front can be run off the gel if desired.
Removing the gels
1. Remove the lid and carefully lift the UBC upwards making sure the cassettes remain in the anode assembly by applying downward pressure on them.
2. Lift the gel cassette holder upwards and remove the gels.
Care and Maintenance
1. On completion of the electrophoresis run, immediately remove the UBC from the Ettan DALTsix Electrophoresis Unit.
2. Wash the UBC in distilled water of room temperature to wash off the buffer solution. Rinse thoroughly and allow the UBC to dry at room temperature.
3. Do not leave the UBC in buffer solution when the unit is not in use. Store the UBC empty, not even on the cassette holder, since the sealings in the middle.
10× Laemmli SDS electrophoresis buffer
(250 mM Tris base, 1.92 M glycine, 1% SDS, 10 l)*
| Final concentration | Amount | |
|---|---|---|
| Tris base (FW 121.1) | 250 mM | 303 g |
| Glycine (FW 75.07) | 1.92 mM | 1441 g |
| SDS (FW 288.38) | 1% (w/v) | 100 g |
| Double-distilled water | - | to 10 l |
* The pH of this solution should not be adjusted.
Store at room temperature.
1× Laemmli SDS electrophoresis buffer
(25 mM Tris base, 192 mM glycine, 0.1% SDS, 10 l)*
| Final concentration | Amount | |
|---|---|---|
| Tris base (FW 121.1) | 25 mM | 30.3 g |
| Glycine (FW 75.07) | 192 mM | 144.0 g |
| SDS (FW 288.38) | 0.1% (w/v) | 10.0 g |
| Double-distilled water | - | to 10 l |
* The pH of this solution should not be adjusted.
This solution can be prepared by diluting one volume of 10× Laemmli SDS buffer with nine volumes of double-distilled water.
Store at room temperature.
2× Laemmli SDS electrophoresis buffer
(50 mM Tris base, 384 mM glycine, 0.2% SDS, 10 l)*
| Final concentration | Amount | |
|---|---|---|
| Tris base (FW 121.1) | 50 mM | 60.6 g |
| Glycine (FW 75.07) | 384 mM | 288.0 g |
| SDS (FW 288.38) | 0.2% (w/v) | 20.0 g |
| Double-distilled water | - | to 10 l |
* The pH of this solution should not be adjusted.
This solution can be prepared by diluting two volumes of 10× Laemmli SDS buffer with eight volumes of double-distilled water.
Store at room temperature.
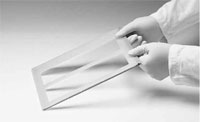
1. Open the gel package
Cut around the package on two sides at approximately 1 cm from the edge to avoid cutting the gel or the support film. Remove the gel from the package. The gel is cast onto a plastic support film and does not cover the film entirely. The gel is covered with a protective plastic sheet. Markings on the protective sheet indicate the orientation of the gel and the direction of electrophoresis. The bottom (+ or anodic) edge of the gel is flush with the edge of the support film. The support film protrudes approximately 15 mm beyond the top (- or cathodic) edge of the gel and approximately 5 mm at either side.
2. Open DALT Precast Gel Cassette
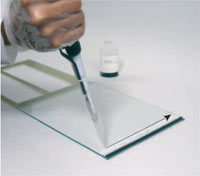
Place the gel cassette on the bench top with the hinge down. Apply 1 ml gel buffer onto the glass plate as a streak along the spacer on the right edge of the glass plate (Fig 2). Add an additional 2 ml of gel buffer to the center of the plate.
Fig 2. Pipetting a streak of gel buffer onto the glass plate. The arrow indicates the direction of motion in applying the streak.
3. Remove the protective plastic sheet from the gel
Handling the gel only by the side support film margins, hold it (gel-side down) over the glass plate. Ensure that it is oriented with the cathodic (-) edge of the gel toward the cathodic (-) edge of the cassette. Align the right edge of the gel with the right edge of the side spacer of the glass plate side, flex the gel downward slightly and lower it slowly toward the glass plate from right to left. Take care that the bottom (anodic) edge of the gel is flush (within 1 mm) of the bottom (anodic) edge of the glass plate. The protruding side support film margins (but not the gel) should rest on top of the side spacers.
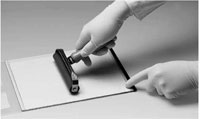
4. Remove bubbles and excess buffer
Use the roller (a separate accessory) to press out any bubbles or liquid from between the gel and the glass. Press firmly against the plastic support film with the roller and roll over the entire gel (Fig 3). After rolling, the gel should adhere firmly to the glass and resist further movement.
Fig 3. Pressing out air pockets between gel and glass plate.
5. Close the cassette
Close the cassette, snap the plastic frame to the glass plate (Fig 4) and press the edges tightly together along the entire side of the cassette. Ensure that the cassette is closed completely; an incompletely closed cassette causes a strongly curved front.
Fig 4. Closing the DALT Precast Gel Cassette.
6. Repeat the procedure for each second-dimension gel to be run
The second-dimension vertical gel must be ready for use prior to Immobiline DryStrip gel equilibration.
Equilibration is carried out in a two-step process using tubes and volume of equilibration solution as specified in the table 1 below.
Preparatory steps
1. Place the IPG strips in individual tubes, with the support film toward the tube wall.
2. Prepare an appropriate volume of SDS equilibration buffer solution (see Table 2 below) then measure into two equal volumes. Add DTT to one portion (100 mg per 10 ml) and iodoacetamide to the other (250 mg per 10 ml).
Equilibration
1. Add the appropriate volume of SDS equilibration buffer (+ DTT) to each strip. Cap or seal the tubes with flexible paraffin film and place them on their sides on a rocker for the equilibration process. Equilibrate for 15 min.
2. Pour off buffer from above step and add the appropriate volume of SDS equilibration buffer (+iodoacetamide) to each strip. Again cap or seal the tubes with flexible paraffin film and place them on their sides on a rocker for the equilibration process. Equilibrate for an additional 15 min.
Note: Be consistent with the timing of the equilibration steps.
Note: The subsequent steps of gel assembly, preparation of electrophoresis unit, insertion of the gel into the precast gel cassette, and melting of the sealing solution can be performed as the Immobiline DryStrip gels are equilibrating, as long as the timeframes above are adhered to.
Table 1. Suggested containers and volumes of equilibration solution.
| Strip length (cm) | Container | Equilibration solution (ml) |
|---|---|---|
| 7 | Disposable, 15-ml conical tubes | 2.5 - 5 |
| 11 | 25 × 200 mm screw-cap culture tubes | 5 - 10 |
| 13 | 25 × 200 mm screw-cap culture tubes | 5 - 10 |
| 18 | 25 × 200 mm screw-cap culture tubes, Equilibration tubes or Petri dish | 10 - 15 |
| 24 | Equilibration tubes or Petri dish | 10 - 15 |
Table 2. SDS equilibration buffer solution.
(6 M urea, 75 mM Tris-HCl pH 8.8, 29.3% glycerol, 2% SDS, 0.002% bromophenol blue, 200 ml)*
| Final concentration | Amount | |
|---|---|---|
| Urea (FW 60.06) | 6 M | 72.1 g |
| Tris-HCl, pH 8.8** | 75 mM | 10.0 ml |
| Glycerol (87% w/w) | 29.3% (v/v) | 69 ml (84.2 g) |
| SDS (FW 288.38) | 2% (w/v) | 4.0 g |
| 1% Bromophenol blue stock solution | 0.002% (w/v) | 400 μl |
| Double-distilled water | - | to 200 ml |
* This is a stock solution. Just prior to use, add DTT or iodoacetamide (for first or second equilibration, respectively).
** For preparing the Tris-HCl, pH 8.8 solution see Table 3.
Store in 20- or 50-ml aliquots at -20 °C.
Table 3. 4× resolving gel buffer solution.
(1.5 M Tris base, pH 8.8, 1 l)
| Final concentration | Amount | |
|---|---|---|
| Tris base (FW 121.1) | 1.5 M | 181.7 g |
| Double-distilled water | - | 750 ml |
| HCI | - | adjust to pH 8.8 |
| Double-distilled water | - | to 1 l |
Filter solution through a 0.45-μm filter. Store at 4 °C.
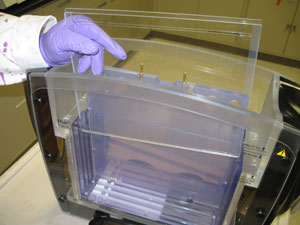
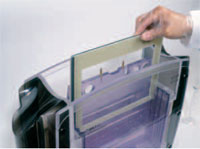
1. Carefully insert the electrophoresis gels (Fig 5) and fill any empty slots with DALT blank cassette inserts.
Fig 5. Inserting the cassettes into the cassette carrier.
2. Sealing and filling the Upper buffer chamber.
Wet the Upper buffer chamber (UBC) sealings with buffer solution or 0.1% SDS (immerse the sealings in solution or spray the sealings of the UBC using a plant sprayer) and carefully slide the UBC over the gel cassettes. Do not move the UBC repeatedly up and down as this will reduce the sealing effect. Fill the UBC with 1.2 liters of 2x Laemmli SDS electrophoresis buffer, refer to section 6, Buffer recipes. and use a funnel to adjust the buffer level in the lower buffer chamber to the same height as in the UBC, by adding 1x Laemmli SDS electrophoresis buffer, refer to section 6, Buffer recipes.
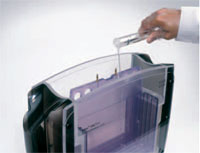
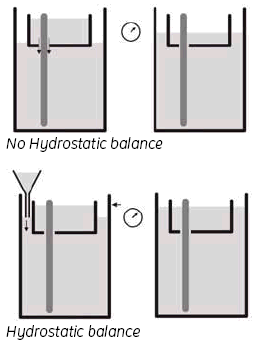
3. Hydrostatic balance.
By adjusting the buffer level in the Lower buffer chamber to be the same as the level in the UBC, you achieve a status called ‘hydrostatic balance’, where there will be no overall change in the levels of either buffer chamber during electrophoresis. This will also help to improve runs and minimize any possible ‘leakage’ from the UBC. See Fig 6.
Fig 6. Adjusting the buffer level.

1. When preparing to run a gel in the DALTsix instrument, insert the anode assembly in the tank and then fill the lower buffer chamber tank. Add one bottle (125 ml) of DIGE Anode Buffer stock solution included in the DIGE Buffer Kit into the tank. Fill the electrophoresis unit to the 4.5 l fill line with distilled or deionized water, and turn the pump on.
Note: Use only one bottle of the DIGE Anode (lower) Buffer for each DALTsix run.
2. Turn on the circulation pump by plug the leads attached to DALTsix base unit. (Only perform this operation once the tank contains buffer.)
3. Connect an external thermostatic circulator (e.g. MultiTemp III) and set the temperature to 22ºC for a day run and to 15ºC for an overnight run. Equilibrate the buffer to 15ºC before starting an overnight run.
Note: Place the unit close to a sink for easy rinsing and draining. Connect the tubing leading to and from the heat exchanger to a thermostatic temperature controller such as MultiTemp III. Do not connect the heat exchanger to a water tap or any other coolant supply that does not have pressure regulation. Position a suitable power supply (e.g. EPS 601) conveniently close to the electrophoresis unit.
1. Prepare anode and cathode buffers (stocks included in the DALT Buffer Kit)
Dilute half of the 100× anode (lower) buffer by adding 37.5 ml to 4.5 l of water.
Dilute one bottle of 10× cathode (upper) buffer to a final volume of 0.8 l with deionized water.
2. Prepare anode assembly
When preparing to run a gel in the Ettan DALTsix Electrophoresis Unit, insert the anode assembly in the tank and then fill the lower buffer chamber tank with 4.5 liters of 1x electrophoresis buffer (Fig 1.) Turn on the circulation pump by plug the leads attached to the DALTsix base unit. (Only perform this operation once the tank contains buffer.)
Fig 1. Filling the Ettan DALTsix electrophoresis unit with anode buffer.
3. Temperature control
Connect an external thermostatic circulator (e.g. MultiTemp™ III) and set the temperature to 25°C for a day run and to 30°C for an overnight run.
The equilibration step saturates the Immobiline™ DryStrip gel (IPG strip) with the SDS buffer system required for the second-dimension separation. To reduce vertical streaking in the second dimension it is necessary to apply two equilibration steps. The first step saturates the IPG strip with the SDS system and the second step blocks the protein thiol groups. The equilibration solution contains buffer, urea, glycerol, reductant, SDS and dye.
Prepare equilibration solution. Prepare SDS equilibration buffer (Table 1). This is a stock solution. Just prior to use, add 50 mg DTT per 10 ml SDS equilibration buffer (0.5% [w/v]).
Table 1. SDS equilibration buffer.
| Final concentration | Amount | |
|---|---|---|
| 1.5 M Tris-Cl, pH 8.8 | 50 mM | 6.7 ml |
| Urea (FW 60.06) | 6 M | 72.07 g |
| Glycerol (87% w/w) | 30% (v/v) | 69 ml |
| SDS (FW 288.38) | 2% (w/v) | 4.0 g |
| Bromophenol blue | 0.001% (w/v) | 2 mg |
| Distilled or deionized water | - | to 200 ml |
Store in 40 ml aliquots at –20ºC.
Equilibration.
Place the IPG strips in individual tubes with the support film toward the tube wall. Add 10 ml DTT-containing solution to each tube. Place the tubes on a rocker and equilibrate for 15 min.
Note: When using CyDye DIGE saturation dyes (Labeling Kit for scarce samples), repeat the first equilibration with DTT-containing SDS equilibration solution for another 15 min.
Second equilibration.
A second equilibration is performed with an iodoacetamide solution (instead of DTT). Prepare a solution of 450 mg iodoacetamide per 10 ml of SDS equilibration buffer (4.5% [w/v]). Decant the first equilibration solution and add the same volume of iodoacetamide containing equilibration solution to each tube. Place the tubes on a rocker and equilibrate for an additional 15 min.
Note: The subsequent steps of electrophoresis unit preparation, insertion of gels and melting of the Sealing Solution can be performed while the IPG strips are equilibrating
1. Carefully insert the electrophoresis gels (Fig 4) and fill any empty slots with DALT blank cassette inserts.
Fig 4. Inserting the cassettes into the cassette carrier.
2. Sealing and filling the Upper buffer chamber.
Wet the Upper buffer chamber (UBC) sealings with buffer solution or 0.1% SDS (immerse the sealings in solution or spray the sealings of the UBC using a plant sprayer) and carefully slide the UBC over the gel cassettes. Do not move the UBC repeatedly up and down as this will reduce the sealing effect. Fill the UBC with 1.2 liters of 2x buffer and use a funnel to adjust the buffer level in the lower buffer chamber to the same height as in the UBC, by adding 1x buffer.
3. Hydrostatic balance.
By adjusting the buffer level in the Lower buffer chamber to be the same as the level in the UBC, you achieve a status called ‘hydrostatic balance’, where there will be no overall change in the levels of either buffer chamber during electrophoresis. This will also help to improve runs and minimize any possible ‘leakage’ from the UBC. See Fig 9.
Fig 9. Adjusting the buffer level.
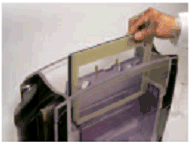
Applying equilibrated Immobiline DryStrip gels
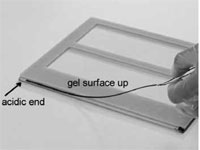
The DALT gel cassettes have a “longer” glass plate. The cassette should be laid on the bench with the longer glass plate down, and the protruding edge oriented toward the operator , refer to Fig 2.
Fig 2. Positioning an equilibrated Immobiline DryStrip gel on the DALT gel cassette.
1. Position the Immobiline DryStrip gel.
Dip the equilibrated Immobiline DryStrip gel in the SDS electrophoresis buffer (Table 4) to lubricate it.
Table 4. 1× Laemmli SDS electrophoresis buffer.
(25 mM Tris base, 192 mM glycine, 0.1% SDS, 10 l)*

| Final concentration | Amount | |
|---|---|---|
| Tris base (FW 121.1) | 25 mM | 30.3 g |
| Glycine (FW 75.07) | 192 mM | 144.0 g |
| SDS (FW 288.38) | 0.1% (w/v) | 10.0 g |
| Double-distilled water | - | to 10 l |
* The pH of this solution should not be adjusted.
This solution can be prepared by diluting one volume of 10× Laemmli SDS buffer, with nine volumes of double-distilled water.
Store at room temperature, refer to section 6, Buffer recipes.
Place the strip with the acidic end to the left, gel surface up onto the protruding edge of the longer glass plate (Fig. 2)
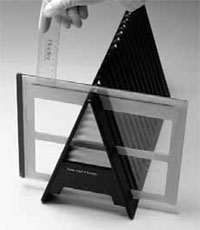
2. Ensure Immobiline DryStrip gel has good contact
With a thin plastic ruler, gently push the Immobiline DryStrip gel down so that the entire lower edge of the Immobiline DryStrip gel is in contact with the top surface of the slab gel (Fig 3). Ensure that no air bubbles are trapped between the Immobiline DryStrip gel and the slab gel surface or between the gel backing and the glass plate.
Fig 3. Pushing the Immobiline DryStrip gel down to contact the gel slab.
3. Optional: Apply molecular weight marker proteins.
Best results are obtained when the molecular weight marker protein solution is mixed with an equal volume of a hot 1% agarose solution prior to application to the IEF sample application piece. The resultant 0.5% agarose will gel and prevent the marker proteins from diffusing laterally prior to the application of electric current. Other alternatives are to apply the markers to a paper IEF sample application piece in a volume of 15–20 μl. For less volume, cut the sample application piece proportionally. Place the IEF application piece on a glass plate and pipette the marker solution onto it, then pick up the application piece with forceps and apply to the top surface of the gel next to one end of the Immobiline DryStrip gel. The markers should contain 200–1000 ng of each component for Coomassie staining and approximately 10–50 ng of each component for silver staining.
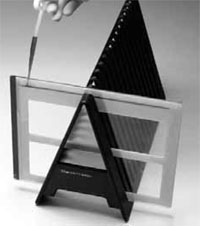
4. Seal the Immobiline DryStrip gel in place.
Agarose sealing solution prevents the Immobiline DryStrip gel from moving or floating in the electrophoresis buffer. If using the Laemmli buffer system, see Table 5. Melt each aliquot as needed in a 100 °C heat block (each gel will require 1–1.5 ml). It takes approximately 10 min to fully melt the agarose.
Table 5. Agarose sealing solution.
(25 mM Tris base, 192 mM glycine, 0.1% SDS, 0.5% agarose, 0.002% bromophenol blue, 100 ml)
| Final concentration | Amount | |
|---|---|---|
| Laemmli SDS electrophoresis buffer (see Table 4.) |
100 ml | |
| Agarose (NA or M) | 0.5% | 0.5 g |
| 1% Bromophenol blue stock solution | 0.002% (w/v) | 200 μl |
Add all ingredients into a 500-ml Erlenmeyer flask. Swirl to disperse. Heat in a microwave oven on low or on a heating stirrer until the agarose is completely dissolved. Do not allow the solution to boil over. Dispense 1.5-ml aliquots into screw-cap tubes.
Store at room temperature.
Note: An ideal time to carry out this step is during Immobiline DryStrip gel equilibration.
Allow the agarose to cool until the tube can be held with your fingers (60 °C) and then slowly pipette the amount required to seal the Immobiline DryStrip gel in place, refer to Fig 4. Pipette slowly to avoid introducing bubbles. Apply only the minimum quantity of agarose sealing solution required to cover the Immobiline DryStrip gel. Allow a minimum of 1 min for the agarose to cool and solidify.
Fig 4. Sealing the Immobiline DryStrip gel in place using agarose sealing solution.

Note: Place the unit close to a sink for easy rinsing and draining. Connect the tubing leading to and from the heat exchanger to a thermostatic temperature controller such as MultiTemp III. Do not connect the heat exchanger to a water tap or any other coolant supply that does not have pressure regulation. Position a suitable power supply (e.g. EPS 601) conveniently close to the electrophoresis unit.
1. When preparing to run a gel in the Ettan DALTsix Electrophoresis Unit, insert the anode assembly in the tank and then fill the lower buffer chamber tank with 4.5 liters of 1x Laemmli SDS electrophoresis buffer (Fig 1), refer to section 6. Buffer recipes.
Fig 1. Filling the Ettan DALTsix electrophoresis unit with anode buffer.
2. Turn on the circulation pump by plug the leads attached to DALTsix base unit. Only perform this operation once the tank contains buffer.
3. Connect an external thermostatic circulator (e.g. MultiTemp III) and set the temperature to 25ºC for a day run and to 30ºC for an overnight run.
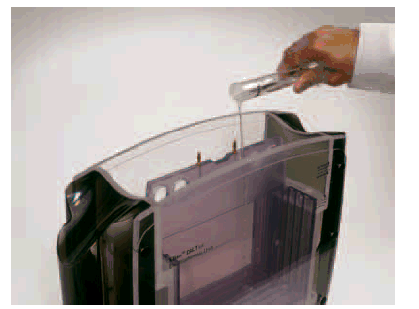
Table 6 lists the recommended conditions for running lab-cast gels using Ettan DALTsix system. Electrophoresis is performed at constant power in two steps. Stop electrophoresis when the dye front is approximately 1 mm from the bottom of the gel. Temperature control improves gel-to-gel reproducibility, especially if the ambient temperature of the laboratory fluctuates significantly. For best results, gels should be run at 25 °C. After electrophoresis, remove gels from their gel cassettes in preparation for staining or blotting.
Table 6. Recommended electrophoresis conditions for second-dimension vertical gels.
| Step | Current (mA) | Voltage (V) | Power (W) | Time (h) | |
|---|---|---|---|---|---|
| Day-run 1 mm thick gel |
1 2 |
10 40 |
80 500 |
1 13 |
1:00 4:30-6:00* |
| Day-run 1.5 mm thick gel |
1 2 |
15 60 |
80 500 |
1 13 |
1:00 4:30-6:00* |
| Overnight-run 1 mm thick gel |
1 2 |
10 12 |
80 150 |
1 2 |
1:00 15-17*,† |
| Overnight-run 1.5 mm thick gel |
1 2 |
15 18 |
80 150 |
1 2 |
1:00 15-17*,† |
* Continue the electrophoresis until the bromophenol blue reaches the end of the gel.
† To speed up the separation it is possible to change to day-run protocol when ever convenient.
Table 6 lists the recommended conditions for running DALT Gel 12.5 using Ettan DALTsix system. Electrophoresis is performed at constant power in two steps. Stop electrophoresis when the dye front is approximately 1 mm from the bottom of the gel. Temperature control improves gel-to-gel reproducibility, especially if the ambient temperature of the laboratory fluctuates significantly. For best results, gels should be run at 25 °C. After electrophoresis, remove gels from their gel cassettes in preparation for staining or blotting. Precast gels have a barcode, number, and gel percentage printed on them, which should be noted for orientation.
Table 6. Recommended electrophoresis conditions for second-dimension vertical gels.
| Step | Current mA/gel | Voltage (V) | Power (W/gel) | Time (h:min) | |
|---|---|---|---|---|---|
| DALT Gel 12.5 (1 mm thick gel, set temperature to 25°C) |
1 2 |
10 40 |
80 500 |
1 13 |
1:00 4:30-6:00* |
| Overnight runs (1 mm thick gel, set temperature to 30°C)** |
1 2 |
10 12 |
80 150 |
1 2 |
1:00 15-17* |
* Continue the electrophoresis until the bromophenol blue reaches the end of the gel.
** For the best possible resolution, faster separation time should be used. Use the faster protocol instead. Change to the day-run protocol when ever convenient.
Take out the gels from the refrigerator and keep gels at room temperature. Open the gel package and remove the gel. The DIGE gels come in glass cassettes and are ready to be used. Allow the gels to reach room temperature before use.
Loading of focused Immobiline DryStrips
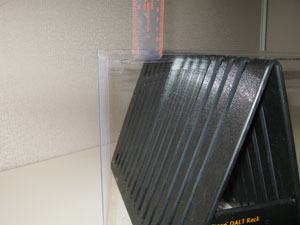
1. Place the gels in the Ettan DALT cassette rack.
2. Briefly rinse the Immobiline DryStrips by submerging them in a measuring cylinder containing SDS electrophoresis running buffer for Ettan DALT.
3. Holding one end of the Immobiline DryStrip with forceps, carefully place the Immobiline DryStrip in-between the two glass plates of the gel. Using a thin plastic spacer, push against the plastic backing of the Immobiline DryStrip (not the gel itself) and slide the strip between the two glass plates until it comes into contact with the surface of the gel.
Note: The strip should just rest on the surface of the gel. Avoid trapping air bubbles between strip and the gel and avoid piercing the second-dimension gel with the strip.
Note: The acidic end of the Immobiline DryStrip should be on the right side of the gel when the shorter of the two plates is facing the user.
Note: The gel face of the strip must not touch the opposite glass plate.
4. Melt an aliquot of agarose overlay solution in a heating block or boiling water bath for each Immobiline DryStrips. Allow the agarose to cool slightly and slowly pipette the molten agarose solution, along the upper surface of the gel, up to the top of the glass plate. Take care not to introduce bubbles. Do not allow the agarose to solidify.
5. Once the agarose solution has completely set the gel should be run in the second dimension as soon as practically possible.
The second-dimension vertical gel must be ready for use prior to Immobiline DryStrip gel equilibration.
Equilibration is carried out in a two-step process using tubes and volume of equilibration solution as specified in the table 1 below.
Preparatory steps
1. Place the IPG strips in individual tubes, with the support film toward the tube wall.
2. Prepare an appropriate volume of SDS equilibration buffer solution (see Table 2 below) then measure into two equal volumes. Add DTT to one portion (100 mg per 10 ml) and iodoacetamide to the other (250 mg per 10 ml).
Equilibration
1. Add the appropriate volume of SDS equilibration buffer (+ DTT) to each strip. Cap or seal the tubes with flexible paraffin film and place them on their sides on a rocker for the equilibration process. Equilibrate for 15 min.
2. Pour off buffer from above step and add the appropriate volume of SDS equilibration buffer (+iodoacetamide) to each strip. Again cap or seal the tubes with flexible paraffin film and place them on their sides on a rocker for the equilibration process. Equilibrate for an additional 15 min.
Note: Be consistent with the timing of the equilibration steps.
Note: The subsequent steps of gel assembly, preparation of electrophoresis unit, insertion of the gel into the precast gel cassette, and melting of the sealing solution can be performed as the Immobiline DryStrip gels are equilibrating, as long as the timeframes above are adhered to.
Table 1. Suggested containers and volumes of equilibration solution.
| Strip length (cm) | Container | Equilibration solution (ml) |
|---|---|---|
| 7 | Disposable, 15-ml conical tubes | 2.5 - 5 |
| 11 | 25 × 200 mm screw-cap culture tubes | 5 - 10 |
| 13 | 25 × 200 mm screw-cap culture tube | 5 - 10 |
| 18 | 25 × 200 mm screw-cap culture tube, Equilibration tubes or Petri dish | 10 - 15 |
| 24 | Equilibration tubes or Petri dish | 10 - 15 |
Table 2. SDS equilibration buffer solution.
(6 M urea, 75 mM Tris-HCl pH 8.8, 29.3% glycerol, 2% SDS, 0.002% bromophenol blue, 200 ml)*
| Final concentration | Amount | |
|---|---|---|
| Urea (FW 60.06) | 6 M | 72.1 g |
| Tris-HCl, pH 8.8** | 75 mM | 10.0 ml |
| Glycerol (87% w/w) | 29.3% (v/v) | 69 ml (84.2 g) |
| SDS (FW 288.38) | 2% (w/v) | 4.0 g |
| 1% Bromophenol blue stock solution | 0.002% (w/v) | 00 μl |
| Double-distilled water | - | to 200 ml |
* This is a stock solution. Just prior to use, add DTT or iodoacetamide (for first or second equilibration, respectively).
** For preparing the Tris-HCl, pH 8.8 solution see Table 3.
Store in 20- or 50-ml aliquots at -20 °C.
Table 3. 4× resolving gel buffer solution.
(1.5 M Tris base, pH 8.8, 1 l)
| Final concentration | Amount | |
|---|---|---|
| Tris base (FW 121.1) | 1.5 M | 181.7 g |
| Double-distilled water | - | 750 ml |
| HCI | - | adjust to pH 8.8 |
| Double-distilled water | - | to 1 l |
Filter solution through a 0.45-μm filter. Store at 4 °C.
1. Carefully insert the electrophoresis gels (Fig 8) and fill any empty slots with DALT blank cassette inserts.
Fig 8. Inserting the cassettes into the cassette carrier.
2. Sealing and filling the Upper buffer chamber.
Wet the Upper buffer chamber (UBC) sealings with buffer solution or 0.1% SDS (immerse the sealings in solution or spray the sealings of the UBC using a plant sprayer) and carefully slide the UBC over the gel cassettes. Do not move the UBC repeatedly up and down as this will reduce the sealing effect. Fill the UBC with 1.2 liters of 2x buffer and use a funnel to adjust the buffer level in the lower buffer chamber to the same height as in the UBC, by adding 1x buffer.
3. Hydrostatic balance.
By adjusting the buffer level in the Lower buffer chamber to be the same as the level in the UBC, you achieve a status called ‘hydrostatic balance’, where there will be no overall change in the levels of either buffer chamber during electrophoresis. This will also help to improve runs and minimize any possible ‘leakage’ from the UBC. See Fig 9.
Fig 9. Adjusting the buffer level.

The DALT gel cassettes have a “longer” glass plate. The cassette should be laid on the bench with the longer glass plate down, and the protruding edge oriented toward the operator (Fig 5).
Fig 5. Positioning an equilibrated Immobiline DryStrip gel on the DALT Precast Gel Cassette.
1. Position the Immobiline DryStrip gel
Dip the equilibrated Immobiline DryStrip gel in the SDS electrophoresis buffer (Table 4) to lubricate it. If using the DALT Gel 12.5, the diluted cathode buffer can be used to lubricate the strip.
Table 4. 1× Laemmli SDS electrophoresis buffer
(25 mM Tris base, 192 mM glycine, 0.1% SDS, 10 l)*
| Final concentration | Amount | |
|---|---|---|
| Tris base (FW 121.1) | 25 mM | 30.3 g |
| Glycine (FW 75.07) | 192 mM | 144.0 g |
| SDS (FW 288.38) | 0.1% (w/v) | 10.0 g |
| Double-distilled water | - | to 10 l |
* The pH of this solution should not be adjusted.
This solution can be prepared by diluting one volume of 10× Laemmli SDS buffer (solution F) with nine volumes of double-distilled water. Store at room temperature.
Place the strip with the acidic end to the left, gel surface up onto the protruding edge of the longer glass plate (Fig. 5)
2. Ensure Immobiline DryStrip gel has good contact
With a thin plastic ruler, gently push the Immobiline DryStrip gel down so that the entire lower edge of the Immobiline DryStrip gel is in contact with the top surface of the slab gel (Fig 6). Ensure that no air bubbles are trapped between the Immobiline DryStrip gel and the slab gel surface or between the gel backing and the glass plate.
Fig 6. Pushing the Immobiline DryStrip gel down to contact the gel slab.
3. Optional: Apply molecular weight marker proteins
Best results are obtained when the molecular weight marker protein solution is mixed with an equal volume of a hot 1% agarose solution prior to application to the IEF sample application piece. The resultant 0.5% agarose will gel and prevent the marker proteins from diffusing laterally prior to the application of electric current. Other alternatives are to apply the markers to a paper IEF sample application piece in a volume of 15–20 μl. For less volume, cut the sample application piece proportionally. Place the IEF application piece on a glass plate and pipette the marker solution onto it, then pick up the application piece with forceps and apply to the top surface of the gel next to one end of the Immobiline DryStrip gel. The markers should contain 200–1000 ng of each component for Coomassie staining and approximately 10–50 ng of each component for silver staining.
4. Seal the Immobiline DryStrip gel in place
The agarose sealing solution prevents the Immobiline DryStrip gel from moving or floating in the electrophoresis buffer. For precast DALT gels, the agarose blocks the narrow gap(s) between the gel edge(s) and the lateral spacer(s) to prevent leakage of the upper buffer. Prepare agarose sealing solution for DALT precast gels using the agarose sealing solution from the DALT Buffer Kit. If using the Laemmli buffer system, see Table 5. Melt each aliquot as needed in a 100 °C heat block (each gel will require 1–1.5 ml). It takes approximately 10 min to fully melt the agarose.
Table 5. Agarose sealing solution.
(25 mM Tris base, 192 mM glycine, 0.1% SDS, 0.5% agarose, 0.002% bromophenol blue, 100 ml)
| Final concentration | Amount | |
|---|---|---|
| Laemmli SDS electrophoresis buffer (see Table 1.) | 100 ml | |
| Agarose (NA or M) | 0.5% | 0.5 g |
| 1% Bromophenol blue stock solution | 0.002% (w/v) | 200 μl |
Add all ingredients into a 500-ml Erlenmeyer flask. Swirl to disperse. Heat in a microwave oven on low or on a heating stirrer until the agarose is completely dissolved. Do not allow the solution to boil over. Dispense 1.5-ml aliquots into screw-cap tubes. Store at room temperature.
Note: An ideal time to carry out this step is during Immobiline DryStrip gel equilibration.
Allow the agarose to cool until the tube can be held with your fingers (60 °C) and then slowly pipette the amount required to seal the Immobiline DryStrip gel in place (Fig 7). Pipette slowly to avoid introducing bubbles. Apply only the minimum quantity of agarose sealing solution required to cover the Immobiline DryStrip gel. Allow a minimum of 1 min for the agarose to cool and solidify.
Fig 7. Sealing the Immobiline DryStrip gel in place on a DALT precast gel using agarose sealing solution.
Consumables
| # | Product Name | Product Code | Price | |
|---|---|---|---|---|
| 1 | DIGE Buffer Kit | 28937452 | 358.00 USD |
Add to cart
|
| 3 | PlusOne Glycine | 17132301 | 71.57 USD |
Add to cart
|
| 4 | Tris | 17132101 | 120.41 USD |
Add to cart
|
| # | Product Name | Product Code | Price | |
|---|---|---|---|---|
| 2 | Sodium Dodecyl Sulfate | 17131301 | 75.15 USD |
Add to cart
|
| # | Product Name | Product Code | Price | |
|---|---|---|---|---|
| 2 | PlusOne Repel-Silane ES | 17133201 | 389.00 USD |
Add to cart
|
| # | Product Name | Product Code | Price | |
|---|---|---|---|---|
| 2 | LMW-SDS Marker Kit | 17044601 | 345.00 USD |
Add to cart
|
| 4 | HMW Native Marker Kit | 17044501 | 345.00 USD |
Add to cart
|
| 5 | Amersham ECL Full-Range Rainbow Molecular Weight Markers | 67610165 | 187.59 USD |
Add to cart
|
| 6 | Amersham ECL High-Range Rainbow Molecular Weight Markers | 67610166 | 154.85 USD |
Add to cart
|
| 7 | Amersham ECL Low-Range Rainbow Molecular Weight Markers | 67610167 | 154.85 USD |
Add to cart
|
| # | Product Name | Product Code | Price | |
|---|---|---|---|---|
| 4 | Iodoacetamide | 25900066 | 165.10 USD |
Add to cart
|
Accessories
| # | Product Name | Product Code | Price | |
|---|---|---|---|---|
| 2 | Mains cable, 120 V | 19244701 | 71.49 USD |
Add to cart
|
| 3 | Mains cable 220 V | 19244801 | 110.80 USD |
Add to cart
|
Spare parts
| # | Product Name | Product Code | Price | |
|---|---|---|---|---|
| 4 | Anode assembly/Cassette carrier | 80649135 | 959.00 USD |
Add to cart
|
| 5 | Pump repair kit 220 V | 80649116 | 294.00 USD |
Add to cart
|
| 6 | Tank chamber, DALTsix | 80649021 | 2,852.00 USD |
Add to cart
|
| 7 | Cooling tubing | 80110656 | 302.00 USD |
Add to cart
|
| 7 | Wonder wedge, molded | 80612788 | 107.37 USD |
Add to cart
|
| 7 | Quick fit connector set | 80649382 | 128.07 USD |
Add to cart
|
| # | Product Name | Product Code | Price | |
|---|---|---|---|---|
| 2 | Cooling tubing | 80110656 | 302.00 USD |
Add to cart
|
| 4 | Wonder wedge, molded | 80612788 | 107.37 USD |
Add to cart
|
| 9 | Quick fit connector set | 80649382 | 128.07 USD |
Add to cart
|
Troubleshooting
Find solutions to product related issues. For unlisted issues please contact local Cytiva service representation.
Stained gels
| Possible cause | Suggested remedy |
|---|---|
1. Use only highest quality reagents. |
| Possible cause | Suggested remedy |
|---|---|
1. Allow gel to polymerize completely. |
| Possible cause | Suggested remedy |
|---|---|
1. Check pH of cathode buffer. Should be between 8.3 and 8.8. |
| Possible cause | Suggested remedy |
|---|---|
1. Buffer depleted. Check pH of upper (cathode) buffer. Should be below pH 8.3-8.8. |
| Possible cause | Suggested remedy |
|---|---|
1. The gel pore size is too small. Decrease the %T. |
| Possible cause | Suggested remedy |
|---|---|
The molecular weight range of the sample requires an acrylamide concentration gradient to resolve the full range of proteins. |
| Possible cause | Suggested remedy |
|---|---|
1. Use reagents of the highest purity, preferably electrophoresis grade. |
Pre-cast gels
| Possible cause | Suggested remedy |
|---|---|
Interfering substances. Non-protein impurities in the sample can interfere with IEF, causing horizontal streaking. |
Modify sample preparation to limit these contaminants. |
Ionic detergent in sample. |
If the ionic detergent SDS is used in sample preparation, the final concentration must not exceed 0.25% after dilution into the rehydration solution. Additionally, the concentration of the nonionic detergent present must be at least eight times higher than the concentration of any ionic detergent to ensure complete removal of SDS from the protein. |
| Possible cause | Suggested remedy |
|---|---|
Impurities in agarose overlay or equilibration solution. |
Prepare fresh agarose overlay and equilibration solution. |
| Possible cause | Suggested remedy |
|---|---|
Sample is insufficient. Insufficient sample entered the Immobiline DryStrip gel due to poor sample solubilization. |
Increase the amount of sample applied. Increase the concentration of the solubilizing components in the sample solution. |
Sample contains impurities that prevent focusing. |
Increase the focusing time or modify the sample preparation method. |
The pH gradient is incorrectly oriented. |
The "+" end of the Immobiline DryStrip is the acidic end and should point toward the anode (+). |
(Flatbed gel format) Immobiline DryStrip gel is placed wrong side down on second-dimension gel. |
Ensure that the Immobiline DryStrip gel is placed gel-side down (plastic backing upward) on the SDS second-dimension gel. |
Detection method was not sensitive enough. |
Use another detection method (e.g. silver staining instead of Coomassie blue staining). |
Failure of detection reagents. |
Check expiry dates on staining solutions. Prepare fresh staining solutions. |
| Possible cause | Suggested remedy |
|---|---|
One of the slots in the upper buffer chamber is open. |
All 6 slots in the UBC should be occupied by either a gel cassette or a blank cassette insert. |
The UBC is damaged. |
Carefully fill both buffer chambers to the same level. |
Anodic buffer has mixed with cathodic buffer from overfilling of either the cathodic or the anodic reservoir. |
Ensure that the level of the anode (lower) buffer does not come above level of the buffer in the UBC when the electrophoresis unit is fully loaded. |
| Possible cause | Suggested remedy |
|---|---|
The top surface of the gel has been damaged during application of the IPG strip. |
Take care during application of the IPG strip that neither gel is damaged. |
Bubbles between the gel and the glass plate. |
Use the roller to remove any bubbles or excess liquid between the gel and the glass plate. Ensure that no visible bubbles remain and that the gel adheres firmly to the glass and resists movement. |
Liquid between the gel and the glass plate. |
Ensure that no visible bubbles remain and that the gel adheres firmly to the glass and resists movement. |
Interfering substances in the first dimension. |
Contaminants in the sample can cause distortions or swollen regions in the IPG strip following IEF. Modify sample preparation to limit these contaminants. See the 2-D Principles & Methods Guide |
| Possible cause | Suggested remedy |
|---|---|
There is an unfilled gap between the gel and one of the spacers. |
When sealing the IPG strip into place, ensure that some of the agarose sealing solution flows down any gap that may exist between the gel and spacer. |
| Possible cause | Suggested remedy |
|---|---|
The cassette was either not snapped shut properly, or, during the run, the snap came undone. This causes the precast gel to take up buffer and expand on the snap side (because it is no longer restricted by the cassette). The lowered current density through the wider thickness of the gel at the snap side will lead to dye and protein migrating slower on the snap side. Dye and protein also skew towards the now-opened hinge (current leak). |
It helps if the snap is dry before pressing it together. |
| Possible cause | Suggested remedy |
|---|---|
Bubbles between the gel and the glass plate. |
Use the roller to remove any bubbles or excess liquid between the gel and the glass plate. |
Liquid between the gel and the glass plate. |
Ensure that no visible bubbles remain and that the gel adheres firmly to the glass and resists movement. |
Interfering substances in the first dimension. |
Contaminants in the sample can cause distortions or swollen regions in the IPG strip following IEF. These distortions can result in turn in disturbances in the second dimension. |
| Possible cause | Suggested remedy |
|---|---|
Impurities in sample. |
Modify sample preparation. |
Impurities in rehydration solution components. |
Use only high-quality reagents. |
Bubble between Immobiline DryStrip gel and top surface the of second-dimension gel. |
Ensure that no bubbles are trapped between Immobiline DryStrip gel and the top surface of the second-dimension gel. |
(Flatbed gel format) Urea crystals on the surface of the Immobiline DryStrip gel. |
Allow residual equilibration solution to drain from the Immobiline DryStrip gel before placing the strip on the second-dimension gel. |
(Flatbed gel format) Bubbles under the Immobiline DryStrip gel. |
Ensure that the Immobiline DryStrip gel is placed firmly on the gel with no air bubbles trapped underneath. Stroke the plastic backing of the Immobiline DryStrip gel gently with a pair of forceps to remove trapped bubbles. |
| Possible cause | Suggested remedy |
|---|---|
Incorrectly prepared equilibration solution. |
Prepare equilibration solution according to instructions. |
Insufficient equilibration. |
Prolong equilibration time |
Poor transfer of protein from IPG strip to second dimension gel. |
1. IPG strip not properly placed on gel surface. Make sure IPG strip uniformly contacts the gel surface along its entire length |
| Possible cause | Suggested remedy |
|---|---|
IPG strip is not placed properly. |
Ensure that the plastic backing of the IPG strip is against the glass plate of the second dimension cassette. |
| Possible cause | Suggested remedy |
|---|---|
Incorrectly prepared equilibration solution. |
Prepare equilibration solution according to instructions. |
Poor transfer of protein from IPG strip to second dimension gel. |
Use low power for sample entry phase. Extend entry phase if necessary. |
| Possible cause | Suggested remedy |
|---|---|
Issues with the buffer circulation or pump |
1. Check circulation of the buffer. |
| Possible cause | Suggested remedy |
|---|---|
Bubbles between the gel and the glass plate. |
Use the roller to remove any bubbles or excess liquid between the gel and the glass plate. |
Liquid between the gel and the glass plate. |
Ensure that no visible bubbles remain and that the gel adheres firmly to the glass and resists movement. |
Gels run too fast resulting in uneven migration. |
Run at a lower power setting. Use a two-step program: Start at a low power setting until the proteins enter the gel, then increase the power for the remainder of the run. |
Depletion of anode buffer. |
1. Check buffer recipe and preparation. |
Imperfect seal along the snap side of the gel cassette. Current is leaking. |
Make sure the cassette is closed. If this problem persists, the use of mylar tape to seal the snap side has solved this problem. |
| Possible cause | Suggested remedy |
|---|---|
Streaking is related to the disappearance of the reducing agent from the basic part of the IPG strip, followed by oxidation of the protein thiol groups resulting in inter and intra chain -S-S-bonds. |
Use Destreak Reagent (17-6003-18, 17-6003-19). |
| Possible cause | Suggested remedy |
|---|---|
Sample is poorly soluble in rehydration solution. |
Increase the concentration of the solubilizing components in the rehydration solution |
Underfocusing. Focusing time was not long enough to achieve steady-state focusing. |
Prolong focusing time. |
| Possible cause | Suggested remedy |
|---|---|
(Flatbed gel format) Sample aggregation or precipitation. |
Dilute the sample and apply as a larger volume. |
| Possible cause | Suggested remedy |
|---|---|
Sample applied at too acidic pH |
Increase the concentration of IPG buffer in sample and Immobiline DryStrip. Add slightly more alkaline IPG buffer to the sample. |
Lab-cast gels
| Possible cause | Suggested remedy |
|---|---|
Sample applied at too acidic pH |
Increase the concentration of IPG buffer in sample and Immobiline DryStrip. Add slightly more alkaline IPG buffer to the sample. |
| Possible cause | Suggested remedy |
|---|---|
Uneven gel surface. |
Overlay the running gel with water-saturated butanol before polymerization begins to avoid forming an uneven gel surface. |
It has been found (with the Laemmli SDS-PAGE system) that the buffer in the cathode chamber was becoming depleted during the run. |
Double the concentration of Tris-glycine-SDS running buffer in the cathode chamber. |
Depletion of anode buffer. |
1. Check buffer recipe and preparation. |
Imperfect seal along the snap side of the gel cassette. Current is leaking. |
Make sure the cassette is closed. If this problem persists, the use of mylar tape to seal the snap side has solved this problem. |
| Possible cause | Suggested remedy |
|---|---|
Sample is insufficient. Insufficient sample entered the Immobiline DryStrip gel due to poor sample solubilization. |
Sample is insufficient. Insufficient sample entered the Immobiline DryStrip gel due to poor sample solubilization. |
Sample contains impurities that prevent focusing. |
Increase the focusing time or modify the sample preparation method. |
The pH gradient is incorrectly oriented. |
The "+" end of the Immobiline DryStrip is the acidic end and should point toward the anode (+). |
(Flatbed gel format) Immobiline DryStrip gel is placed wrong side down on second-dimension gel. |
Ensure that the Immobiline DryStrip gel is placed gel-side down (plastic backing upward) on the SDS second-dimension gel. |
Detection method was not sensitive enough. |
Use another detection method (e.g. silver staining instead of Coomassie blue staining). |
Failure of detection reagents. |
Check expiry dates on staining solutions. Prepare fresh staining solutions. |
| Possible cause | Suggested remedy |
|---|---|
Sample is poorly soluble in rehydration solution. |
Increase the concentration of the solubilizing components in the rehydration solution |
Underfocusing. Focusing time was not long enough to achieve steady-state focusing. |
Prolong focusing time. |
| Possible cause | Suggested remedy |
|---|---|
Impurities in agarose overlay or equilibration solution. |
Prepare fresh agarose overlay and equilibration solution. |
| Possible cause | Suggested remedy |
|---|---|
(Flatbed gel format) Sample aggregation or precipitation. |
Dilute the sample and apply as a larger volume. |
| Possible cause | Suggested remedy |
|---|---|
Interfering substances. Non-protein impurities in the sample can interfere with IEF, causing horizontal streaking. |
Modify sample preparation to limit these contaminants. |
Ionic detergent in sample. |
If the ionic detergent SDS is used in sample preparation, the final concentration must not exceed 0.25% after dilution into the rehydration solution. Additionally, the concentration of the nonionic detergent present must be at least eight times higher than the concentration of any ionic detergent to ensure complete removal of SDS from the protein. |
Electrical and mechanical equipment
| Possible cause | Suggested remedy |
|---|---|
Insufficient volume of buffer in upper reservoir. |
Ensure that the unit contains enough buffer to contact the upper electrode. |
Incorrect connected cables |
Check connections and cables |
Incorrect recipes |
Check buffer and gel recipes, and remake them, if necessary. |
| Possible cause | Suggested remedy |
|---|---|
Level of the buffer in the upper buffer chamber (i.e. the cathode buffer) drops during the run |
For precast gels and buffer kit: |
One or more UBC flaps are damaged allowing excessive mixing of cathode and anode buffers |
Check the UBC flaps |
| Possible cause | Suggested remedy |
|---|---|
Pump is not primed. |
Turn pump off and on to purge air bubbles. |
Pump is off. |
Turn on pump by plugging in the connector in the mains power outlet. |
Pump is broken. |
Please contact GE Healthcares service engineer |
| Possible cause | Suggested remedy |
|---|---|
Unlike the anode (tank) buffer, there is no active cooling of the cathode buffer in the upper buffer chamber. It is thus normal for the cathode buffer to end up as much as 10 °C warmer than the anode (tank) buffer. Since the cassettes are largely surrounded by the cooled anode buffer, the warm temperature of the cathode buffer does not appreciably affect electrophoretic migration (e.g. "smiling"). |
| Possible cause | Suggested remedy |
|---|---|
For precast gels and buffer kit: |
Gel casting
| Possible cause | Suggested remedy |
|---|---|
Gel caster is not correctly packed |
Properly pack the unit with glass cassettes and filler sheets. |
Polymerization issues |
Do not adjust the rate of polymerization. The gel will polymerize well as recommended. Adjusting things so the polymerization takes longer will make distortions worse. |
Vacuum is created |
Use the triangular gasket for casting homogeneous gels to avoid creating vacuum as the acrylamide polymerizes under the plates. |
Caster leakage. If there is leakage of the caster during polymerization, part of the gel may polymerize while the other end is leaking out |
Check for leakage. |
| Possible cause | Suggested remedy |
|---|---|
1. Add sucrose [15% (w/v)] or glycerol (25% (v/v)) to the high-percent monomer solution. |
| Possible cause | Suggested remedy |
|---|---|
1. Allow the solution to settle, or reach equilibrium, before applying the overlay. |
| Possible cause | Suggested remedy |
|---|---|
1. If gel polymerized too fast (<10 min), reduce the concentration of catalyst (APS and TEMED) by 25%. |
| Possible cause | Suggested remedy |
|---|---|
1. Check and adjust crosslinker concentration. Standard SDS gels should have a crosslinker concentration of |
| Possible cause | Suggested remedy |
|---|---|
Poor chemicals |
|
Solutions with extreme pH values (especially acidic) may not polymerize. |
- |
Oxygen is present |
Remove oxygen from the gel environment: Degas the monomer solution 5 to 10 minutes before pouring and then overlay the gel surface with water-saturated n-butanol. |
Gel solution has too low temperature |
Adjust the gel solution temperature to a minimum of 20 °C, especially for low %T (Total acrylamide concentration) gels. |
Too low concentration of TEMED or APS (Ammonium persulphate) |
Increase TEMED or APS concentration, or both |
| Possible cause | Suggested remedy |
|---|---|
1. Apply a light film of GelSeal compound to the foam gasket on the front plate before clamping and casting. |