The main cause of low protein recovery or yield during ion exchange chromatography is poor binding of the protein to the ion exchanger. There are several reasons for poor binding. Explore the five troubleshooting tips below for maximizing your protein binding and recovery with ion exchange chromatography.
| Your checklist to optimize protein binding during ion exchange chromatography (IEX) | ||
|---|---|---|
| About Isoelectric point (pI) |
|
|
| Ion exchanger |
|
|
| IEX buffer |
|
|
| Sample conditions |
|
|
| Column maintenance |
|
|
| Binding capacity |
|
|
Before we start: what is pI, the isoelectric point of a protein?
The isoelectric point (pI) is the pH at which a protein has no net charge. Ion exchange chromatography takes advantage of the fact that the relationship between net surface charge and pH is unique for a specific protein.
A protein that has no net charge at a pH equivalent to its isoelectric point (pI) will not interact with a charged resin. However, at a pH above its pl, a protein will bind to a positively charged ion exchange chromatography resin or anion exchanger. At a pH below its pI, a protein will bind to a negatively charged IEX resin or cation exchanger (Fig 1).
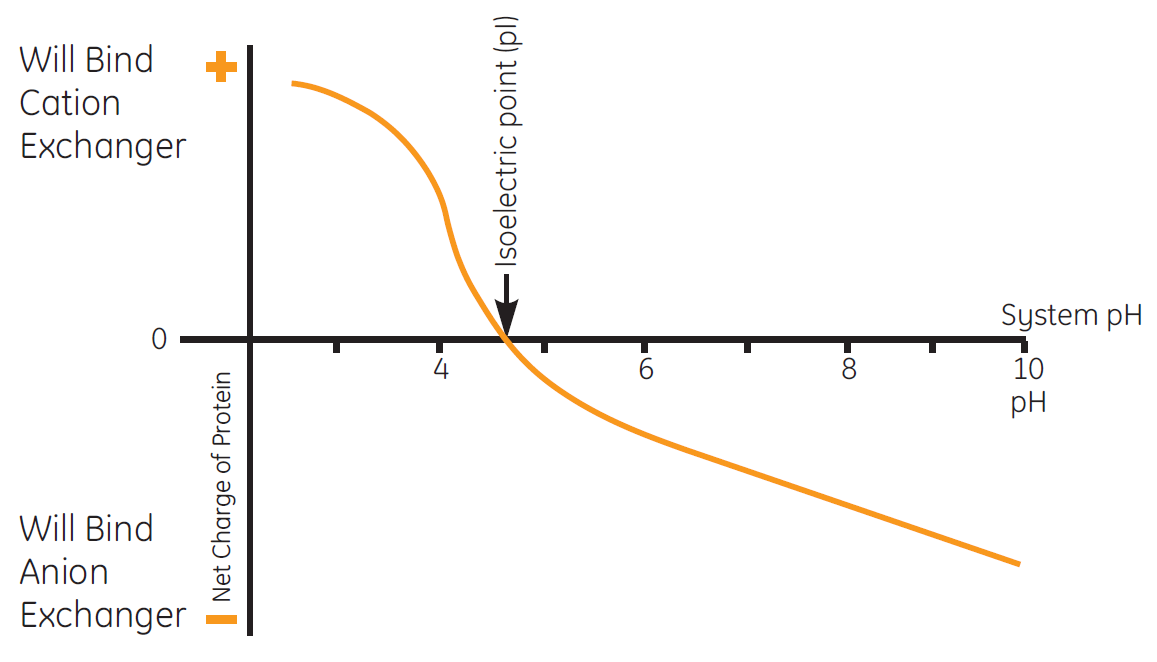
Fig 1. The isoelectric point (pI) of the protein is the pH where the protein is uncharged and therefore does not bind to any ion exchange resin.
Back to checklist
Select the correct ion exchanger for your protein
The functional groups used to create an ion exchange resin (Table 1) determine the charge of the resin, that is, a positively charged anion exchanger or a negatively charged cation exchanger.
Table 1. Functional groups used on ion exchangers
| Anion exchangers | Functional group | |
|---|---|---|
| Quaternary ammonium (Q) | strong | -CH2-N+-(CH3)3 |
| Diethylaminoethyl (DEAE)* | weak | -CH2-CH2-N+-(CH2-CH3)2 |
| Diethylaminopropyl (ANX)* | weak | -CH2-CH2-N+-(CH2-CH3)2 |
| Cation exchangers | Functional group | |
| Sulfopropyl (SP) | strong | -CH2-CH2-CH2-SO3- |
| Methyl sulfonate (S) | strong | -CH2-SO3- |
| Carboxymethyl (CM) | weak | -CH2-COO- |
* The active end of the charged group is the same for DEAE and ANX. The difference between them is in the length of the carbon chain of the charged group. DEAE has a diethylaminoethyl group bound to the agarose. ANX has a diethylaminopropyl group attached which prevents the formation of quaternary groups, giving a different selectivity compared to DEAE.
The terms strong and weak refer to the extent that the ionization state of the functional groups varies with pH. The terms strong and weak do not refer to the strength with which the functional groups bind to proteins.
Strong ion exchangers show no variation in ion exchange capacity with change in pH. These exchangers do not take up or lose protons with changing pH, remaining fully charged over a broad pH range. Strong ion exchangers include Q (anionic), S, and SP (cationic).
There are several advantages to working with strong ion exchangers:
- Development and optimization of separations is fast and easy since the charge characteristics of the resin do not change with pH.
- The mechanism of interaction is simple since there are no intermediate forms of charge interaction.
- Sample loading (binding) capacity is maintained at high or low pH since there is no loss of charge from the ion exchanger.
Weak ion exchangers can take up or lose protons with changing pH. As a result, their ion exchange capacity varies with pH. An advantage of a weak ion exchanger, such as DEAE (anionic), ANX (anionic), and CM (cationic) is that they can offer a different selectivity compared to strong ion exchangers.
When choosing an ion exchanger, there are two main scenarios, depending on whether you know your protein’s pI.
If the isoelectric point (pI) of your protein is known
The pI of the protein determines the buffer pH and the ion exchange column to use.
- At a buffer pH above its pI, a protein is negatively charged and will bind to an anion exchanger.
- At a buffer pH below its pI, a protein is positively charged and will bind to a cation exchanger.
If the isoelectric point (pI) of your protein is unknown
If you do not know the pI of your protein, it will not be obvious which pH buffer or ion exchange resin to use, since the charge of the protein at different pH values is unknown. Studies have shown that most cytoplasmic proteins in both prokaryotes and eukaryotes have pIs in the range of pH 5 to 6. Therefore, a good recommendation is to choose a strong anion exchanger at a neutral pH as a starting point, such as quaternary ammonium, or “Q” resins.
Another option is to use an ion exchange selection kit to screen for the most appropriate ion exchanger. The results from a screening of four different anion exchangers are shown in Figure 2.
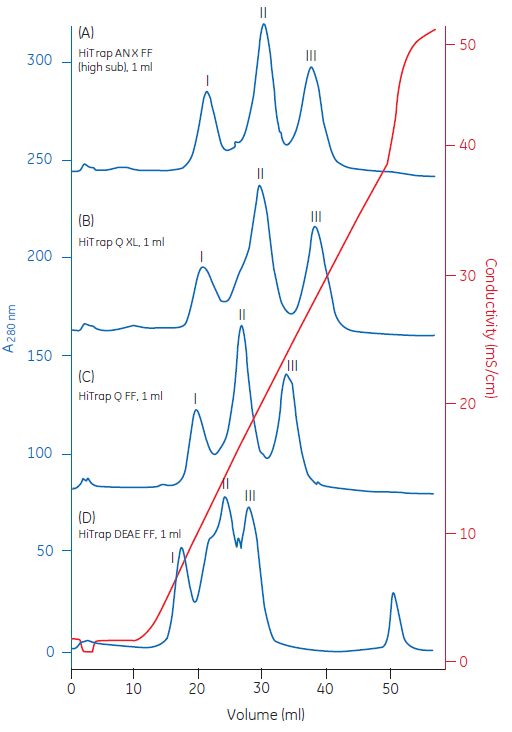
Fig 2. Ion exchange (IEX) selection kits can be used for screening multiple ion exchangers to determine the most appropriate resin to use. In this example, model proteins were used to show the different binding properties of the ion exchange ligands under identical conditions.
Back to checklist
Appropriate ion exchange chromatography buffer is crucial for protein binding
Buffer pH should not be too close to pI
The appropriate IEX buffer will help ensure proper protein binding. The choice of buffer depends both on your protein’s pI and its pH stability window (proteins are often unstable when pH = pI), as well as the type of ion exchanger.
The pH of the start buffer should be at least 0.5 pH unit above the pI of the target protein when using an anion exchanger. For cation exchangers, the pH of the start buffer should be at least 0.5 pH unit below the pI of the target protein.
Choose the right buffer ion
The choice of buffering ion is critical to protein binding. When a buffer contains the wrong buffering ion, it can prevent binding of the target protein to the resin. Therefore, choose a buffering ion with same charge as the resin to prevent it from interacting with the ion exchange process.
An exception to this rule is with the use of phosphate buffers with anion exchange separations. However, phosphate buffers used in anion exchange must be prepared carefully to ensure reproducibility between runs.
Figure 3 lists commonly used buffers for anion- and cation-exchange chromatography. Our recommendation is to use a buffer concentration that is sufficient to maintain buffering capacity, constant pH, and with an ionic strength sufficiently low. A buffer concentration of 20 to 50 mM usually meets these needs.
Buffers for anion exchange chromatography
Choose buffer at least 0.5 pH unit above pI
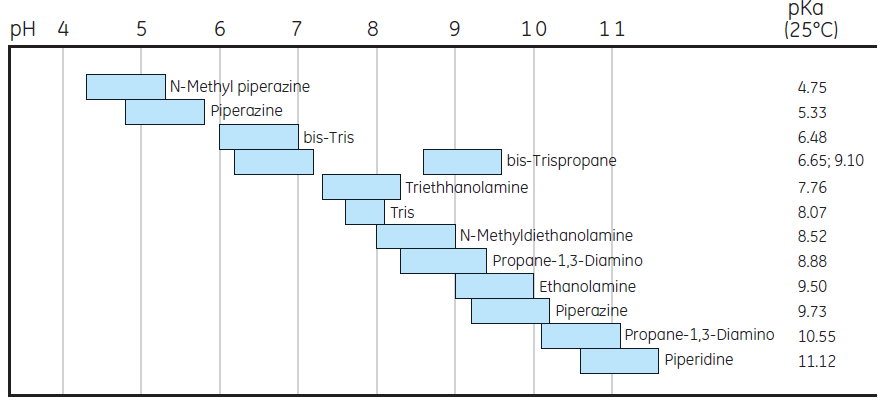
Buffers for cation exchange chromatography
Choose buffer at least 0.5 pH unit below pI
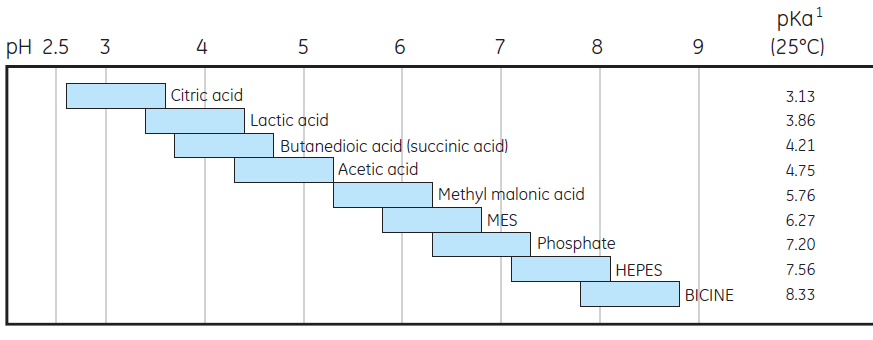
Fig 3. Commonly used buffers for anion and cation exchange chromatography.
Back to checklist
Use correct sample conditions during sample application to ensure protein binding
What happens if the sample conditions are not correct?
With incorrect conditions, a sample that should have bound to the column may be washed out during sample load and initial column wash (Fig 4).
Guidelines to obtain the right sample condition prior to ion exchange chromatography
After a suitable pH buffer and ion exchanger have been identified, the next step is to ensure correct binding conditions during sample application.
- The pH of the sample must be adjusted to match the pH of the chosen start buffer.
- The salt concentration of the sample must be below the salt concentration necessary for elution.
- The column must thoroughly equilibrated with the start or binding buffer.
Example of correct and incorrect sample preparation prior to ion exchange chromatography
Figure 4A shows a separation on an anion exchange column with a sample that has not been adjusted to the same pH as the starting buffer. The sample pH is more acidic, as can be seen by the dip in the pH curve. As a result, a large amount of sample is not bound to the column during sample loading and is washed out.
Figure 4B shows the same sample applied to the anion exchange column with the sample pH adjusted to match the pH of the starting buffer. The effects are clear.
The same result will be seen when samples with a high ionic strength are applied. If the ionic strength of the sample is the same or above the ionic strength necessary for elution, the sample will not bind and will be washed out with results like those seen in Figure 4A.
The sample buffer condition is particularly critical for larger sample volumes, for example when the sample volume is greater than the column volume. In this case, the column will become equilibrated with the sample buffer during sample application.
For smaller sample volumes, typically a tenth of the column volume, it is more important that the column has been thoroughly equilibrated with the correct starting buffer, since the sample will be strongly diluted into this buffer and will thereby have the correct conditions for binding.
How to obtain correct sample conditions
For optimum results, transfer samples into starting buffer prior to applying them to the column. This can be accomplished using a desalting column. If buffer exchange is not possible, be sure that the sample is near starting buffer pH, that the ionic strength is sufficiently low, and that the column is thoroughly equilibrated with starting buffer.
Sample was not adjusted to starting buffer pH
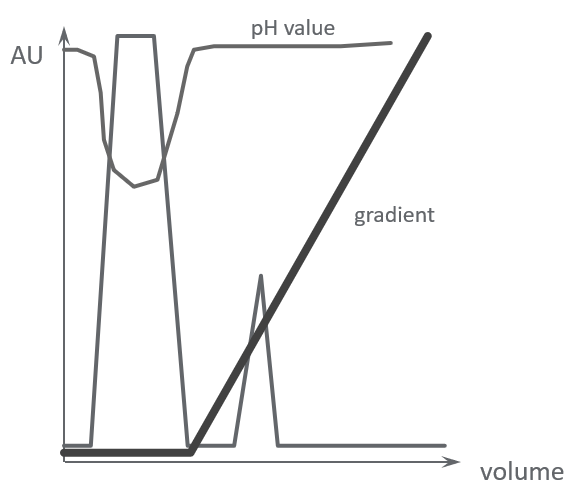
A. A large amount of sample is not bound to the column and is washed out
Sample was adjusted to the starting buffer pH
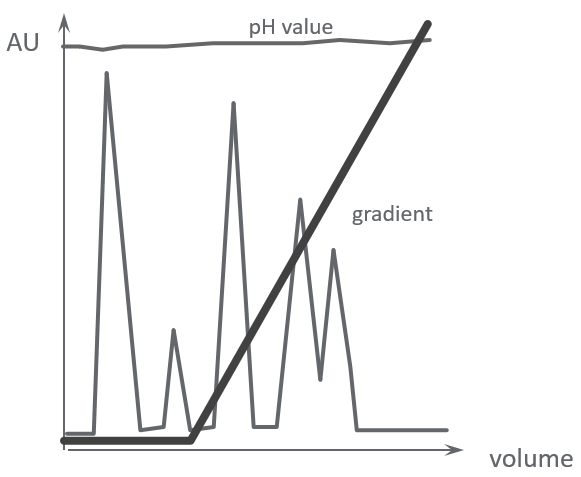
B. Sample is bound to the column
Fig 4. The sample must be at the correct pH to ensure binding to the ion exchange resin.
Back to checklist
Cleaning a dirty ion exchange chromatography column can restore the binding capacity
When an ion exchange column has been in use for some time, it needs to be cleaned to remove precipitated proteins or other contaminants that have built up in the column. Indeed, a dirty column can reduce the binding capacity of the ion exchange resin.
The need for cleaning may be indicated by the appearance of a colored band at the top of the column, a significant increase in back pressure, or a loss in resolution.
In the example shown below, a protein was purified from an E. coli lysate using a 1 mL ion exchange column (HiTrap Q HP). After the purification step (Fig 5A), the capacity was checked again, and the result showed that 23% of the capacity was lost (Fig 5B). By cleaning the column using 1 M NaOH (3 × 2 mL) the capacity was restored as seen to the right (Fig 5C). This example shows that it is important to regularly clean the column to maintain the column performance.
| (A) Fresh column | (B) After a purification step using 30 mL E. coli lysate as sample | (C) After cleaning the column with 1 M NaOH (3 x 2 mL) |
|---|---|---|
| Capacity:
62 mg ovalbumin/mL (100%) |
Capacity:
48 mg ovalbumin/mL (77%) |
Capacity:
59 mg ovalbumin/mL (95%) |
 |
 |
 |
Fig 5: Capacity for binding albumin on a fresh ion exchange column (A), after injection of 30 mL E. coli lysate (B) and after cleaning (C). Column: HiTrap Q HP 1 mL.
Back to checklist
Avoid protein loss by using an ion exchange resin with sufficient binding capacity
Low yield of your target protein can occur because the protein binding capacity of the ion exchange resin has been exceeded and the target protein goes straight through the column.
To increase binding capacity, use resins with high capacity, or use a larger amount of resin to bind your protein. You can also increase the binding capacity of the resin by optimizing the running conditions, such as pH, salt concentration, and flow rate. For more information, see this article about dynamic binding capacity (DBC).
If you are using HiTrap ion exchange columns, a convenient way to increase binding capacity is to connect up to three columns in a series (Fig 6). Note that the back pressure will be increased, so flow rate must be decreased. Another option to increase binding capacity is to use a larger prepacked column such as a HiPrep ion exchange column, which contains 20 mL of resin (Fig 6).
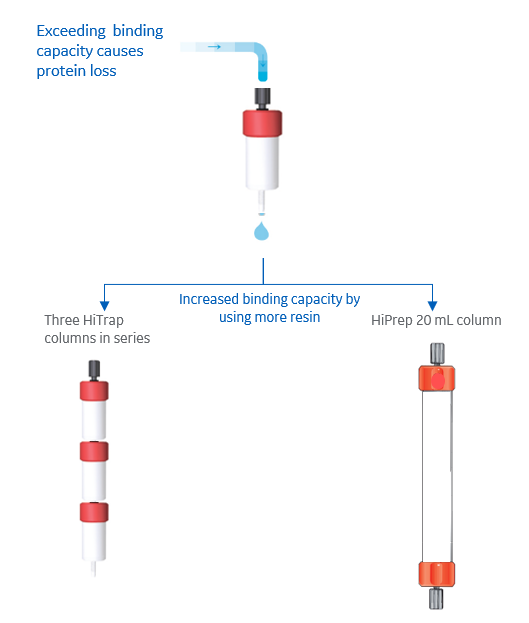
Fig 6. Increase binding capacity by increasing the amount of resin, either by using several columns in a series or by using a larger column.
If you are looking for more ion exchange chromatography tips, we encourage you to read our ion exchange chromatography handbook.
Back to checklist