Despite many advances in nucleic acid amplification tests (NAATs), PCR still lies at the heart of every laboratory that works with nucleic acids. From basic to applied research, PCR helps identify, sequence, or modify RNA and DNA.
But using even this well-established method can go wrong. PCR can create non-specific, false positives, heterogeneous products with different genetic mutations, and sometimes no product at all. How can you minimize these challenges in your work? The success of PCR arises from making suitable choices for the approach, design, reagents, and instruments you use.
Try our best practices for designing and implementing PCR and see if you can improve your data today.
1. Find the best approach for your PCR
We have access to so many approaches for PCR, including different detection methods, it can be easy to overlook an option that might work better for your application.
Conventional PCR
Conventional PCR detects the presence or absence of DNA at the end point of the reaction by means of intercalating dyes (e.g., ethidium bromide or SYBR™ Green).
As a simple and inexpensive technique, conventional PCR might be your method of choice for use in cloning, or detecting microorganisms in medicine, but it also plays a role in modern genomics by providing the means to amplify starting material for next-generation sequencing (NGS).
Quantitative PCR (qPCR)
Quantitative PCR (qPCR) or real-time (real-time PCR) can provide a fast, specific measurement of DNA amplification with the use of fluorescent probes.
You can also identify multiple DNA targets using different primers and probes in a multiplex PCR. Targeting several DNA regions in one reaction with a sample of known good quality can save cost and minimize false negatives.
For RNA, you can quantify through either a two-step or one-step process. However, with the potential for differences in quality across multiple samples, the one-step process makes it more challenging to compare between samples, and leaves no opportunity to repeat any failed PCR.
Table 1. Summary of the advantages and disadvantages of one-step and two-step reverse transcriptase PCR (RT-qPCR)
| Advantages | Disadvantages | |
|---|---|---|
| One-step RT-qPCR |
|
|
| Two-step RT-qPCR |
|
|
Both approaches rely on good quality sample extraction, ideally with a level of consistency that means you minimize time spent adjusting and optimizing reverse transcription.
Direct RT-PCR can address this challenge, enabling an extraction-free NAAT.
Find out more about our Direct RT-qPCR technology
Digital PCR
A recent development in PCR methods, digital PCR (dPCR) involves partitioning the PCR solution into tens of thousands of nano-liter sized droplets in which each droplet is a separate PCR.
Digital PCR enables the detection of smaller variations or uncommon events, and is more resistant to inhibitors than qPCR. The method is particularly well suited for detecting rare mutations or SNPs, and genome edits, but is less suitable than qPCR for identifying pathogens or studying gene expressions as it does not rely on establishing a standard curve.
2. Prepare high-quality nucleic acid
The quality of your PCR is related to the quality of the input nucleic acid. Making your own reagents can achieve good quality extractions. However, commercial kits can minimize variations and standardize the extraction process to give high yields even from the smallest samples.
Either approach can still carry over impurities that might influence or inhibit PCR. For example, phenol can degrade polymerases, while any ethylenediaminetetraacetic acid (EDTA) carried over from Tris-EDTA (TE) buffer could sequester magnesium ions from the reaction, reducing polymerase efficiency.
A low-quality extraction method might also carry over nucleases, which will degrade the sample. So, remember to check the A260/280 ratio by spectrophotometry, which should be approximately 2.0 for pure RNA and 1.8 for pure DNA. Lower values than this would suggest the presence of contaminants such as salts, phenol or proteins.
Optimizing the extraction procedure and choosing an appropriate elution buffer can help with these challenges.
You can also eliminate challenges with nucleic acid extraction by using direct RT-PCR which removes the need for a separate nucleic acid extraction step, and by so doing also improves the time to result and throughput. This approach is well suited for the fast, accurate, and sensitive detection of viral RNA directly from unpurified samples, such as SARS-CoV-2 viral RNA from nasopharyngeal swabs.
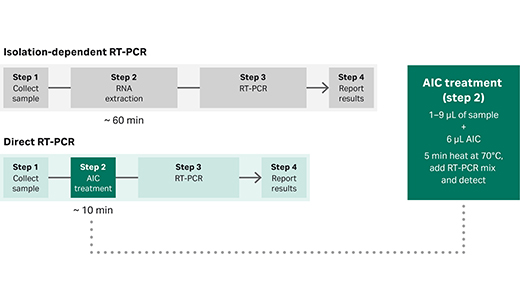
Fig 1. Comparison of isolation-dependent RT-PCR and Direct RT-PCR workflows.
Our direct RT-qPCR master mix kit includes an anti-inhibitor complex (AIC) that maintains the integrity of the RNA while the sample is lysed (Fig. 1).
Discover our Direct RT-qPCR master kit for extraction-free analysis of RNA
3. Take time to design appropriate primers and probes
Designing optimal primers can be a tricky business. There are several rules to follow that help avoid problems with primers self-annealing, primer dimers, and diverse melting temperatures (Tm) between the primer pairs.
Various online primer design tools will flag up the potential for these types of issues in your sequence.
So, what are the rules for primer design?
Primers need to:
- Be short (15-30 kb) oligonucleotide sequences.
- Be highly specific to the target region.
- Have minimal nucleotide repeats.
- Have low GC content (< 60%).
Adapt for high GC content
Guanine-cytosine (GC) content is an important consideration as a high GC content increases the melting point of the primers due to the increased stability of bonding, which can lead to secondary annealing.
If the template itself is GC-rich, using a reaction master mix designed for this can help. These master mixes usually contain additives, such as dimethyl sulfoxide (DMSO), and come with optimized polymerases.
Make splice junctions work for you
To study RNA, you need to synthesize cDNA, but how do you prevent amplifying any contaminating DNA?
While you could treat your sample with a nuclease, like DNase I, it might not remove all traces of contaminating DNA. Instead (or in addition), consider designing your primers to anneal across exon-exon junctions. This approach will make sure you only amplify cDNA and enable you to search for specific splice variants.
Similarly, to study DNA, you could consider using an RNase and avoid amplifying contaminating RNA by designing primers across exon-intron junctions.
4. Find the best suited probe
Intercalating dyes
Staining a gel with an intercalating dye, such as the classic choice of ethidium bromide, is a common way to check conventional PCR. Ethidium bromide is low cost, sensitive, and easy to use.
One issue to look out for when using intercalating dyes, however, is that they can form non-specific products when the target is in low abundance, increasing noise. In the case of SYBR Green, the dye can also inhibit PCR when present above a certain concentration.
An alternative to consider is EvaGreen™ dye, which is designed to produce lower background and higher signal, and has less of an inhibitory effect on PCR. These characteristics make it well suited for sensitive applications such as high-resolution genotyping.
Fluorescent probes
You have an extensive choice of fluorescently labeled oligonucleotide probes for designing your qPCR, including hydrolysis, molecular beacon, and dual hybridization probes. In each case, the probe should lie near one of the primers, with a slightly higher Tm (by 6–8°C) than the primers and a low GC content.
But is an intercalating dye or fluorescent probe the best option for qPCR? Compare the advantages and disadvantages in Table 2.
While designing these probes can be challenging, various online tools make this process relatively straightforward. Depending on the dyes calibrated by the qPCR cycler manufacturer to work on a particular instrument, you could design a duplex experiment. As an example, a 6-FAM labeled probe which emits at 517 nm can be multiplexed together with a Cy™ 3 or Cy™ 5 labeled probe, both of which emit at 564 nm and 670 nm respectively. If you were, instead, to design the duplex assay with a probe labeled with 6-JOE (which emits at 548 nm) and the other probe labeled with Cy™ 3, you risk getting signal crosstalk which can skew the data analysis.
Table 2. Comparison of advantages and disadvantages of intercalating dyes and fluorescent probes for qPCR
| Advantages | Disadvantages | |
|---|---|---|
| Intercalating dyes |
|
|
| Fluorescent probes |
|
|
5. Don’t forget the other reagents in your reaction!
Master mix kits have the basic components of DNA amplification pre-optimized, but when a PCR fails, it is worth considering the effect of each reagent on your specific reaction.
A typical master mix will contain:
- DNA polymerase
- dNTPs
- MgCl2
- Buffer (containing any additives)
DNA polymerase
Taq DNA Polymerase is the most well-known of the polymerases, and you might use it in a variety of conventional PCR experiments. It lacks proofreading capabilities, but Taq polymerase can be a good starting point for qPCR.
If you’re looking to amplify a GC-rich region, however, you could try a polymerase designed for those more difficult regions, such as Pfu DNA polymerase.
Similarly, if you are finding non-specific amplification to be a challenge, a hot-start polymerase, which is inactive below its optimum working temperature, can minimize non-specific amplification during set-up.
dNTPs
Nucleotides are usually added at equimolar amounts in a reaction, except in random mutagenesis applications where you might use unbalanced dNTPs to promote misincorporation.
For general use, however, dNTP concentration should be in the region of 0.2 mM. You can increase this concentration in proportion with any increases in MgCl2 you might require. However, you should not let dNTP concentration fall below 0.01 mM in your master mix to avoid losing PCR efficiency.
MgCl2
Magnesium is an essential cofactor for DNA polymerases and primer hybridization. As such, you can adjust the concentration to modulate PCR efficiency in relation to other components.
Try starting at 1–4 mM, and adjust in increments to optimize your reaction. A concentration of magnesium that is too low might lead to little or no PCR product, while a concentration that is too high will show as non-specific products in the reaction.
Buffer and additives
The buffer provides a suitable chemical environment for the activity of DNA polymerase and reduces DNA damage.
For example, dimethyl sulfoxide (DMSO) is a common additive that can reduce secondary structures created by GC-rich regions.
6. Enhance GC-rich region amplification
A few options to make amplifying GC-rich regions easier include:
- Increasing the melting temperature (though bear in mind the polymerase will start to denature more rapidly above 95°C).
- Perform your PCR with a titration of MgCl2 to find an optimum concentration for the target.
- Use an additive to reduce secondary structure formation, such as:
- 3–10% DMSO
- 1.25% formamide
- 5% DMSO and 1.25% formamide
- Betaine (2.2 M final concentration)
- Ethylene glycol (1.075 M final concentration)
- 1,2-propanediol (0.816 M final concentration)
Alternatively, a simpler option might be to select a robust commercial master mix designed with difficult-to-amplify regions in mind, such as our Cytiva RT-qPCR kit. These master mixes come with an optimized combination of reagents for efficient amplification.
In the case of our kit, we include the Cytiva RT-qPCR master mix in a lyophilized format.
Request a sample of our Cytiva RT-qPCR kit
7. Determine relevant controls
Make sure you have all the appropriate controls in place, including:
- A negative control (e.g., nuclease-free water) that replaces template DNA in a reaction.
- A positive control that is known to be carrying the target of interest.
- A no-RT control, which can help assess the presence of any contaminating nucleic acids.
- Housekeeping genes as endogenous references to control for sample-to-sample variation.
If you’re troubleshooting failed reactions, spiking the samples with an exogenous positive control can be useful for determining the presence of any PCR inhibitory factors.
8. Check available equipment and supplies
The thermal cycler is responsible for accurate and reproducible ramping of the sample temperature during each step of the PCR cycle. These machines might use either a heating block or air for rapid heating and cooling of the tubes.
Each model will provide a slightly different capability in terms of ramp rate and temperature consistency, so it can be important to check these fit your needs. Ramp rate, for example, might influence the production of non-specific products.
Some PCR machines provide a gradient function that enables optimization of different temperatures for each target PCR. You can assess temperature consistency across the entire block to see if it will affect your experiment, as cooler temperatures at the edges of the block can lead to PCR disparities.
Best practices yield reliable PCR results
While PCR is a decades-old technology, scientists continue to push the boundaries of what it can do. Use our best practices to design and fine-tune your PCR for optimal results. And should you run into unanticipated results, check back with this list to be sure you’ve made the best choices for PCR success.
At Cytiva, we provide a broad range of tools and solutions for DNA sample preparation and PCR. Visit our genomics blogs for news, tips, and insights. For support in any aspect of your workflow, contact our Scientific Support team.
- Nucleic acid isolation from clinical samples
- 10 top tips to help reduce the cost of your NGS workflow
- Technologies in molecular diagnostics: microarrays and NGS
- Unraveling the challenges of nucleic acid isolation
- Fundamentals in NGS sample preparation
- Sensitive detection of RNA and DNA
- Sensitive detection of viral RNA using direct RT-PCR chemistry