FAQ
How much DryStrip cover fluid should I apply to the different strip holders?
3 ml is sufficient for the Cup-Loading Strip Holder or 24-cm regular (fixed-length) strip holder and proportionately less for the smaller strip holders i.e., 2.3 ml for the 18-cm, 1.6 ml for the 13-cm, 1.4 ml for the 11-cm, and 0.9 ml for the 7-cm strip holder. Apply the volumes drop wise along the length of the strip holder and allow the cover fluid to flow evenly together.
Please note: In any case, do not exceed 6 ml for the Cup-Loading Strip Holder or 24-cm regular strip holder, or 4.5 ml for the 18-cm, 3.2 ml for the 13-cm, 2.7 ml for the 11-cm, or 1.7 ml for the 7-cm strip holder.
What samples have been labeled using the Ettan DIGE technology?
A. Mammalian cell lines, mammalian tissues, mammalian biopsy, bacteria, yeast, plant, Drosophila, and biological fluids such as plasma and serum.
Is there a recommended washing procedure for the instrument?
Use detergent and rinse well with water.
Caution: Do not leave the Immobiline DryStrip Kit Tray immersed in water.
The IPGphor specifications for the serial port connector refer to 2 types of devices, DTE or DCE. What are they?
DCE and DTE Devices
DTE stands for Data Terminal Equipment, and DCE stands for Data Communications Equipment. These terms are used to indicate the pin-out for the connectors on a device and the direction of the signals on the pins. Your computer is a DTE device, while most other devices are usually DCE devices.
The RS-232 standard states that DTE devices use a 25-pin male connector, and DCE devices use a 25-pin female connector. You can therefore connect a DTE device to a DCE using a straight pin-for-pin connection.
How do I remove a burn mark off the gold electrode area on the IPGphor 3 platform surface?
The cause of the burn mark is sparking/arcing when conductive liquid (probably an overflow of DryStrip cover fluid and rehydration solution/sample) ends up between the gold electrode surface and the bottom electrodes of the strip holder. Avoid overfilling the strip holder with cover fluid. Only about 3 ml is needed for the largest (24 cm) strip holders; use proportionately less for the smaller-sized strip holders. Also, dry the outsides of strip holders and the surface platform of the IPGphor before use.
If there is a burn mark on the gold electrode, it is very difficult to remove. This area has had a patch of the conductive gold foil removed by burning. No amount of polishing will bring it back. In fact, polishing would only remove more of the gold foil.
Note that this burn mark is only a cosmetic problem. It is sufficient to merely avoid contact between the electrodes on the strip holders and the burn mark on the platinum. This is easy to do, since the strip holder can move freely about the platform surface of the electrode.
Output voltage (i.e., the voltage during the run) fails to reach the set voltage limit. Why?
As with any power supply + electrophoresis unit setup only one limit can be reached at any one time. If the voltage limit isn't being reached it's because the power supply is at the current limit (50 µA per strip) or the power limit (12 W for the IPGphor). Which limit is reached is dependent upon the electrical load. In the case of the IPGphor, the "load" is the IPG strips and the conductivity they possess. IPG strips alone have little conductivity, so it is the sample and the additives which comprise the electrical load. Therefore, you can see that the failure to reach a set voltage limit is often due to a sample or additive being more conductive than expected.
Check the following:
1. Too many ionic impurities present in the sample or additives. A quick check = after focusing take out the IPG strip and view it from the edge. If the cathodic end of the IPG strip is fat and ragged then electroendosmosis (EEO) has occurred. EEO is exacerbated by the presence of charged contaminants so a fat and ragged cathodic end is indicative of the presence of charged contaminants.
2. If using the 7 cm IPG strips, 8000 V will probably never be attained. This is because the distance between the electrodes is shorter, so that the required voltage gradient (V/cm) is reached at a lower V. A voltage of between 3000 and 5000 V is normal at 50 µA per strip.
3. Check the IPGphor protocol settings:
b. Check that the actual number of strips in place is set.
c. Program a low voltage during the sample introduction period. Make allowances for salts to clear (shallow voltage ramps and paper pads at the electrodes).
4. Check for the presence of a short-circuit. See if the IPGphor can maintain 8000 V with no strip holders present at all, or with a dry and empty strip holder. Set it for 8000 V, 50 µA and 1 strip, Under these conditions, IPGphor running rev A software should run at 8000 V and about 20-25 µA. An IPGphor running rev B0 software or later should run at 8000 V and <10 µA. A lower voltage and/or higher current implies the presence of a short-circuit.
5. In rare circumstances, the strip holders themselves may have accumulated a layer of residue that carries excessive current. Recommend the following cleaning procedure: As soon as the run is complete, soak the strip holders in a mild (pH-neutral) dishwashing soap. Then, clean vigorously with IPGphor Strip Holder Cleaning Solution using a toothbrush or cotton swab. Rinse thoroughly with deionized water and allow to air dry.
Cup-loading vs. Rehydration. Why use cup loading?
Cup loading has been found to improve protein focusing patterns, particularly on basic IPG strips (pH 6-9 and 6-11). Under conditions where substantial water transport (electroendosmosis) accompanies focusing, such as with protein loads in excess of 1 mg, the faceup mode frequently yields better resolution.
Even after treatment of sample with the 2-D Clean-Up Kit, current is high and/or voltage is low during first dimension IEF. There are disturbances at the ends of the IPG strip. Why?
Check if the following are true:
1. Examine the IPG strip after focusing -- view the IPG strip from the edge. Is the cathodic end fat and ragged? Is the anodic end thin?
2. Was the voltage low during the first dimension IEF? That is, were the 8000 V limits never reached? (Exception: for 7-cm strips the maximum voltage attained will be in the 3000-5000 V range. This is normal.)
If those were true, then that indicates that there are charged contaminants still present during the first-dimension focusing step. These charged contaminants come from the various substances used to rehydrate the dried IPG strip. Consider the following:
1. Insufficient washing with wash buffer.
- a. Ensure that the pellet is thoroughly dispersed and vortex frequently during incubation with wash buffer. [Keep in mind that you just added a solution of acid to precipitate the proteins in your sample. Acid is charged material. Carefully remove all liquid above the pellet. Furthermore, a solid pellet at this stage "locks in" acids, salts and charged detergents that cannot be washed away by the wash buffer. Disperse the pellet in the wash buffer so that the protein is properly washed. If necessary, use the Sample Grinding Kit to completely disperse the pellet.]
b. Alternatively, insert this additional pellet wash step into the protocol, between steps 6 and 7. Add 40 µl Co-Precipitant on top of the pellet (for a larger sample size, add a volume that is 3 to 4 times the size of the pellet). Carefully reposition the tube in the centrifuge as before (i.e., cap/hinge facing outward). Centrifuge the tube again for 5 minutes. Using a pipette tip, remove and discard the supernatant.
2. Rehydrate the pellet in the recommended Rehydration Solution. Do not rehydrate in buffer, salts or charged detergents. Do not heat any rehydration solution that contains urea.
3. Check the quality of the additives used for solubility. Notably, urea can degrade easily to charged products. "Bad urea" should be deionized (over a mixed-bed ion-exchange resin such as Amberlite) or a new bottle of urea crystals should be acquired.
Running procedures
Table. Guidelines for running 7–24-cm Immobiline DryStrip gels on Ettan IPGphor II Isoelectric Focusing Unit. Running conditions: Temperature 20 °C; current 50 μA per strip except where noted. See footnotes for information specific to the different strip lengths.
7-cm strips
| pH intervals | Voltage mode | Voltage (V) | Time (h:min) | kVh |
|---|---|---|---|---|
|
3 - 11 NL 3 - 10 6 - 11 |
1 Step and Hold* 2 Gradient 3 Gradient 4 Step and Hold Total |
300 1000 5000 5000 |
0:30* 0:30 1:20 0:06 - 0:25 2:26 - 2:45 |
0.2 0.3 4.0 0.5 - 2.0 5.0 - 6.5 |
|
3 - 10 NL 4 - 7 3 - 5.6 NL |
1 Step and Hold* 2 Gradient 3 Gradient 4 Step and Hold Total |
300 1000 5000 5000 |
0:30* 0:30 1:30 0:12 - 0:36 2:42 - 3:06 |
0.2 0.3 4.5 1.0 - 3.0 6.0 - 8.0 |
| 7 - 11 NL |
1 Step and Hold* 2 Gradient 3 Gradient 4 Step and Hold Total |
300 1000 5000 5000 |
0:30* 1:00 1:30 0:20 - 0:55 3:20 - 3:55 |
0.2 0.7 4.5 1.6 - 4.6 7.0 - 10.0 |
|
5.3 - 6.5 6.2 - 7.5 |
1 Step and Hold* 2 Gradient 3 Gradient 4 Step and Hold Total |
300 1000 5000 5000 |
1:00* 1:00 2:30 0:45 - 1:30 5:15 - 6:00 |
0.2 0.7 7.5 3.6 - 7.6 12.0 - 16.0 |
* When running crude samples, step 1 may be extended up to 4 h to allow salt to migrate out of the strip at low voltage.
11-cm strips
| pH intervals | Voltage mode | Voltage (V) | Time (h:min) | kVh |
|---|---|---|---|---|
|
3 - 11 NL 3 - 10 6 - 11 |
1 Step and Hold* 2 Gradient 3 Gradient 4 Step and Hold Total |
500 1000 6000 6000 |
1:00 1:00 2:00 0:10 - 0:40 4:05 - 4:40 |
0.5 0.8 7.0 0.7 - 3.7 9.0 - 12.0 |
|
4 - 7 3 - 5.6 NL |
1 Step and Hold* 2 Gradient 3 Gradient 4 Step and Hold Total |
500 1000 6000 6000 |
1:00 1:00 2:30 0:10 - 0:50 4:40 - 5:20 |
0.5 0.8 8.8 0.9 - 4.9 11.0 - 15.0 |
| 7 - 11 NL |
1 Step and Hold* 2 Gradient 3 Gradient 4 Step and Hold Total |
500 1000 6000 6000 |
1:00 1:00 2:00 0:50 - 1:40 5:20 - 6:10 |
0.5 0.8 8.8 4.9 - 9.9 15.0 - 20.0 |
|
5.3 - 6.5 6.2 - 7.5 |
1 Step and Hold† 2 Gradient 3 Gradient 4 Step and Hold Total |
500 1000 6000 6000 |
1:00† 1:00 3:00 2:40 - 3:50 7:40 - 8:50 |
0.5 0.8 10.5 16.2 - 23.2 28.0 - 35.0 |
* When running crude samples, step 1 may be extended up to 4 h to allow salt to migrate out of the strip at low voltage.
† To convert this to a convenient overnight run, extend Step 1 to 6 h (3 kVh) and reduce step 4 by 3 kVh.
13-cm strips
| pH intervals | Voltage mode | Voltage (V) | Time (h:min) | kVh |
|---|---|---|---|---|
|
3 - 10 3 - 11 NL 6 - 11 |
1 Step and Hold* 2 Gradient 3 Gradient 4 Step and Hold Total |
500 1000 8000 8000 |
1:00 1:00 2:30 0:10 - 0:30 4:40 - 5:00 |
0.5 0.8 11.3 1.4 - 4.4 14.0 - 17.0 |
|
4 - 7 3 - 5.6 NL |
1 Step and Hold* 2 Gradient 3 Gradient 4 Step and Hold Total |
500 1000 8000 8000 |
1:00 1:00 2:30 0:25 - 0:55 4:55 - 5:25 |
0.5 0.8 11.3 3.4 - 7.4 16.0 - 20.0 |
| 7 - 11 NL |
1 Step and Hold* 2 Gradient 3 Gradient 4 Step and Hold Total |
500 1000 8000 8000 |
1:00 1:00 3:00 0:45 - 1:15 5:45 - 6:15 |
0.5 0.8 13.5 6.2 - 10.2 21.0 - 25.0 |
|
5.3 - 6.5 6.2 - 7.5 |
1 Step and Hold* 2 Gradient 3 Gradient 4 Step and Hold Total |
500 1000 8000 8000 |
1:00† 1:00 3:00 2:55 - 4:10 7:55 - 9:10† |
0.5 0.8 13.5 23.2 - 33.2 38.0 - 48.0 |
* When running crude samples, step 1 may be extended up to 4 h to allow salt to migrate out of the strip at low voltage.
† To convert this to a convenient overnight run, extend Step 1 to 6 h (3 kVh) and reduce step 4 by 3 kVh.
18-cm strips
Note: When using IPGphor Manifold and 10 kV, set current limit to 75 μA per strip and follow step 1, 2, 3b and 4b. Using IPGphor Regular Strip Holder or Cup Loading Strip Holder with the 18- and 24-cm strips, the maximum allowed voltage is 8000 V and current 50 μA per strip. Follow step: 1, 2, 3a, 4a.
| pH intervals | Voltage mode | Voltage (V) | Time (h:min) | kVh |
|---|---|---|---|---|
|
3 - 10 3 - 11 NL 6 - 11 |
1 Step and Hold 2 Gradient* 3a Gradient 4a Step and Hold 3b Gradient 4b Step and Hold Total |
500 1000 8000 8000 10000 10000 |
1:00 1:00 (8:00)* 3:00 0:46 - 1:30 3:00 0:20 - 0:55 |
0.5 0.8 (6.0) 13.5 6.2 - 12.2 16.5 3.2 - 9.2 21.0 - 27.0 |
|
3 - 10 NL 4 - 7 3 - 5.6 NL |
1 Step and Hold 2 Gradient* 3a Gradient 4a Step and Hold 3b Gradient 4b Step and Hold Total |
500 1000 8000 8000 10000 10000 |
1:00 1:00 (8:00)* 3:00 1:30 - 2:40 3:00 0:55 - 1:50 |
0.5 0.8 (6.0) 13.5 12.2 - 21.2 16.5 9.2 - 18.2 27.0 - 36.0 |
|
6 - 9 7 - 11 NL |
1 Step and Hold 2 Gradient* 3a Gradient 4a Step and Hold 3b Gradient 4b Step and Hold Total |
500 1000 8000 8000 10000 10000 |
1:00 1:00 (8:00)* 3:00 3:10 - 4:30 3:00 2:15 - 3:15 |
0.5 0.8 (6.0) 13.5 25.2 - 35.2 16.5 22.2 - 32.2 40.0 - 50.0 |
|
5.3 - 6.5 6.2 - 7.5 |
1 Step and Hold 2 Gradient* 3a Gradient 4a Step and Hold 3b Gradient 4b Step and Hold Total |
500 1000 8000 8000 10000 10000 |
2:00 2:00 (3:00)* 3:00 6:45 - 8:40 3:00 5:05 - 6:35 |
1.0 1.5 (2.2) 13.5 54 - 69 16.5 51 - 66 70.0 - 85.0 |
* When using the IPGphor Cup Loading Strip Holder, running crude samples, or when a more convenient overnight run of 15–17 h is desired, the time in step 2 can be prolonged up to 8 h with a duration of 6.0 kVh. Using this option, step 4 can be reduced by the added kVh in step 2, to reach the specified total kVh.
24-cm strips
Note: When using IPGphor Manifold and 10 kV, set current limit to 75 μA per strip and follow step 1, 2, 3b and 4b. Using IPGphor Regular Strip Holder or Cup Loading Strip Holder with the 18- and 24-cm strips, the maximum allowed voltage is 8000 V and current 50 μA per strip. Follow step: 1, 2, 3a, 4a.
| pH intervals | Voltage mode | Voltage (V) | Time (h:min) | kVh |
|---|---|---|---|---|
|
3 - 11 NL 3 - 10 |
1 Step and Hold 2 Gradient* 3a Gradient 4a Step and Hold 3b Gradient 4b Step and Hold Total |
500 1000 8000 8000 10000 10000 |
1:00 1:00 (8:00)* 3:00 2:30–3:45 3:00 1:45–2:45 |
0.5 0.8 (6.0)* 13.5 20–30 16.5 17.2–27.2 35–45 |
|
3 - 10 NL 4 - 7 3 - 5.6 NL |
1 Step and Hold 2 Gradient* 3a Gradient 4a Step and Hold 3b Gradient 4b Step and Hold Total |
500 1000 8000 8000 10000 10000 |
1:00 1:00 (7:00)* 3:00 3:45–5:36 3:00 2:45–4:15 |
0.5 0.8 (5.2)* 13.5 30–45 16.5 27.2–42.2 45–60 |
|
6 - 9 7 - 11 NL |
1 Step and Hold 2 Gradient* 3a Gradient 4a Step and Hold 3b Gradient 4b Step and Hold Total |
500 1000 8000 8000 10000 10000 |
1:00 1:00 (5:00)* 3:00 5:36–8:45 3:00 4:15–6:45 |
0.5 0.8 (3.8)* 13.5 45–70 16.5 42.2–67.2 60–85 |
| 3.5 - 4.5 |
1 Step and Hold 2 Gradient* 3a Gradient 4a Step and Hold 3b Gradient 4b Step and Hold Total |
500 1000 8000 8000 10000 10000 |
2:00 2:00 (5:00)* 3:00 9:10–10:30 3:00 7:05–8:05 |
1.0 1.5 (3.8)* 13.5 74–84 16.5 71–81 90.0–100 |
|
5.3 - 6.5 6.2 - 7.5 |
1 Step and Hold 2 Gradient* 3a Gradient 4a Step and Hold 3b Gradient 4b Step and Hold Total |
500 1000 8000 8000 10000 10000 |
2:00 2:00 (5:00)* 3:00 11:45–14:15 3:00 9:05–11:05 |
1.0 1.5 (3.8)* 13.5 94–114 16.5 91–111 110–130 |
* When using the IPGphor Cup Loading Strip Holder, running crude samples, or simply to adapt the run time to a convenient overnight run of 15–17 h, the time in step 2 can be prolonged by up to 8 h with a duration of 5.2 kVh. Using this option, step 4 can be reduced by the added kVh in step 2, to reach the specified total kVh.
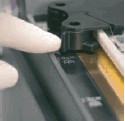
Fig 1. Positioning the manifold.
1. Position the manifold on the Ettan IPGphor platform. The small T-shaped protrusion fits into a cutout section of the Ettan IPGphor platform near the lid hinge.
2. Ensure that the manifold is level by placing the round spirit level on the center of the manifold tray after it is placed on the Ettan IPGphor unit.
3. Measure out 108 ml of Immobiline DryStrip Cover Fluid (even if fewer than 12 strips will be loaded into the manifold). Add the cover fluid evenly in the 12 manifold channels.
1. Select and prepare a rehydration solution .
Depending on sample and strip, select the appropriate rehydration solution. Three options are available:
• DeStreak Rehydration Solution with DeStreak reagent, urea, thiourea and CHAPS.
• 2× Sample buffer/rehydration solution stock 1, with urea, thiourea and CHAPS (recipe see Table 1).
• 2× Sample buffer/rehydration solution stock 2, with urea and CHAPS (recipe see Table 2).
DeStreak Rehydration Solution contains DeStreak reagent and optimized concentrations of urea, thiourea and CHAPS. DeStreak in the rehydration solution is recommended for strips with a pH above .
If sample is added in the rehydration solution (when performing In-Gel rehydration), DeStreak Rehydration Solution is not recommended. The pH is adjusted by addition of IPG Buffer with same pH interval as the IPG strip used.
Table 1. 2× Sample buffer/rehydration solution stock 1.
| Reagent | Quantity | Final concentration |
|---|---|---|
| Urea (Mr 60.06) | 10.5 g | 7 M |
| Thiourea (Mr 76.12) | 3.8 g | 2 M |
| CHAPS (Mr 614.89) | 0.5 g | 2% (w/v) |
| Distilled water | Make up to 25 ml |
Small aliquots (e.g. 2.5 ml) can be stored at -20ºC. Stable for 6 months.
Table 2. 2× Sample buffer/rehydration solution stock 2.
| Reagent | Quantity | Final concentration |
|---|---|---|
| Urea (Mr 60.06) | 12 g | 8 M |
| CHAPS (Mr 614.89) | 0.5 g | 2% (w/v) |
| Distilled water | Make up to 25 ml |
Small aliquots (e.g. 2.5 ml) can be stored at -20ºC. Stable for 6 months.
2. Place the IPGbox on a leveled table and place a Reswell Tray in the IPGbox.
3. Apply rehydration solution, see Table 3.
Note: For complete sample uptake, do not apply excess rehydration solution.
Table 3. Rehydration solution volume per Immobiline DryStrip gel.
| Immobiline DryStrip gel length (cm) | 7 | 11 | 13 | 18 | 24 |
| Total volume per strip1 (µl) | 125 | 200 | 250 | 340 | 450 |
1 Including sample, if applied.
4. Carefully pull off the cover film from Immobiline DryStrip gel and place Immobiline DryStrip gel into the slot, gel-side down. Distribute the rehydration solution evenly under the strip. Gently lift and lower the strip and slide it back and forth along the surface of the solution to get complete and even wetting of the entire gel.
Note: Ensure that no bubbles are trapped under the Immobiline DryStrip gel.
Fig 1. Example of IPG strips in a Reswell Tray.
5. Gently close the lid of the IPGbox and allow the Immobiline DryStrip gels to rehydrate at room temperature for 10-24 hours. Overnight is recommended.
6. Use the Immobiline DryStrip gels within 20 minutes of opening the IPGbox. Discard the used Reswell Tray.
Note: Do not store the Reswell Tray in IPGbox. Long time pressure of a Reswell Tray can reduce the life span of the IPGbox Insert.

1. A maximum of 150 μl of sample may be placed in these cups.
2. Check to make sure that there is cover fluid over the samples. When the sample is introduced into the cups, it will sink through the oil to the bottom of the cup and come into contact with the IPG strip.
3. Close the Ettan IPGphor lid.
4. Start the Ettan IPGphor from the Ettan IPGphor Control Software or Program and run the Ettan IPGphor from its own control panel display.
For detailed instructions on installation and usage of Ettan IPGphor Control Software, and also on computer instrument connection, please refer to the Ettan IPGphor Software User Manual.
For Creating, editing, and running protocol programs from the Ettan IPGphor control panel, please refer to the Ettan IPGphor 3 Instrument User Manual.
Fig 4. Load and cover samples.
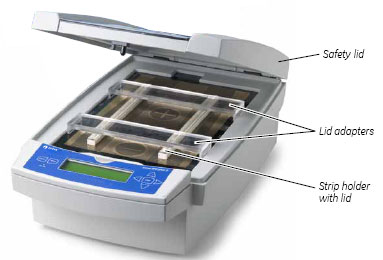
When using the IPGphor standard strip holders, lid adapters (see Fig. 11) must be used to apply the correct amount of pressure to the lids of the IPGphor strip holders. The pressure keeps the IPG strip in contact with the IPG strip holder electrodes.

Fig 11. Lid adapter.
To ensure good electrical contact when using the fixed length strip holder:
1. Apply two lid adapters right across the lids of the strip holders, one over the anodic area and the other over the cathodic area, see Fig 12.
Fig 12. Safety lid and lid adapters.
2. If running only one strip holder, place a second empty strip holder on the opposite side of the platform to balance the lid adaptor correctly (see Fig 12.). Distribute multiple stripholders evenly across the platform.
3. Carefully close the safety lid by applying light downwards pressure, ensure the mechanism locks the lid.
To inspect the run the light protective cover (see figure below) can be lifted without stopping the run.
Fig 13. To open the safety lid.
Press down the lid and the lock is released and the run is stopped. Close the lid and the run continues.
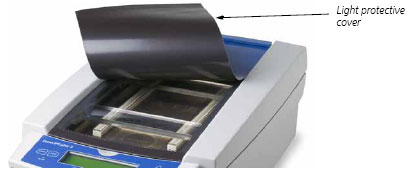
WARNING! Check that the high voltage is turned off before opening the safety lid. The HV ON indicator on the front panel should not light.
Fixed-length strip holders allow IPG strips to be rehydrated and samples loaded in one step before proceeding automatically to perform the separation. The IPG strips are 3 mm wide and 0.5 mm thick after rehydration.
Fig 1. Strip holder.
IMPORTANT! Handle the ceramic holders with care, as they are brittle and fragile.
1. Select the strip holder(s) corresponding to the IPG strip length chosen for the experiment
2. Wash each holder with the strip holder cleaning solution supplied to remove residual protein.
3. Rinse thoroughly with double distilled water.
4. Use a cotton swab or a lint-free tissue to dry the holder or allow it to air-dry. The holder must be completely dry before use.

If desired, the sample can be absorbed by the IPG strip under low voltage. This may improve the uptake of high molecular weight proteins.
To perform rehydration under voltage:
1. Set the rehydration time to 0:00 and program Step 1 of the protocol for low voltage (30 –100 V) for 10–12 h.
2. Program additional steps as desired to achieve complete focusing.

Fig 3. Remove protective film from Immobiline DryStrip gel, starting at the acid (+) end, to prevent damage of the basic end of the gel which is generally softer.
Fig 4. Position it with the gel.
1. Position it with the gel side down and the anodic (+) end of the strip directed toward the pointed end of the strip holder.
2. Anodic (+) end first, lower the strip onto the solution. To help coat the entire strip, gently lift and lower the strip and slide it back and forth along the surface of the solution, tilting the strip holder slightly as needed to assure complete and even wetting.
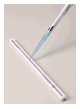
Fig 5. Lay entire IPG strip in the strip holder.
3. The anodic (+) end of the strip should be positioned as close to the top (pointed) end of the strip holder as posible. The gel can be visually identified once the rehydration solution begins to dye the gel. Be careful not to trap bubbles under the strip.
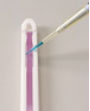
Fig 6. Protein sample can be applied at sample application well following the rehydration step if the protein sample was not included in the rehydration solution.

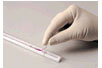
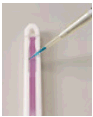
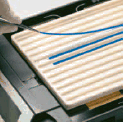
Fig 7. Apply Immobiline DryStrip Cover Fluid to minimize evaporation and urea crystallization.
1. Pipet the cover fluid drop wise into one end of the strip holder until one half of the strip is covered.
2. Then pipet the cover fluid drop wise into the other end of the strip holder, adding fluid until the entire IPG strip is covered.
Fig 8. Position the cover on the holder.
Pressure blocks on the underside of the cover ensure that the strip maintains good contact with the electrodes as the gel rehydrates.

The Ettan IPGphor platform has two electrode areas:
• The larger area is the positive electrode (anode)
• The smaller area is the negative electrode (cathode)
Position the strip holder on the platform as shown below: The pointed end of the holder is over the anode (pointing to the back of the unit) and the blunt end is over the cathode. Guide marks along the sides of the platform show approximate positioning for each strip holder size (7, 11, 13, 18, and 24 cm).
Fig 10. Ettan IPGphor 3 electrode areas.

Table. Guidelines for running 7–24-cm Immobiline DryStrip gels on Ettan IPGphor II Isoelectric Focusing Unit. Running conditions: Temperature 20 °C; current 50 μA per strip except where noted. See footnotes for information specific to the different strip lengths.
7-cm strips
| pH intervals | Voltage mode | Voltage (V) | Time (h:min) | kVh |
|---|---|---|---|---|
|
3 - 11 NL 3 - 10 6 - 11 |
1 Step and Hold* 2 Gradient 3 Gradient 4 Step and Hold Total |
300 1000 5000 5000 |
0:30* 0:30 1:20 0:06 - 0:25 2:26 - 2:45 |
0.2 0.3 4.0 0.5 - 2.0 5.0 - 6.5 |
|
3 - 10 NL 4 - 7 3 - 5.6 NL |
1 Step and Hold* 2 Gradient 3 Gradient 4 Step and Hold Total |
300 1000 5000 5000 |
0:30* 0:30 1:30 0:12 - 0:36 2:42 - 3:06 |
0.2 0.3 4.5 1.0 - 3.0 6.0 - 8.0 |
| 7 - 11 NL |
1 Step and Hold* 2 Gradient 3 Gradient 4 Step and Hold Total |
300 1000 5000 5000 |
0:30* 1:00 1:30 0:20 - 0:55 3:20 - 3:55 |
0.2 0.7 4.5 1.6 - 4.6 7.0 - 10.0 |
|
5.3 - 6.5 6.2 - 7.5 |
1 Step and Hold* 2 Gradient 3 Gradient 4 Step and Hold Total |
300 1000 5000 5000 |
1:00* 1:00 2:30 0:45 - 1:30 5:15 - 6:00 |
0.2 0.7 7.5 3.6 - 7.6 12.0 - 16.0 |
* When running crude samples, step 1 may be extended up to 4 h to allow salt to migrate out of the strip at low voltage.
11-cm strips
| pH intervals | Voltage mode | Voltage (V) | Time (h:min) | kVh |
|---|---|---|---|---|
|
3 - 11 NL 3 - 10 6 - 11 |
1 Step and Hold* 2 Gradient 3 Gradient 4 Step and Hold Total |
500 1000 6000 6000 |
1:00 1:00 2:00 0:10 - 0:40 4:05 - 4:40 |
0.5 0.8 7.0 0.7 - 3.7 9.0 - 12.0 |
|
4 - 7 3 - 5.6 NL |
1 Step and Hold* 2 Gradient 3 Gradient 4 Step and Hold Total |
500 1000 6000 6000 |
1:00 1:00 2:30 0:10 - 0:50 4:40 - 5:20 |
0.5 0.8 8.8 0.9 - 4.9 11.0 - 15.0 |
| 7 - 11 NL |
1 Step and Hold* 2 Gradient 3 Gradient 4 Step and Hold Total |
500 1000 6000 6000 |
1:00 1:00 2:00 0:50 - 1:40 5:20 - 6:10 |
0.5 0.8 8.8 4.9 - 9.9 15.0 - 20.0 |
|
5.3 - 6.5 6.2 - 7.5 |
1 Step and Hold† 2 Gradient 3 Gradient 4 Step and Hold Total |
500 1000 6000 6000 |
1:00† 1:00 3:00 2:40 - 3:50 7:40 - 8:50 |
0.5 0.8 10.5 16.2 - 23.2 28.0 - 35.0 |
* When running crude samples, step 1 may be extended up to 4 h to allow salt to migrate out of the strip at low voltage.
† To convert this to a convenient overnight run, extend Step 1 to 6 h (3 kVh) and reduce step 4 by 3 kVh.
13-cm strips
| pH intervals | Voltage mode | Voltage (V) | Time (h:min) | kVh |
|---|---|---|---|---|
|
3 - 10 3 - 11 NL 6 - 11 |
1 Step and Hold* 2 Gradient 3 Gradient 4 Step and Hold Total |
500 1000 8000 8000 |
1:00 1:00 2:30 0:10 - 0:30 4:40 - 5:00 |
0.5 0.8 11.3 1.4 - 4.4 14.0 - 17.0 |
|
3 - 10 NL 4 - 7 3 - 5.6 NL |
1 Step and Hold* 2 Gradient 3 Gradient 4 Step and Hold Total |
500 1000 8000 8000 |
1:00 1:00 2:30 0:25 - 0:55 4:55 - 5:25 |
0.5 0.8 11.3 3.4 - 7.4 16.0 - 20.0 |
| 7 - 11 NL |
1 Step and Hold* 2 Gradient 3 Gradient 4 Step and Hold Total |
500 1000 8000 8000 |
1:00 1:00 3:00 0:45 - 1:15 5:45 - 6:15 |
0.5 0.8 13.5 6.2 - 10.2 21.0 - 25.0 |
|
5.3 - 6.5 6.2 - 7.5 |
1 Step and Hold* 2 Gradient 3 Gradient 4 Step and Hold Total |
500 1000 8000 8000 |
1:00† 1:00 3:00 2:55 - 4:10 7:55 - 9:10† |
0.5 0.8 13.5 23.2 - 33.2 38.0 - 48.0 |
* When running crude samples, step 1 may be extended up to 4 h to allow salt to migrate out of the strip at low voltage.
† To convert this to a convenient overnight run, extend Step 1 to 6 h (3 kVh) and reduce step 4 by 3 kVh.
18-cm strips
Note: When using IPGphor Manifold and 10 kV, set current limit to 75 μA per strip and follow step 1, 2, 3b and 4b. Using IPGphor Regular Strip Holder or Cup Loading Strip Holder with the 18- and 24-cm strips, the maximum allowed voltage is 8000 V and current 50 μA per strip. Follow step: 1, 2, 3a, 4a.
| pH intervals | Voltage mode | Voltage (V) | Time (h:min) | kVh |
|---|---|---|---|---|
|
3 - 10 3 - 11 NL 6 - 11 |
1 Step and Hold 2 Gradient* 3a Gradient 4a Step and Hold 3b Gradient 4b Step and Hold Total |
500 1000 8000 8000 10000 10000 |
1:00 1:00 (8:00)* 3:00 0:46 - 1:30 3:00 0:20 - 0:55 |
0.5 0.8 (6.0) 13.5 6.2 - 12.2 16.5 3.2 - 9.2 21.0 - 27.0 |
|
3 - 10 NL 4 - 7 3 - 5.6 NL |
1 Step and Hold 2 Gradient* 3a Gradient 4a Step and Hold 3b Gradient 4b Step and Hold Total |
500 1000 8000 8000 10000 10000 |
1:00 1:00 (8:00)* 3:00 1:30 - 2:40 3:00 0:55 - 1:50 |
0.5 0.8 (6.0) 13.5 12.2 - 21.2 16.5 9.2 - 18.2 27.0 - 36.0 |
|
6 - 9 7 - 11 NL |
1 Step and Hold 2 Gradient* 3a Gradient 4a Step and Hold 3b Gradient 4b Step and Hold Total |
500 1000 8000 8000 10000 10000 |
1:00 1:00 (8:00)* 3:00 3:10 - 4:30 3:00 2:15 - 3:15 |
0.5 0.8 (6.0) 13.5 25.2 - 35.2 16.5 22.2 - 32.2 40.0 - 50.0 |
|
5.3 - 6.5 6.2 - 7.5 |
1 Step and Hold 2 Gradient* 3a Gradient 4a Step and Hold 3b Gradient 4b Step and Hold Total |
500 1000 8000 8000 10000 10000 |
2:00 2:00 (3:00)* 3:00 6:45 - 8:40 3:00 5:05 - 6:35 |
1.0 1.5 (2.2) 13.5 54 - 69 16.5 51 - 66 70.0 - 85.0 |
* When using the IPGphor Cup Loading Strip Holder, running crude samples, or when a more convenient overnight run of 15–17 h is desired, the time in step 2 can be prolonged up to 8 h with a duration of 6.0 kVh. Using this option, step 4 can be reduced by the added kVh in step 2, to reach the specified total kVh.
24-cm strips
Note: When using IPGphor Manifold and 10 kV, set current limit to 75 μA per strip and follow step 1, 2, 3b and 4b. Using IPGphor Regular Strip Holder or Cup Loading Strip Holder with the 18- and 24-cm strips, the maximum allowed voltage is 8000 V and current 50 μA per strip. Follow step: 1, 2, 3a, 4a.
| pH intervals | Voltage mode | Voltage (V) | Time (h:min) | kVh |
|---|---|---|---|---|
|
3 - 11 NL 3 - 10 |
1 Step and Hold 2 Gradient* 3a Gradient 4a Step and Hold 3b Gradient 4b Step and Hold Total |
500 1000 8000 8000 10000 10000 |
1:00 1:00 (8:00)* 3:00 2:30–3:45 3:00 1:45–2:45 |
0.5 0.8 (6.0)* 13.5 20–30 16.5 17.2–27.2 35–45 |
|
3 - 10 NL 4 - 7 3 - 5.6 NL |
1 Step and Hold 2 Gradient* 3a Gradient 4a Step and Hold 3b Gradient 4b Step and Hold Total |
500 1000 8000 8000 10000 10000 |
1:00 1:00 (7:00)* 3:00 3:45–5:36 3:00 2:45–4:15 |
0.5 0.8 (5.2)* 13.5 30–45 16.5 27.2–42.2 45–60 |
|
6 - 9 7 - 11 NL |
1 Step and Hold 2 Gradient* 3a Gradient 4a Step and Hold 3b Gradient 4b Step and Hold Total |
500 1000 8000 8000 10000 10000 |
1:00 1:00 (5:00)* 3:00 5:36–8:45 3:00 4:15–6:45 |
0.5 0.8 (3.8)* 13.5 45–70 16.5 42.2–67.2 60–85 |
| 3.5 - 4.5 |
1 Step and Hold 2 Gradient* 3a Gradient 4a Step and Hold 3b Gradient 4b Step and Hold Total |
500 1000 8000 8000 10000 10000 |
2:00 2:00 (5:00)* 3:00 9:10–10:30 3:00 7:05–8:05 |
1.0 1.5 (3.8)* 13.5 74–84 16.5 71–81 90.0–100 |
|
5.3 - 6.5 6.2 - 7.5 |
1 Step and Hold 2 Gradient* 3a Gradient 4a Step and Hold 3b Gradient 4b Step and Hold Total |
500 1000 8000 8000 10000 10000 |
2:00 2:00 (5:00)* 3:00 11:45–14:15 3:00 9:05–11:05 |
1.0 1.5 (3.8)* 13.5 94–114 16.5 91–111 110–130 |
* When using the IPGphor Cup Loading Strip Holder, running crude samples, or simply to adapt the run time to a convenient overnight run of 15–17 h, the time in step 2 can be prolonged by up to 8 h with a duration of 5.2 kVh. Using this option, step 4 can be reduced by the added kVh in step 2, to reach the specified total kVh.
1. With the electrode cams in the open position, position the electrode assembly on top of all the wicks. The electrode must be in contact with the wick.
2. Swivel the cams into the closed position under the external lip of the tray. The electrodes should not be moved while the cams are in the closed position.
Fig 3. Positioning electrode assembly.
Rehydration can proceed on the bench top or on the Ettan IPGphor unit platform. Ensure that the holder is on a level surface. A minimum of 10 h is required for rehydration; overnight is recommended.
Alternatively, the rehydration period can be programmed as the first step of an Ettan IPGphor protocol. This is especially convenient if temperature control during rehydration is a concern, or if a low voltage is applied during rehydration.
Note: Active rehydration (20-120 V) can also be performed if sample is included.
Recommended sample loads
It is usual to include your sample in rehydration buffer. Sample should be free of particulates and prepared to be free of buffer salts, and other ionic contaminants (e.g. use 2-D Clean-up kit)
Table 1. Suitable sample loads* for silver and Coomassie staining using cup loading and rehydration loading.
| Immobiline Dry Strip gel length (cm) | pH | Suitable sample load (μg of protein) Silver stain (analytical) |
Suitable sample load (μg of protein) Coomassie stain (preparative) |
|---|---|---|---|
| 7 | 3–11 NL, 3–10 NL, 3–10 4–7 3–5.6 NL, 5.3–6.5, 6.2–7.5, 6–11, 7–11 NL |
3–6 4–8 8–16 |
30–60 25–150 40–240 |
| 11 | 3–11 NL, 3–10 4–7 6–11, 3–5.6 NL, 5.3–6.5, 6.2–7.5, 7 –11 NL |
7–15 10–20 20–40 |
50–120 50–300 100–600 |
| 13 | 3–11 NL, 3–10 NL, 3–10 4–7 6–11 narrow and medium intervals† |
10–20 15–30 30–60 |
50–240 75–450 150–900 |
| 18 | 3–11 NL, 3–10 NL, 3–10 4–7 6–11, 6–9, narrow and medium intervals§ |
20–40 30–60 60–120 |
100–500 150–900 300–1500 |
| 24 | 3–11NL, 3–10 NL, 3–10 4–7, 3–7 NL 6–9, narrow and medium intervals§§ |
30–60 45–90 80–170 |
200–600 200–1300 400–2000 |
* When using cup loading, an increased sample concentration will lead to an increased risk of protein precipitation in the sample cup.The volume is limited to 100 ul in the sample cup and the sample concentration should not exceed 1 mg/ml.
† Immobiline DryStrip gels, pH intervals: 3–5.6 NL,5.3–6.5, 6.2–7.5, and 7–11 NL.
§ Immobiline DryStrip gels, pH intervals: 3–5.6 NL, 5.3–6.5, 6.2–7.5 and 7–11 NL.
§§ Immobiline DryStrip gels, pH intervals: 3–5.6 NL, 5.3–6.5, 6.2–7.5, 7–11 NL and 3.5–4.5.
Apply the rehydration solution
Fig 2. Apply appropriate volume rehydration solution to the Strip Holder.
For typical composition of rehydration solution see either Table 2 or Table 3. For the correct volume to each strip see Table 4.
Table 2. Urea rehydration stock solution.
(8 M urea, 2% CHAPS, 0.5/2% Pharmalyte or IPG Buffer, 0.002% bromophenol blue, 25 ml)*

| Final concentration | Amount | |
|---|---|---|
| Urea (FW 60.06) | 8 M† | 12 g |
| CHAPS‡ | 2% (w/v) | 0.5 g |
| Pharmalyte or IPG Buffer§ (same range as the IPG strip) |
0.5% (v/v) | 125 μl or 500 μl |
| 1% Bromophenol blue stock solution | 0.002% | 50 μl |
| Double-distilled water | - | to 25 ml (16 ml required) |
* DTT is added just prior to use: 7 mg DTT per 2.5-ml aliquot of rehydration stock solution. For rehydration loading, sample is also added
to the aliquot of rehydration solution just prior to use.
† If necessary, the concentration of urea can be increased to 9 M or 9.8 M.
‡ Other neutral or zwitterionic detergents may be used at concentrations up to 2% (w/v). Examples include Triton X-100, NP-40, octyl
glucoside, and the alkylamidosulfobetaine detergents ASB-14 and ASB-16 (Calbiochem).
§ As an alternative to IPG Buffer, use Pharmalyte 3–10 for Immobiline DryStrip 3–10 or 3–10 NL, Pharmalyte 5–8 for Immobiline DryStrip 4–7.
Store in 2.5-ml aliquots at -20 °C.
Table 3. Thiourea rehydration stock solution.
(7 M urea,2 M thiourea, 2% CHAPS, 0.5/2% Pharmalyte or IPG Buffer, 0.002% bromophenol blue, 25 ml)*
| Final concentration | Amount | |
|---|---|---|
| Urea (FW 60.06) | 7 M† | 10.5 g |
| Thiourea (FW 76.12) | 2 M | 3.8 g |
| CHAPS‡ | 2% (w/v) | 0.5 g |
| Pharmalyte or IPG Buffer | 0.5% (v/v) | 125 μl or 500 μl |
| 1% Bromophenol blue stock solution | 0.002% | 50 μl |
| Double-distilled water | - | to 25 ml (13.5 ml required) |
* DTT is added just prior to use: 7 mg DTT per 2.5-ml aliquot of rehydration stock solution. For rehydration loading, sample is also added to the aliquot of rehydration solution just prior to use.
‡ Other neutral or zwitterionic detergents may be used at concentrations up to 2% (w/v). Examples include Triton X-100, NP-40, octyl glucoside, and the alkylamidosulfobetaine detergents ASB-14 and ASB-16 (Calbiochem).
Store in 2.5-ml aliquots at -20 °C.
Table 4. Rehydration solution volume per Immobiline DryStrip gel.
| Immobiline DryStrip gel length (cm) | 7 | 11 | 13 | 18 | 24 |
| Total volume per strip1 (μl) | 125 | 200 | 250 | 340 | 450 |
1 Including sample, if applied.
1. Deliver the solution slowly at a central point in the strip holder channel away from the sample application wells.
2. Remove any larger air bubbles.
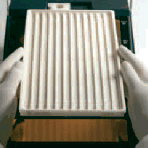
1. Transfer the strips to the Ettan IPGphor Cup Loading Manifold.
Fig 2. Ettan IPGphor Manifold is a accessory for Ettan IPGphor IEF unit allowing electrophoresis of large sample loads on IPG strip lengths from 7-24 cm.
2. Position the strips under the cover fluid face up in the tray with the anodic (+) end of the IPG strip pointing at the anode of the Ettan IPGphor.
3. Center the strip down the length of the manifold channel. Protrusions along the sides guide the strip approximately straight, although some manual adjustment of the strip may be necessary
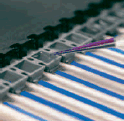
Sample cups
1. Position a strip of sample cups in the appropriate position, for example ~1 cm from the end of the gel portion of the IPG strip. Do NOT place the cup with the feet over a center protrusion.
2. Ensure that the feet of the cups are properly seated at the bottom of the channel. Use the insertion tool, wiggle the tool gently while pushing it down.
3. Fill the cups with cover fluid to test for proper seating of the cups.
4. Remove the cover fluid after 10 minutes.
Electrode paper wicks
1. Add 150 μl distilled water to each paper wick.
2. Position the wicks on each end of the IPG strips so that one end of the wick overlaps the end of the gel on the IPG strip.
If the sample was not applied by inclusion in the rehydration solution, it can be applied immediately prior to IEF.
Note: The IPG strip backing is impermeable; do not apply the sample to the back of the strip.
Fig 9. Applying sample after rehydration
1. Prepare the sample in a solution similar in composition to the rehydration solution used.
2. Pipet the sample into either or both of the lateral wells at either end of the strip holder. Introduce the sample below the cover fluid.
Up to 7.5 μl of sample solution can be added to each side (i.e. 15 μl per well or 30 μl max. if both sides of both wells are used).
Accessories
| # | Product Name | Product Code | Price | |
|---|---|---|---|---|
| 1 | Cable serial 9 pin F/F with null modem adaptor | 80650636 | 119.75 USD |
Add to cart
|
| 2 | Equilibration tubes | 80646779 | 91.01 USD |
Add to cart
|
| # | Product Name | Product Code | Price | |
|---|---|---|---|---|
| 1 | Strip holder 7 cm | 80641611 | 3,417.00 USD |
Add to cart
|
| 1 | Strip holder 7 cm | 80641687 | 665.00 USD |
Add to cart
|
| 2 | Strip holder 11 cm | 80641630 | 3,538.00 USD |
Add to cart
|
| 2 | Strip holder 11 cm | 80641706 | 684.00 USD |
Add to cart
|
| 3 | Strip holder 13 cm | 80641649 | 3,810.00 USD |
Add to cart
|
| 3 | Strip holder 13 cm | 80641725 | 741.00 USD |
Add to cart
|
| 4 | Strip holder 18 cm | 80641668 | 4,161.00 USD |
Add to cart
|
| 4 | Strip holder 18 cm | 80641744 | 800.00 USD |
Add to cart
|
| 5 | Strip holder 24 cm | 80646988 | 5,420.00 USD |
Add to cart
|
| 5 | Strip holder 24 cm | 80647007 | 1,051.00 USD |
Add to cart
|
| # | Product Name | Product Code | Price | |
|---|---|---|---|---|
| 1 | Strip holder cover, 7 cm | 80645544 | 139.63 USD |
Add to cart
|
| # | Product Name | Product Code | Price | |
|---|---|---|---|---|
| 1 | Ettan™ IPGphor™ Manifold, complete | 80649838 | 7,051.00 USD |
Add to cart
|
| 2 | Ettan™ IPGphor™ Cup Loading Manifold Light with Plastic Tray | 11002688 | 2,082.00 USD |
Add to cart
|
| # | Product Name | Product Code | Price | |
|---|---|---|---|---|
| 1 | IPGbox | 28933465 | 510.00 USD |
Add to cart
|
| 2 | IPGbox Kit | 28933492 | 102.01 USD |
Add to cart
|
| # | Product Name | Product Code | Price | |
|---|---|---|---|---|
| 1 | IPGbox | 28933465 | 510.00 USD |
Add to cart
|
| 2 | IPGbox Kit | 28933492 | 102.01 USD |
Add to cart
|
Consumables
| # | Product Name | Product Code | Price | |
|---|---|---|---|---|
| 2 | Immobiline DryStrip pH 3-10, 7 cm | 17600111 | 157.95 USD |
Add to cart
|
| 3 | Immobiline DryStrip pH 3-10NL, 7 cm | 17600112 | 157.95 USD |
Add to cart
|
| 4 | Immobiline DryStrip pH 3-11NL, 7 cm | 17600373 | 166.06 USD |
Add to cart
|
| 5 | Immobiline DryStrip pH 4-7, 7 cm | 17600110 | 157.95 USD |
Add to cart
|
| 7 | Immobiline DryStrip pH 6-11, 7 cm | 17600194 | 323.00 USD |
Add to cart
|
| 11 | Immobiline DryStrip pH 3-10, 11 cm | 18101661 | 166.06 USD |
Add to cart
|
| 12 | Immobiline DryStrip pH 3-11 NL, 11 cm | 17600374 | 166.06 USD |
Add to cart
|
| 13 | Immobiline DryStrip pH 4-7, 11 cm | 18101660 | 166.06 USD |
Add to cart
|
| 15 | Immobiline DryStrip pH 6-11, 11 cm | 17600195 | 496.00 USD |
Add to cart
|
| 19 | Immobiline DryStrip pH 3-10, 13 cm | 17600114 | 208.00 USD |
Add to cart
|
| 20 | Immobiline DryStrip pH 3-10NL, 13 cm | 17600115 | 208.00 USD |
Add to cart
|
| 21 | Immobiline DryStrip pH 3-11 NL, 13 cm | 17600375 | 208.00 USD |
Add to cart
|
| 22 | Immobiline DryStrip pH 4-7, 13 cm | 17600113 | 208.00 USD |
Add to cart
|
| 24 | Immobiline DryStrip pH 6-11, 13 cm | 17600196 | 622.00 USD |
Add to cart
|
| 28 | Immobiline DryStrip pH 3-10 L, 18 cm | 17123401 | 208.00 USD |
Add to cart
|
| 29 | Immobiline DryStrip pH 3-10 NL,18 cm | 17123501 | 208.00 USD |
Add to cart
|
| 30 | Immobiline DryStrip pH 4-7, 18 cm | 17123301 | 208.00 USD |
Add to cart
|
| 30 | Immobiline DryStrip pH 3-11 NL, 18 cm | 17600376 | 208.00 USD |
Add to cart
|
| 33 | Immobiline DryStrip pH 6-11, 18 cm | 17600197 | 386.00 USD |
Add to cart
|
| 38 | Immobiline DryStrip pH 3-10, 24 cm | 17600244 | 243.00 USD |
Add to cart
|
| 39 | Immobiline DryStrip pH 3-10 NL, 24 cm | 17600245 | 243.00 USD |
Add to cart
|
| 40 | Immobiline DryStrip pH 3-11 NL, 24 cm | 17600377 | 243.00 USD |
Add to cart
|
| 42 | Immobiline DryStrip pH 4-7, 24 cm | 17600246 | 243.00 USD |
Add to cart
|
| 44 | Immobiline DryStrip pH 6-9, 24 cm | 17600247 | 543.00 USD |
Add to cart
|
| # | Product Name | Product Code | Price | |
|---|---|---|---|---|
| 1 | Cleaning Sol IPGPhor Strip Holder 1L | 29011927 | 89.50 USD |
Add to cart
|
| 2 | DeStreak Reagent | 17600318 | 94.77 USD |
Add to cart
|
| 3 | DeStreak Rehydration Solution | 17600319 | 193.49 USD |
Add to cart
|
| 5 | IPG Buffer pH 3–10 | 17600087 | 84.24 USD |
Add to cart
|
| 6 | IPG Buffer pH 3–10 NL | 17600088 | 84.24 USD |
Add to cart
|
| 7 | IPG Buffer pH 3–11 NL | 17600440 | 94.77 USD |
Add to cart
|
| 9 | IPG Buffer pH 4–7 | 17600086 | 84.24 USD |
Add to cart
|
| 11 | IPG Buffer pH 6–11 | 17600178 | 84.24 USD |
Add to cart
|
Spare parts
| # | Product Name | Product Code | Price | |
|---|---|---|---|---|
| 1 | Lid adaptor | 28400841 | 146.63 USD |
Add to cart
|
| 3 | Mains cable, 120 V | 19244701 | 71.49 USD |
Add to cart
|
| 4 | Mains cable 220 V | 19244801 | 110.80 USD |
Add to cart
|
| 5 | USB to RS-232 Adapter | 28400145 | 223.00 USD |
Add to cart
|
Troubleshooting
Find solutions to product related issues. For unlisted issues please contact local Cytiva service representation.
Select symptom:
| Possible cause | Suggested remedy |
|---|---|
Lid open |
The safety lid is not properly closed. When the safety lid is open, the system has an automatic voltage cutoff safety feature. In order for the protocol to proceed, the safety lid must be closed. |
Locked screen in edit mode |
Turn off the mains power switch to reset the instrument. |
Blank display |
If no electrical components are functioning (e.g. HV lamp does not light and the cooling fans are motionless). |
Diagnostic program indicates component failure |
Note the component that failed and press the START key to continue through the diagnostic program. Call your local Cytiva service for further information on how to remedy the failure. |
Arc |
An electric arc has been detected. The instrument will reduce the voltage setting 500 volts automatically. The run continues, and there is no need for further action. |
| Possible cause | Suggested remedy |
|---|---|
- |
Try to reload the software. If reloading doesn't solve the issue please contact you local Cytiva service engineer. |
| Possible cause | Suggested remedy |
|---|---|
Too much cover fluid was applied |
Too much cover fluid was applied to the strip holder and it wicked out under the lid via capillary action. Apply less cover fluid. |
Excessive amounts of charged contaminants |
Excessive amounts of charged contaminants leads to EEO and migration of the oil to the cathode. Clean up the sample. |
| Possible cause | Suggested remedy |
|---|---|
Hydrophobic interaction between the sample components (water, urea, etc) and the ceramic surface of the strip holder |
The wicking can be minimized by immediately placing the IPG strip into the strip holder after laying down the rehydration solution (including sample). Then, immediately add the DryStrip Cover Fluid. |
| Possible cause | Suggested remedy |
|---|---|
Strip holders not sufficient cleaned |
Clean the strip holders after each first-dimension IEF run. Do not let solutions dry in the strip holder. Cleaning may be more effective if the strip holders are first soaked a few hours to overnight in a solution of 2-5% IPGphor Strip Holder Cleaning Solution in water. |
| Possible cause | Suggested remedy |
|---|---|
Conductivity of the sample/IPG strips is too high |
Ensure that the sample is adequately desalted and that additives are neutral (and haven't degraded). Salts pool at the ends of the strips, and then water migrates towards the ends of the strips, too, in order to try to dilute out the salts. The center of the strips dries out and arcing can occur across this gap. |
IPG strip dried out |
IPG strip dried out because the strip was not submerged in DryStrip Cover Fluid. |
| Possible cause | Suggested remedy |
|---|---|
Too much cover fluid was applied |
Do not exceed 6 ml (preferably, use 3 ml) of cover fluid for the Cup-Loading Strip Holder, or the cover fluid will completely wick out (i.e., via capillary action) onto the surface of the IPGphor via the electrode holders on the strip holder. |
Salt or Tris in the sample |
Eliminate salt or Tris from the sample using a mini dialysis kits or the 2-D sample clean up kits. |
| Possible cause | Suggested remedy |
|---|---|
- |
It takes 5-6 hours for the sample to completely move into the gel. Most protocols have a low voltage sample entry time of 6-7 hours. Because of this long low voltage entry time it is not possible to see any sample movement. You can, however, see faint bands of bromophenol blue move through the gel after about 3-4 hours. |
Current is blocked |
The sample cups were pressed down so hard against the gel that they pushed through the gel to rest against the plastic backing. This blocks the current and physically prevents the protein from entering the IPG strip. Replace the IPG strip and reapply the sample cup. |
The ionic strength of the sample is higher than that of the gel |
The ionic strength of the sample is higher than that of the gel. As a result, the field strength in the sample zone is inadequate to move the protein out of the sample zone at an appreciable rate. Movement may stop altogether. Dilute the sample as much as possible, or, just prior to loading, dialyze the sample to remove salts. |
| Possible cause | Suggested remedy |
|---|---|
- |
Turn off the mains power switch to reset the instrument. |
| Possible cause | Suggested remedy |
|---|---|
Incorrect handling and placement of the sample cups |
1. Sample cups are fragile and should not be taken on and off the application bar too many times. |
| Possible cause | Suggested remedy |
|---|---|
Low current at start of run |
IPG strip not properly rehydrated |
No current at start of run |
|
No current later in the run |
IPG strips have dried out during the course of the run. Allow the strips at least 10 hours to rehydrate prior to running. Remember to cover the rehydrated strips with DryStrip cover fluid prior to running. Also, electroendosmosis due to excessive amounts of charged material in the sample or additives may be drying out the center of the strip. Desalt your samples and deionize your urea, thiourea and other additives prior to use. |
| Possible cause | Suggested remedy |
|---|---|
Sparks or burning in strips |
|
Voltage limit not reached |
|
Current too low or zero |
|