Use this quick guide as a starting point for monoclonal antibody purification using MabSelect™ PrismA protein A resin. These tips are suitable for most mAbs and many mAb-derived molecules.
Introduction
Most monoclonal antibody purification schemes use two or three chromatography steps to obtain the desired quality of pure antibody. Figure 1 shows typical resin types for two-and three-step processes.

Fig 1. Monoclonal antibody (mAb) toolboxes using MabSelect™ PrismA protein A resin for the capture step. (A): 3-step process with ion exchange (IEX) polishing steps. (B): 2-step process with a mixed-mode polishing step. AIEX is anion exchange chromatography; CIEX is cation exchange chromatography.
All mAbs have some similar properties that let you use a platform approach. A platform doesn’t mean that all mAb processes will be identical. Instead, it allows you to use past experience with other mAbs to guide you, so you don’t have to develop every aspect of the process from scratch.
mAb platforms typically start with a protein A capture step. This quick start guide provides easy instructions for using MabSelect™ PrismA resin in this step. Both the base matrix and the ligand are optimized for high capacity and alkaline stability. These features will help you to improve productivity, facility fit, and bioburden control.
How to simplify process development for mAb capture
Here are some key points to get you started using MabSelect™ PrismA protein A resin to purify most mAbs and many mAb-derived entities. See Table 1 for general guidelines. But first, you'll need to prepare your sample for loading:
Load preparation
Before you load your sample onto a column, clarify it using a sterile filter. We suggest placing an adsorptive depth filter before the sterile filter to minimize fouling. Perform the chromatography run as soon as possible after cell culture harvest. If you do need to store the cell culture harvest before the run, store it at 4°C, or frozen if possible. If you store the harvest at a different temperature precipitation may ocour, and you might need to run it through a sterile filter before applying it into the column.
Table 1. Outline of typical mAb capture process using MabSelect™ PrismA
| Step | CV | Residence time (min)/linear flow velocity (cm/h) at 20 cm height |
Buffer |
|---|---|---|---|
| Equilibration | 3 | 4/300 | 20 mM sodium phosphate, pH 7.4 + 150 mM NaCl |
| Load | 70% to 80% of QB10 | 6/300 or 200 | As required |
| Wash 1 | 5 | 1.5 CV 4 or 6/300 or 200 | 20 mM sodium phosphate, pH 7 + 500 mM NaCl |
| Wash 2 | 1 | 4/300 | 50 mM sodium acetate, pH 6 |
| Elution step | 3 | 4/300 | 50 mM sodium acetate, pH 3.5 |
| Strip | 2 | 4/300 | 100 M acetic acid, pH 2.9 |
| CIP | 3 (15 min contact time) | 5/240 | 0.5 M NaOH to 1.0 M NaOH |
| Re‑equilibration | 3 | 4/300 | 20 mM sodium phosphate, pH 7.4 + 150 mM |
| Only after last run / for storage |
4 | 7.5/160 | 7.5/160 20% ethanol |
CV is column volume; CIP is cleaning in place.
Run 0 – the blank run. Before you run the first cycle on MabSelect™ PrismA, perform a blank run. The blank run removes trace amounts of ligand that have hydrolyzed during storage, and thus reduces the leached ligand in the elution pool. Use all phases in the chromatography method listed in Table 1, with two changes: (i) use the equilibration buffer during the load phase, because you won’t be loading protein; and (ii) set the elution phase to 3 CV and don’t control elution with a watch function on a chromatography system.
Run 1 – determine DBC. In this first run with your clarified cell harvest, you will determine the dynamic binding capacity (DBC) in a lab-scale column for your specific mAb at 6 minutes residence time. Follow the procedure in Table 1 and overload the column up to the stated maximum DBC. Collect fractions during loading. Determine the mAb concentration in the individual fractions by relating it to the mAb concentration in the start material used for the determination of 10% breakthrough (QB10).
Run 2 – set load conditions. Set these to 70% to 80% of typically 10% breakthrough and follow all steps in Table 1. You can lock the process you’ll use if this run leads to acceptable purity, quality, and yield levels.
Step durations. All the step durations mentioned here are only a suggested starting point. You can shorten your step durations if the chromatograms and fraction data in the specific step warrant it.
Note: Intermediate wash steps can help improve the purity, for example to remove hitchhiking host cell proteins (HCP’s).
Elution conditions. In addition to acetate, you can consider other options, such as citrate buffer (10–100 mM) or glycine. To optimize elution conditions for better impurity clearance, determine the highest pH that still efficiently desorbs the antibody (but note that this can increase pool volumes). Another option is to design the elution conditions to match the pH required for virus inactivation, as discussed in that section.
Analysis. It’s critical to analyze the purity and quality for the capture step after titrating up to load conditions for the next step and filtering through a sterile filter. Also, you must analyze the purity and quality between all unit operations throughout the process. If you see low recovery or high host cell protein (HCP) content in the elution pool, you will need to do further development work to optimize the wash and elution conditions.
Virus inactivation. For appropriate virus inactivation (VI), you must keep the pH in the elution pool at a pH of ≤ 3.8 for at least 30 min (1). If the pH of the elution pool is > 3.8, titrate it by adding acid, or decrease it by further optimizing the elution buffer volume. After reaching the pH for VI, transfer the pool to a new vessel to ensure that the whole volume is subjected to the required pH. After virus inactivation, immediately increase the pH to match loading conditions for the next step by adding Tris, for example.
Note: Try to avoid strong acids and bases such as HCl and NaOH, as the local concentrations can be high and destroy the product.
Precipitation might occur during elution and commonly occurs after pH titration and after low‑pH virus inactivation. Assume that the precipitate contains mainly other entities than the product and only trace amounts of mAb, HCP, and leached ligand. You can safely remove this precipitate by filtration using a sterile filter, but be sure to use the correct filter size. Filters typically used in manufacturing are usually large enough for this step, but they still need to be optimized.
Further optimization. To optimize the process conditions for scale up, we recommend using high‑throughput process development (HTPD). During HTPD, you can evaluate a large number of conditions (for binding, elution, and wash steps) in a short amount of time using PreDictor™ 96‑well filter plates and RoboColumn™ units in the PreDictor™ line.
You can use information gained during HTPD to set the parameters for a robustness study at laboratory scale before scaling up to the pilot plant and manufacturing. This strategy is especially useful when using a quality by design (QbD) approach.
Looking for more details? See full MabSelect™ PrismA instructions.
MabSelect™ PrismA resins and prepacked formats
- MabSelect™ PrismA resin
- MabSelect™ PrismA resin packed in PreDictor™ plates
- MabSelect™ PrismA resin packed in RoboColumn™ in the PreDictor™ line
- MabSelect™ PrismA resin packed in HiTrap™ columns
- MabSelect™ PrismA resin packed in HiScreen™ columns
- MabSelect™ PrismA resin packed in Tricorn™ columns
- MabSelect™ PrismA resin packed in ReadyToProcess™ columns
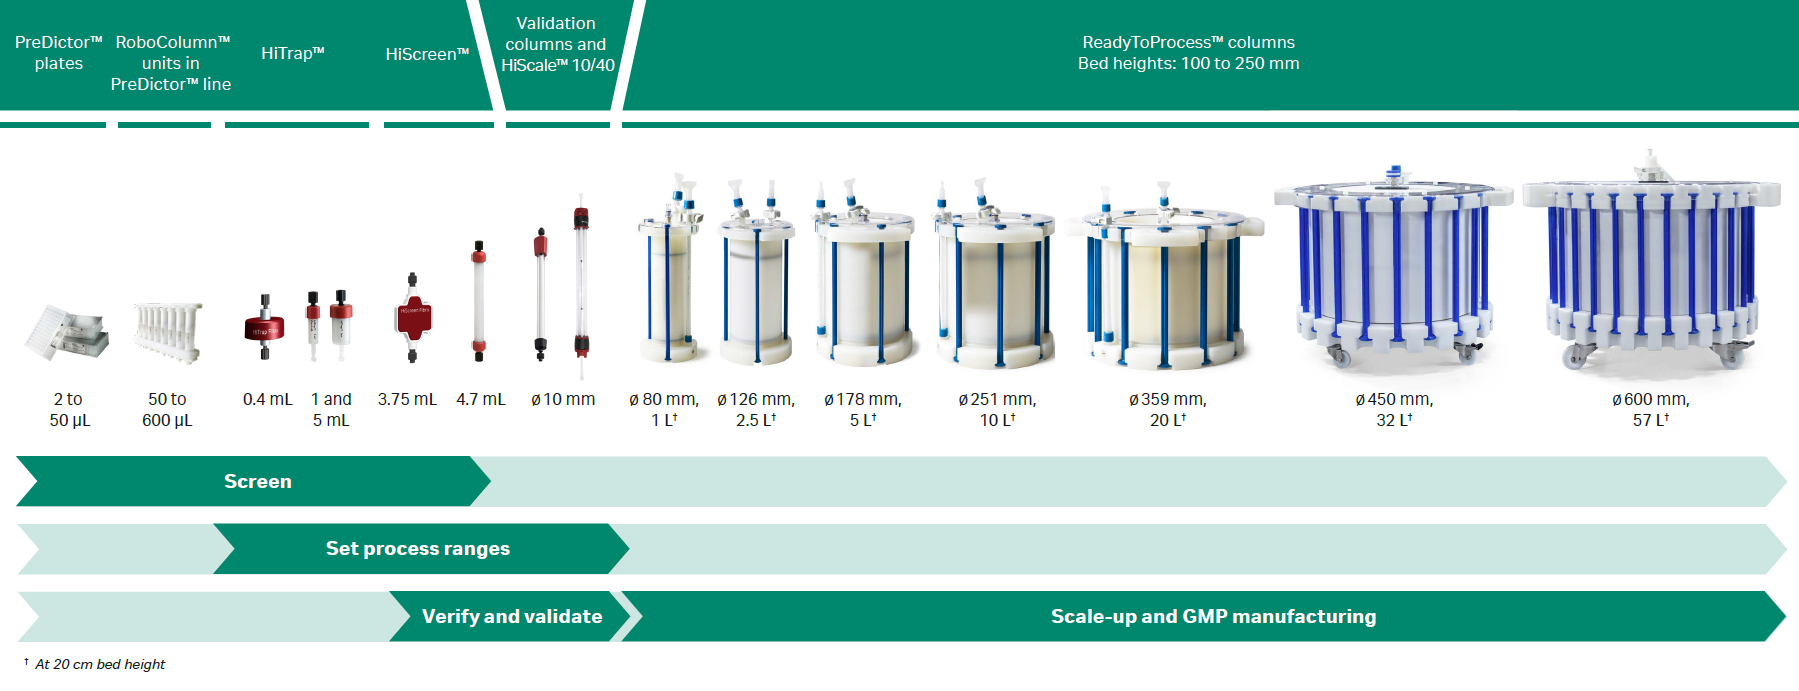
Fig 2. Overview of prepacked formats containing MabSelect PrismA™ resin. Also shows HiTrap™ Fibro PrismA and HiScreen™ Fibro PrismA units, which contain the same PrismA ligand but are based on cellulose fibers (different protocols apply).
References
- Brorson K, Krejci S, Lee K, Hamilton E, Stein K, Xu Y. Bracketed generic inactivation of rodent retrovirus by low pH treatment for monoclonal antibodies and recombinant proteins. Biotech. Bioeng. 2003 May 5;82(3):321-329. doi:10.1002/bit.10574.